Kirigami Tutorial - Simple flower and card tutorial
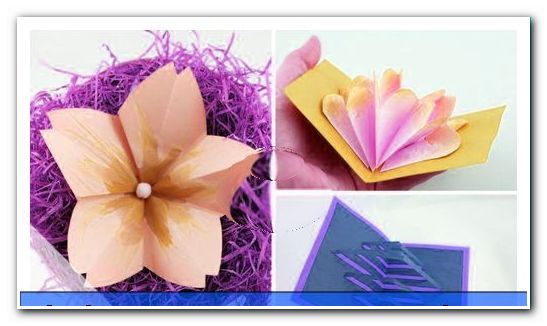
- Kirigami flowers and cards
- Simple pop-up card
- Pop-up card with lotus flower
- Simple cherry blossom per Kirigami
The Japanese cutting art Kirigami brings out with a little practice and enthusiasm true works of art. For beginners, here are two simple instructions for creative pop-up cards and a tutorial, with which you can make simple cherry blossoms with a little folding and cutting.
Kirigami flowers and cards
The Kirigami technique is a simple and yet very effective way to create greeting cards yourself. You will receive a special card, from whose inside a three-dimensional pop-up structure emerges: in this case interesting and versatile interpretable crossbeams and a magnificent lotus flower. Afterwards, we will show you an easy-to-understand guide that will allow you to create and process decorative Kirigami flowers in just a few steps. Anyone who has internalized the approach of the Kirigami will, over time, be able to create, admire and give away increasingly complex work. And best of all: All of these very personal creations, in addition to pretty paper, only need basic tools, such as scissors and a set of tools that are sure to be in your household.
Simple pop-up card
This very simple pop-up card, which is relatively proportionate to a Kirigami work of art, is suitable for many occasions. The three-dimensional appearances can be combined with poetic congratulations for birthdays, weddings or any imaginable anniversaries.
Difficulty: easy to master well, even for absolute beginners
Time required: between 20 minutes and one hour, depending on the skill
Material costs: nice paper is to be had in larger packs or single sheets for prices between 1 and 10 euro, everything else should be present
 You will need that:
- sturdy cardboard in two harmonious colors (depending on the desired size of the resulting card, the format is optional, such as A5 or A4 - only rectangular should be the paper in any case)
- Drawing triangle (isosceles)
- scissors
- Glue
- pencil
That is how it goes:
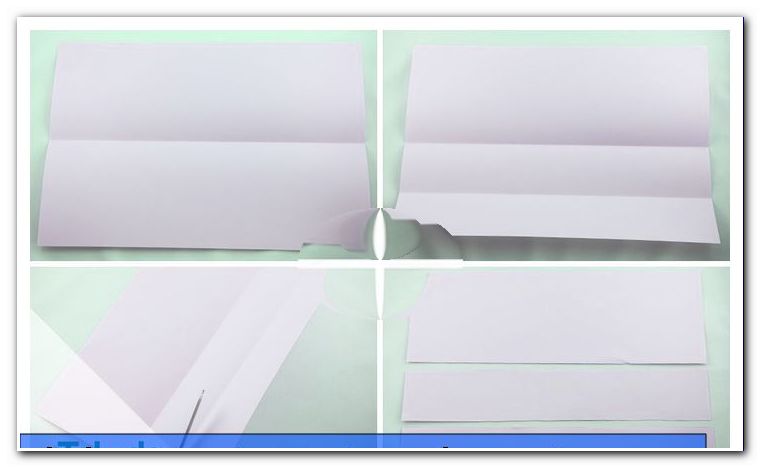
1. First, decide which color should form the exterior of the card and which will appear in the interior view. From now on we refer to the papers thus defined as A (outside) and I (inside).
2. First, pick up I and reduce its size by about an inch.
Tip: This step is particularly easy if you fold the paper symmetrically (without folding the edge strongly) and cut off a strip of one centimeter width both in length and width.
3. Now fold both papers on their smaller axis of symmetry once and sharply tighten the edge with the Geodreieck or by hand.

4. Now place I with the closed edge facing you. Position the broad side of your Geodreieck exactly at the closed edge - both should close exactly, the opposite tip of the triangle be exactly centered.
5. Now draw the shorter sides of the triangle with the pencil and mark first the center of each side and then the center of the halves just created. Each of the two short triangle sides should now have four equal sections.
6. Then, using the geodetic triangle, draw vertical lines down to the closed edge by placing the triangle 0.5 centimeters to the left and right of the marker points drawn in step 5 and then drawing them down at right angles on both sides.
7. Even with the center of your pencil triangle, that is its tip, act as if it were one of the marking points: Measure half a centimeter on either side of it, place your triangle perpendicular to the bottom edge and draw straight lines downwards.
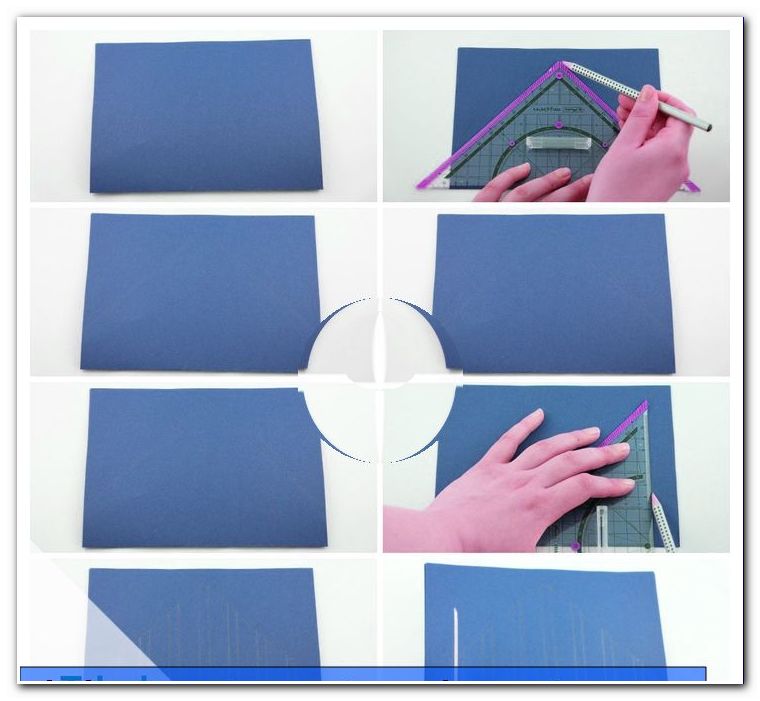
Tip: If you've done the previous two steps correctly, it's almost done. For the time being, however, five uniform (one centimeter wide) bars should be perpendicular to I in her penciled triangle.
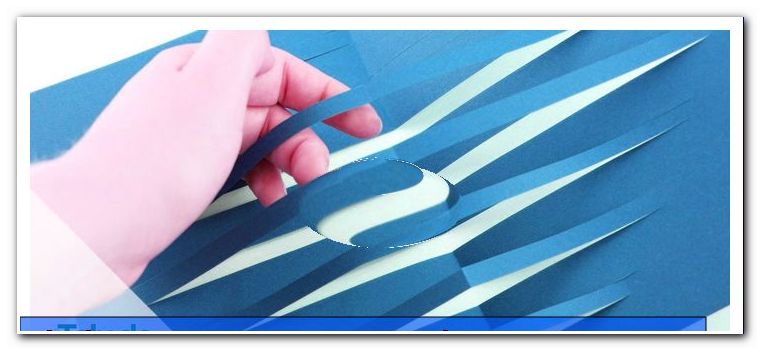
8. Now it's cut! Place vertical cuts along the bars from the bottom edge to the short sides of the triangle. But cut nothing off: "cut in, do not cut" is the motto!
9. Now you can fold the bars slightly upwards until they are approximately at right angles to your tabletop.
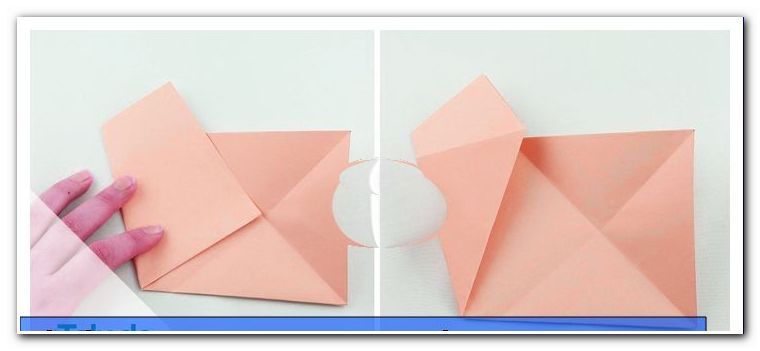
10. Now provide everything from I - except for these bars! - with glue! Of course, only the overhead surface on which you have just drawn everything and their back. The interior of I remains untouched.
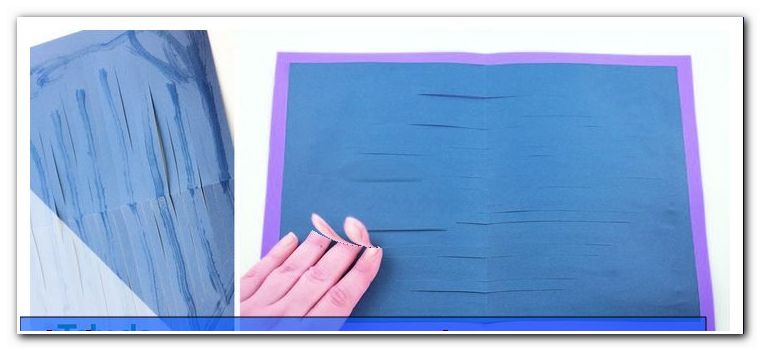
11. Then fold up I and pull the bars through the openings in the side that is still inside of them - they will unfold and appear as a longstring.
12. Glue I with the pasted area into the inside of A - of course, evenly, so that there is an edge of about one centimeter everywhere, where you can see the color of A.
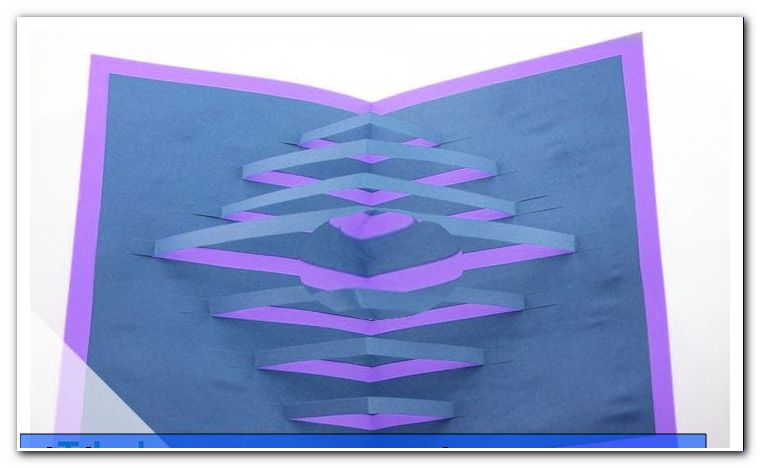
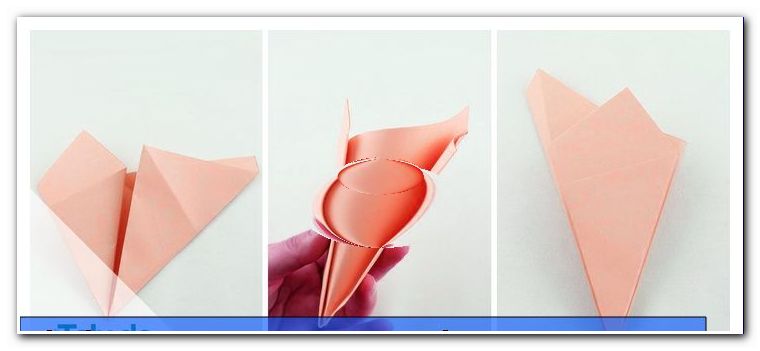
13. Finally, pull everything in shape, fold it carefully and let it dry. Your card is ready!
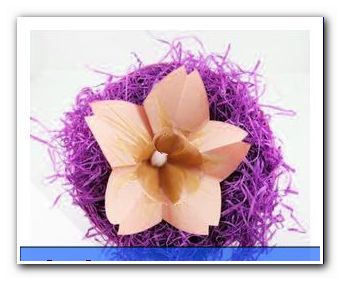
Pop-up card with lotus flower
 Somewhat more complicated and time-consuming than variant 1 is the lotus card. The small extra effort is worthwhile, however, for a fantastically beautiful result: a lotus flower that blossoms directly from the unfolded map!
Difficulty: With a little patience even for beginners easily feasible.
Time required : about half an hour - depending on skill
Material costs: depending on the paper between 2 and 5 euros.
You will need that:
- Stable cardboard paper in preferred color (for the outside of the card); Format as desired, mainly rectangular
- Another thinner paper for flowering - normal white copy or drafting paper already brings beautiful results, even better: a delicate shade of rosé
- Colored pencils in red or pink shades
- scissors
- Glue
That is how it goes:
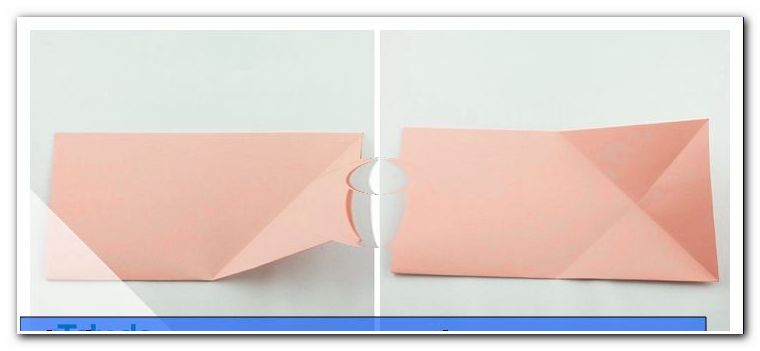
1. Take your thinner paper for flowering. Halve it by folding the long edges symmetrically. Fold the edge well!
2. Now unfold the paper and fold one of the long edges to the center indicated by the fold in step 1.
3. Unfold again and cut along the resulting midline the outer strip. It is exactly one quarter of the paper in width.
4. Proceed in the same way with the adjacent strip. The original longitudinal axis of your paper is now the interface!
5. After these two steps, you should have two strips of the same size in front of you - plus the twice as large remaining piece that you can now put away.
6. Take one of the strips and fold its short edges symmetrically one on top of the other.
7. Put the resulting piece back together with its short edges and fold it well.
8. And also halve this small remaining piece by folding the short edges over each other again and fold well. Now you should have a compact rectangular paper package in front of you.
9. Halve the top of the "package" again. To do this, fold the open edge symmetrically backwards to the closed side.
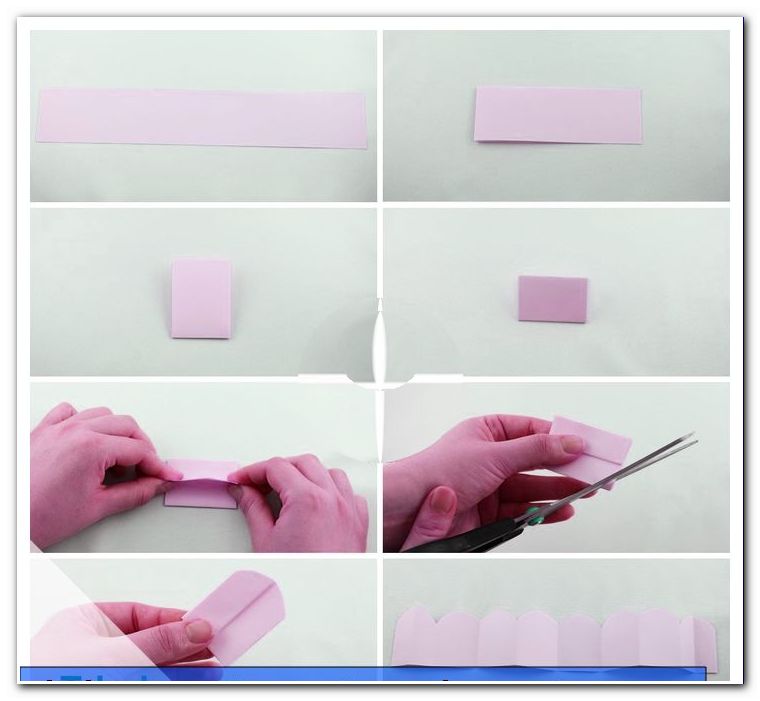
10. To the scissors! Hold the "package" upright and cut off the upper corners. After that, as a result, the slightly thicker side (on which a piece was folded in step 9) should also be cut with a crescent like its adjacent slightly thinner half.
11. Afterwards you can unfold the package! A long strip with one-sided hills - like a roller coaster - is now in front of you.
12. Now paint the hilltops with your crayons or acrylic paint - this will be the later petals and the color gives them the typical lotus effect.
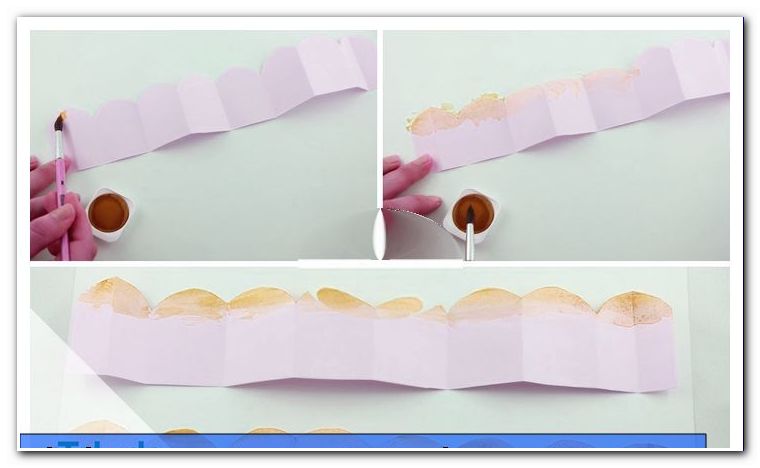
Tip: Smooth the color inwards gently, so from a thicker edge, paint more gently towards the center until your color gradually changes to the original tone of the paper. For an even more delicate look, you can easily smudge the color with your finger or a handkerchief.
13. Repeat steps 6 through 12 carefully with the second remaining strips!
14. Both mountain and valley railways now provide you with four notching lines, once after the first hill, then after the next two and then in two cycles. Watch out! For a strip, these lines are at the bottom edge, while strip number 2 carries its markings up between the hills. It makes sense to be able to nest both strips after the cut at these points.
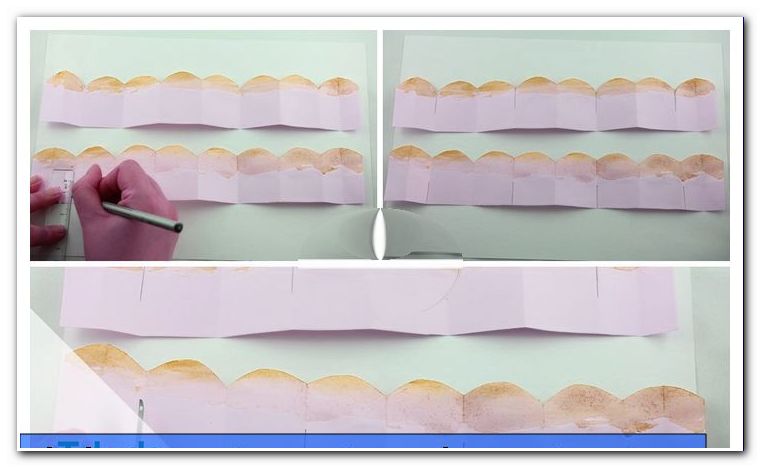
15. Check again if your markings are correctly set before you make the cuts!
16. Now insert the strips into one another at their interfaces: lower edge of one into the top edge of the other, so that one piece of strip always lies in front of and then behind the other. Then it should look like you only have a single homogeneous strip in front of you.
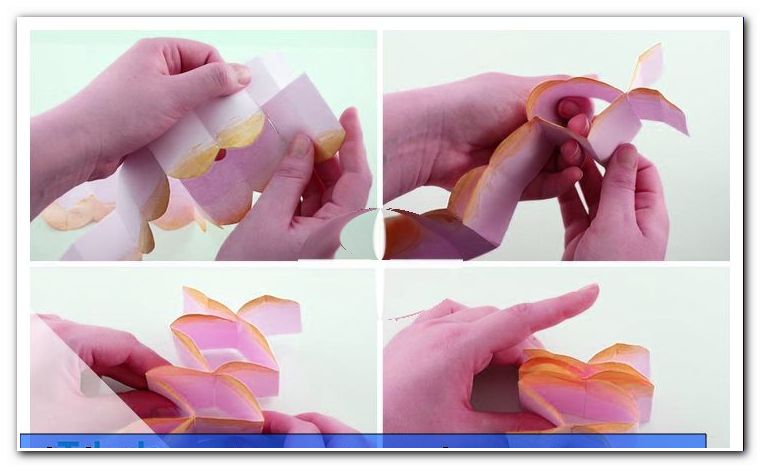
17. Now grasp between both strips and slightly pull apart the sections at their fold edges, in order to then press them together. After this step, a package should be in front of you again, this time looks slightly heart-shaped and can be like the bellows of a concertina apart.
18. Carefully apply adhesive to the top and bottom of the heart pack and secure in the center of your once folded outer card!
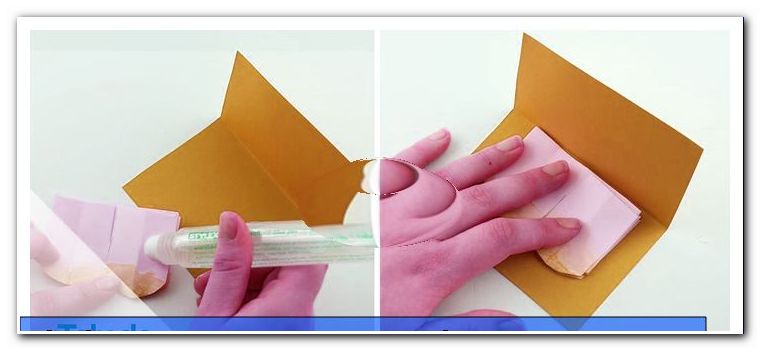
19. Let it dry well, preferably squeezed under a heavy object (such as a thick book) - and your blossoming lotus is done!

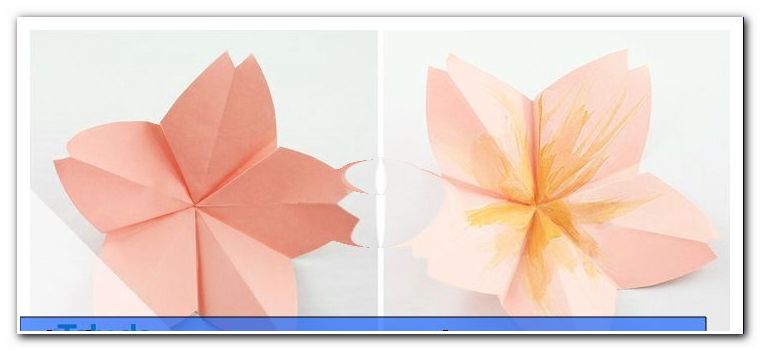
Simple cherry blossom per Kirigami
 Flowers are always good - if you do not have fresh ones on hand, you can fold pretty cherry blossoms out of paper with this simple Kirigami technique: whether as a small touch, for decorating your home or decorating the outside of the cards explained above!
Difficulty: very easy, once the steps have been understood
Time required: complete with a little practice in 5 minutes
Material costs : it is best to buy a pack of pretty origami paper - for 5 to 10 euros, last forever. Otherwise, take plain copy paper for a few cents and paint!
You will need that:
- Square paper, preferably in delicate rosé or soft pattern - based on real cherry blossoms
- a scissors
- possibly crayons
That is how it goes:
1. Fold your square paper in the middle first to form a rectangle. Place the closed side in such a way that it points downwards, ie towards your body.

2. Then fold the lower right corner towards the middle: a diagonal line is formed. Unfold again.
3. Now take the upper right corner and fold to the lower middle: the first diagonal is crossed by a second one. Unfolding.
4. Then fold the lower left corner to the center of the two crossed diagonals on the right.
5. Now move the corner that moved to the diagonal center in step 4 to the left edge. Thereafter, on the left, the sight of a kind of ice cream cone shape should arise.
6. Now fold the remaining right lower edge to the right outside of the ice cream cone.
7. At this center line fold both sides backwards. The ice cream cone should now point further forward to you.
8. Cut off a generous semicircle from right to left at the bottom, visible, transverse paper line (not the fold!). The endpoint on the left is approximately at the end of the first third of the entire left side.
9. After this cut, a small point should have arisen at the top, which you now remove with a straight cut of a few millimeters.
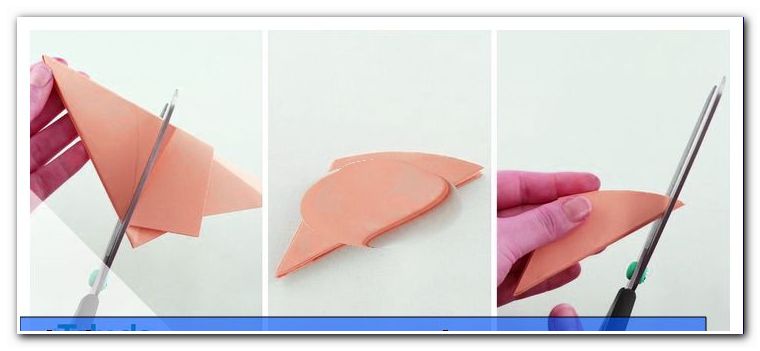
10. When you unfold the paper, you will see the five leaves of a beautiful cherry blossom.
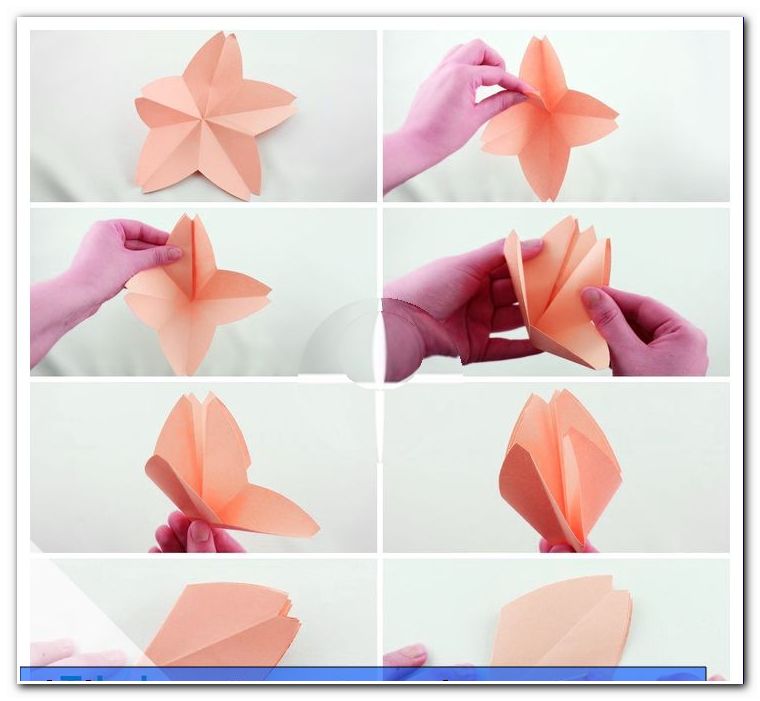
11. Now you can glue the flower to a card, paint it further or use it as a room decoration.
Tips for quick readers:
- Simply Kirigami pop-up card with imaginative levels
- A paper with triangle and pencil edit
- Draw in crossbeam and cut
- Surfaces with adhesive
- and stick in second paper
- Beautiful lotus flower card pop-up
- Cut two equal strips
- Round off wrinkles and crests
- Paint the curves like flowers
- Stick strips together, pull up and fold
- Stick in outer card sleeve
- Cut simple kirigami cherry blossom
- Fold square paper in several steps
- Bring edge into shape by round cutting
- Open and decorate if necessary