Scoubidou - techniques and instructions

- Scoubidou Basics
- The beginning node
- The angular node
- The round knot
- The conclusion
- Braiding Scoubidou bracelet
- Instructional Video
- Make Scoubidou snake
Scoubidou is a special art form somewhere between knotting and lichen. All you need for the design of great Scoubidou models, are braided or Scoubidou bands in different colors and depending on the structure still one or the other accessories more. We explain the basic techniques of the Scoubidou and give you an example of how to create a Scoubidou snake!
What is Scoubidou actually "> 
Note: For a pack of colorful braids you pay depending on the size or scope and manufacturer between three and 15 euros. Be sure to use materials that contain no plasticizers and are manufactured according to the European toy guidelines. Recommended items include the products of the Folia brand. The bands are available for example in transparent, with glitter or with a tiny hole. In the latter versions, very thin wire can be pulled through to make the Scoubidou bands movable and to be able to conjure up animals and other figurines. For beginners are also the Scoubidou craft kits by Folia, in addition to the braids also accessories such as small key rings, eyes and the like integrate.
Scoubidou Basics
Let's start with a hint: let your Scoubidou bands air out for a few days before operating on them. So they lose the sometimes unpleasant (plastic) smell and experimenting makes it even more fun.
The beginning node
There are several variants for the starting node. We would like to introduce you to two of them:
Method A: Pick up a pencil and two Scoubidou ribbons. Tie the first ribbon in the middle of the pencil. Do not wear too tight. Then grab the second volume and pull it under the knot of the first volume. As soon as you remove four "threads" of approximately the same length from the pencil, you can tighten the first ribbon. Release the ribbon construction from the pencil and start tying.

Method B: Grab two scoubidou ribbons. The first fold in the middle and form with your fingers a three to four centimeters loop at the top of the tape. Then take the second band and tie at the bottom of the loop.

The angular node
1. Prepare the tapes according to the method A of the initial node.

2. Lay the orange ribbon facing down from the bottom up over the right blue ribbon.
3. Place the orange ribbon facing up from the top down over the left blue ribbon.

4. Take the blue band which now points to the left and place it horizontally to the right - over the orange band and through the loop of the other, orange band to the right.
5. Take the blue band, which now points to the right and place it horizontally to the left - over the orange band and through the loop of the band on the other side.


6. Pull the ends of the tape to complete your first knot. Pay attention to uniformity.
7. Repeat this procedure as often as you like.
Tip: NEVER work crosswise, otherwise your Scoubidou structure will not be evenly angular. So always lay and connect the individual strings in the manner described.
The round knot
1. Prepare the ribbons again as you did with the square knot.

2. Lay the downward facing orange ribbon from the bottom to the top over the blue left ribbon
3. Lay the orange tape facing up from the top of the blue right-hand tape over the top.

4. Take the blue, left-facing tape and place it horizontally to the right - over the orange ribbon and through the loop of the other orange ribbon on the right.


5. Take the blue, right-facing tape and place it horizontally to the left - over the orange tape and through the loop of the orange tape on the left.
The conclusion
The Scoubidou braids are made of PVC and can be easily merged. First cut off any excess tape remnants. Then warm the shortened ends of the tapes until they melt a little. Then press down. So you fit perfectly into the overall work, without attracting attention.
Tip: Be careful not to burn the ends. Otherwise there are ugly black edges.
In addition to the basic techniques that we have just presented, there are other variants, such as the three-band technique or the angular 6-fold method. However, for the beginning we want to leave it with the simple techniques and now provide you with a guide to the creation of a bracelet and a Scoubidou snake, in which you then also get to know the mentioned square 6-fold method. Do not worry, you get it, even if it may seem a bit difficult at the beginning!
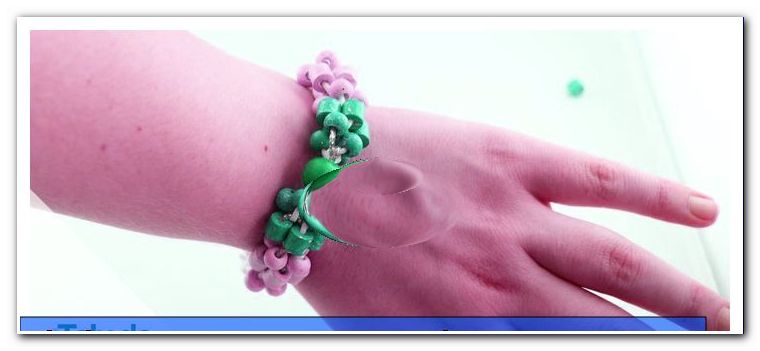
Braiding Scoubidou bracelet
You need this:
- 2 braids
- a big pearl
- many little pearls
- scissors
- superglue
Working time: 1.5 - 2 hours

How to proceed:
Step 1: At the beginning you thread the big pearl on one of the two Scoubidou bands and push them exactly in the middle - so go from the pearl two threads.

Step 2: Now add the second volume. The bracelet is braided with a round knot, as we have already shown in the basics. Lay the second volume across the bead. Start with a round knot.

Step 3: Now you continue to knot until you finally reach a length that reaches from the middle of your wrist to the top of your ankle - that's about 5 - 6 cm.

Step 4: Now the little beads are woven in. For each of the four threads on each pull up a bead and push it to the end. Now, as always, continue to braid. For each new round, four pearls are raised on the Scoubidou ribbons. Continue to braid until the piece of pearl has the desired length.

Tip: Let your creativity run free and use large, small or differently colored beads. Our bracelet has a gradient from white to blue. The center is decorated with a large, single ball. These will simply pull all four Scoubidou threads through and continue braiding.
Step 5: Now the third piece of the Scoubidou bracelet is braided without pearls. This should now be about as long as the initial piece.

Step 6: Now the bracelet needs a closure. Take two ends form this one little loop. This loop should end up being slightly smaller than the big pearl. This pearl is led to the closing later by the loop.

With a third end, this loop is now wrapped - for the longest band should be taken. When the end of this volume is reached, it is knotted. Finally fix the ends with superglue. These can be stapled with a clothespin as long as the glue dries. All other protruding ends are simply cut off.
To close the bracelet, the big pearl is simply pushed through the loop at the other end of the bracelet. The Scoubidou bands are elastic, so it should not be difficult. But the loop should not be too big. Otherwise the ball could slip out.
Instructional Video
Make Scoubidou snake
You need this:
- 5 braids à 80 to 90 cm (best use glitter bands in green and yellow)
- a piece of red ribbon (about 2 cm long)
- 2 wiggle eyes
- scissors
- Adhesive (superglue)
- a 20 cm long wire (take 1.5 mm thick copper wire)
- a 10 cm long piece of tape (only for the intermediate connection)
(Insert image with all materials)
Working time: approx. 1.5 to 3 hours (depending on the practice)
How to proceed:
Step 1: Take four of your five 80 to 90 cm long braids and tie them together using the 10 cm piece of tape at one end. But let a piece of about 2 cm survive.
Step 2: Begin to braiding in the round technique as described in the basic course. After about three to four knots, loosen the four braids from the piece of tape. Then knot another one or two knots.

Step 3: Cut off the supernatants at the short end. So you get a nice start.
Step 4: Take the wire and braid it in the middle. Just push a little into the previous knot and then continue to braid around the wire as usual. Make knots until you have a knotted piece about 16 cm long in front of you.

Step 5: Now add the fifth braid - the head of the serpent should emerge and be slightly wider than the body. Weave the fifth ribbon through a simple knot and go over to the square 6-ply Scoubidou.

The square 6-fold Scoubidou act as follows:

Step 6: After about 1.5 cm, which you have knotted in the 6-fold technique, cut off the wire. Leave about 3 mm of the wire.
Step 7: Grab the 2 cm long piece of red tape and slide it over the wire rest from step 6. The red piece of tape acts as the snake's tongue.

Step 8: Braid the tongue into the overall structure by making another two knots with your braids in the 6-fold technique.
Step 9: Cut off the excess band remnants and fix the remaining ends with a bit of superglue.

Step 10: Slightly split the tongue of the snake at the front - this will make your artwork even more authentic.
Step 11: Stick the wobbly eyes to the sides of the head.
Step 12: Bend your snake. Finished!

Tip: Put the snake between flower containers, this looks very stylish!
Scoubidou is certainly not a suitable art form for impatient people. However, those who take the time and practice a lot, will have great joy with the braiding or knotting method and soon can tinker many charming animals and figures!
Tips for quick readers:
- Scoubidou is a special art form between lichens and knots
- Braids cost 3 to 15 euros
- Basic techniques: initial knot, angular knot, round knot, completion
Braiding Scoubidou bracelet
- Materials: 2 braids, big pearl, many small beads, scissors, superglue
- Knot the bracelet round
- Weave pearls
- big pearl and loop as closure
- Cut off ends and glue
- Working time is about 1.5 to 2 hours
Create a Scoubidou snake with wiggle eyes
- Materials: Braids, wobbly eyes, scissors, glue, wire
- with simple round technique (body) and angular 4- to 6-fold method (head)
- Working time is about 1.5 to 3 hours