Sew V neck - instructions and tips

- material selection
- patterns
- Sew V-neck
- Quick guide
Often it is the "most normal" things that you always push around, because you really have no plan how to do it right. If you tried it, it's easy and you can put a new technique into the sewing repertoire. One of these supposed secrets I want to air today: the V neckline.
Today I'll show you how to prepare a v-neck beautifully and dress it up so that the inside of your top looks nice too. This is not a big hassle and you can master a variant that allows you to customize your wardrobe.
Difficulty level 1/5
(this guide for a V neck is also suitable for beginners)
Material costs 1-2 / 5
(Depending on the choice of fabric and length, a remaining piece of the main or combination material is enough)
Time required 1.5 / 5
(depending on experience and accuracy about 10 to 20 minutes including preparation per V section)
material selection
In this tutorial, I'll show you how to make a V neckline with a leftover strip of your main or composite fabric. In my case it is organic cotton jersey with about 5% elastane . For this type of fabric, it is best to use stretch needles (jersey needles are more suitable for other stretchable fabrics).
Tip: Especially with children's shirts and if the neckline is a bit too big, the cleansing strip can also be cut from cuffed fabric. However, you must be careful not to stretch too much so that the fabric does not fold too much at the neckline. See also the instructions for the crew neck.
patterns
Unless already specified in the pattern, the lower ends of the V should meet on both sides at the same angle. To do this, fold the front upper part vertically in the middle and check whether the cut-out is exactly the same or cut it so.
To prevent the cut from curling or protruding outwards, iron the seam tape to both sides. This tape is ready to buy and only needs to be cut to length. It is ironed between level two and three without steam with medium pressure on the iron. Alternatively, you can also use Framilonband.

Now cut a strip from the main or combination fabric. You can also use ready-made (jersey) bias tape. My stripe is 3.5 cm wide.

Tip: For my stripe, I use the left side of the fabric as the outside to make sure the color fits exactly. But it can also be simply the right side of the fabric or a fabric in contrasting color be set.
Sew V-neck
First, fold the strip along the center and iron over it. I just like to do this with jersey with steam, as it creates a clearer crease. Then fold the strip apart and both sides one centimeter to the middle. Iron on over it again, so that here too the creases are clearly visible. Finally, fold both sides together again and iron over them again to consolidate everything.

After the front and back have been sewn together at the shoulders, start in the front center by putting on the jersey stripe. To do this, first unfold the strip so that there is an open edge at the top. Sewn should then exactly on the upper crease. The end of the strip should survive slightly, especially the bottom corner should go about an inch above the top. Here, you also use a needle to precisely position the point under the point where your seam should begin and end and into which you will also be the first to prick with the sewing machine needle.
For a clean end result, it is very important that they stab in this point again with the last stitch. So when you're back at the top after stitching all over, fold the overlapping fabric from the top of the strip to the side so you do not sew over it. Sew the beginning and end well, so that nothing can slip.

For elastic fabrics please always use elastic stitches. These always involve a sideways movement of the needle. For a better understanding: when you pull on the fabric, it can stretch. A straight stitching has no leeway, so the thread will tear. In a zig-zag stitch or other elastic stitches, the thread still has room to move and can be stretched without tearing. If you are advised to use the triple straight stitch because it is "great, " it's because the fabric has to stretch much more and be overused at these points, so the beautiful garments will sound much quicker and, in the worst case, cause unsightly holes,
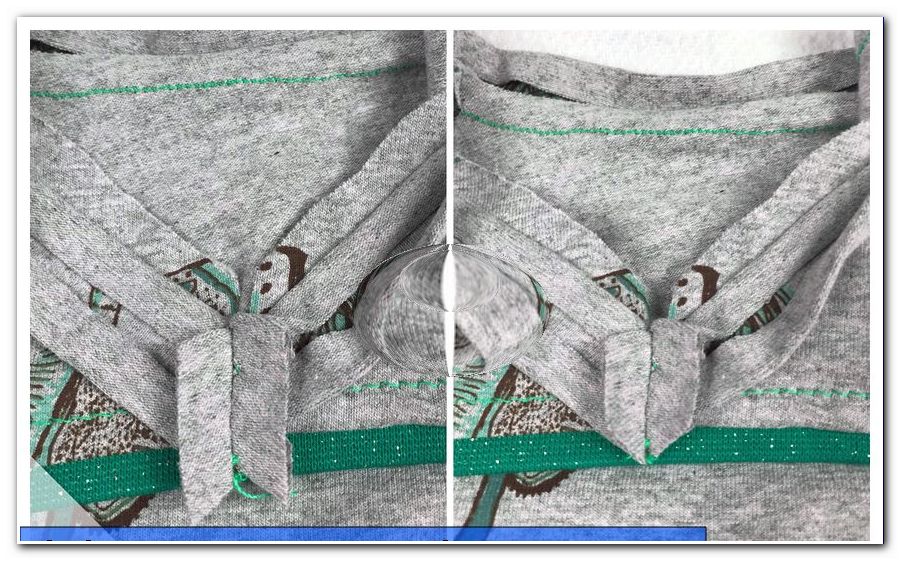
Now fold the top part center left to left (ie with the "nice" fabric side facing outwards). Overlap the two strip ends and fold both edges inwards at the respective crease. Now put these two overlapping strips of fabric exactly on top of each other.
Tip: If one of the stripes is still too long, you can of course shorten it. Both should survive at least one centimeter.
In the following illustration I have marked you the line that is to be sewn now. You can also paint this mark on the fabric, but this is not absolutely necessary. I used a water-soluble trick marker for this.

Tip: If you mark the line, you can push the fabric of the front part under it slightly to the side. This, of course, makes it easier to stitch together accurately and ensures that you do not accidentally sew the fabric on the front piece.
Important: Cut the seam allowance above the tip to just above the seam. The seam itself must not be cut. In the next step, iron the seam allowances apart ...

... and cut it to size: one cut on each side with a distance of about one centimeter to the seam and then down the two protruding corners.
Now fold the entire strip together with the seam allowance inwards on the left side of the fabric (the one without the motif that is inside the finished garment). Make sure that a piece of the outer fabric is visible at the top, so the squeegee strip can not accidentally push out and peek out. This is especially important in contrast colors. Firmly pin the bottom edge of the strip around the entire cutout.

Now sew along this mark tight-edged. Remember to use an elastic stitch again for elastic fabrics!
And already the V neck is finished! I have also attached a photo of the applied children's dress.

Have fun sewing!
Quick guide
1. Check the cutout for symmetry
2. Iron on seam tape (Framilon tape is also ok)
3. Cut the jersey strip (3, 5cm) and prepare or make a bias binding
4. Close shoulder seams
5. Mark the front center and fix the fixed start and end point of the seam
6. Sew on the stiffeners in the uppermost crease at the same angle
7. Cut seam allowance in V, fold upper part centered on left
8. Sew folded strips together vertically and cut seam allowances apart, shorten
9. Fold the strips including the seam allowances inwards, stick them in place and sew on with a short edge.
10. And the V neck is ready!
The twisted pirate