Sew pennant chain from fabric - make the pennant itself

Pennant chains are trendy. Whether in the garden or in the nursery, these colorful or even simple garlands are announced. With a sewn pennant chain you can also spice up some party. In this guide, including pictures, we show you in just 10 steps, how to sew your own pennant chain. The imagination knows no limits. The colors are as endless as the length of the pennant chain.
This project is also good for beginners. Since the steps repeat and small mistakes are easy to repair, even inexperienced seamstress can easily make a pennant chain itself. For a necklace with 10 pennants it takes about 1.5 hours, including creating the pattern, cutting the fabric and everything that goes with it.
You do not need any special materials for this manual. You already have most of it at home. Even a pennant chain made of fabric remnants is a real eye-catcher.
We wish you lots of fun with the imitation and for the beginners: Do not worry, practice makes perfect.
Sewing instructions for a pennant chain
You need this:

- sewing machine
- different substances
- wide fabric ribbon
- Scissors and pins
- yarn
- Tailor's chalk or something else to mark
- Paper for the pattern
sewing machine
We used a simple machine from Silvercrest. This is already available for 100 euros. It is a simple straight stitch and if necessary a stitch for stitching, for example a zig zag stitch necessary.
matter
For pennant chains, you can use just about any fabric you have at hand. For beginners is best suited cotton, because this material does not warp. Whether you use a uniform fabric or ten different, of course, is up to your imagination and your taste. Fabrics are available from 5, - Euro per meter.
fabric tape
You can let off steam even with the ribbon, but it should be at least 3 cm wide. Wider bands are more suitable for beginners, because then the pennants when sewing can not slip so easily. Fabric tape is already available for 1, - Euro per meter.
yarn
To sew the individual pennants can be used any yarn, because you can not see the seams later. To sew into the fabric band, a yarn should be used, which also fits the tape, as this seam is then visible later.
Now it starts. Prepare all materials for your pennant chain to avoid unnecessary work interruptions. We hope you have fun!
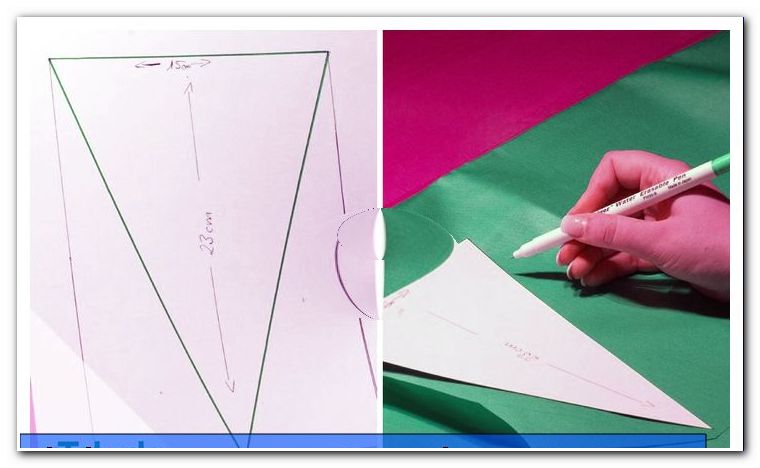
1. Before you can sew pennants, make a pattern. In our example, we have chosen a width of 15 cm. So draw a straight line of 15 cm. Now draw a rectangle with 23 cm long sides and close the rectangle on the other side with another 15 cm long line. Now mark half of one of the short sides, ie at 7.5 cm. Now connect the opposite corners with the 7.5 cm point. This will give you an isosceles triangle. For a better understanding, you can orient yourself to the photo.
2. Now draw the triangles using the pattern. You can vary the number as you like. In any case you will need 2 triangles per pennant. We drew 20 triangles because we wanted to work 10 pennants.
Tip: Work as sparingly as possible by drawing the triangles along the long edge. This saves material and time when cutting. If the outer edge of the fabric is also straight, you can also create the short side directly.
3. Cut the marked triangles. Work as carefully as possible to achieve a nice result. Get the triangles ready.

4. Now place 2 triangles each on right to right. Right to right means that the "beautiful" pages, that is the pages that are at the end of the page, are stacked on top of each other.
Tip: If you are still a bit unsure about sewing or if you have chosen a fabric that is a bit slippery on each other, make the triangles with pins ready.
5. Now sew the long sides together.

Attention: The short sides will NOT be sewn together. The short sides are needed for turning. Since the pennants are sewn in anyway on the short side, also a later sewing is not necessary.
Tip: Lock your seams at the beginning and at the end. This means that you work a few stitches at the beginning and then use the backspace button on most sewing machines in the front right, and then work your seam as usual. When you have finished your seam, sew back 3 to 4 stitches and again until the end. So your seams can not open up uncontrolled again.
How to get a perfect pennant tip: Sew the first side together. Put the needle in the fabric, lift the presser foot and just turn the work in the appropriate direction, lower the presser foot again and sew the second side as usual to the end.
Repeat steps 4 and 5 until all triangles have become pennants.

6. Cut off everything "superfluous". Here you can cut off the long protruding threads, but not too short, to avoid a seam opening. You can also shorten the seam allowance at the tips of the pennants, then the tip can be worked out better after turning. If you have too much protruding seam allowance, you can trim them as well.
7. Now apply all the pennants. To work out the tips, tools such as a pencil or a crochet hook are particularly well suited.
8. Get the pennants at your fingertips, because when you start sewing you should do it in one go to prevent the pennant chain slipping unnecessarily.

9. Now insert an upper and lower thread that matches the fabric ribbon. Follow the instructions of the manufacturer.
10. Now lay the fabric ribbon twice, that is, fold it lengthwise. Set a zig zag stitch or similar stitch and then sew a few inches, according to the length you want to hang. Place a pennant with the short side in the folded ribbon. If you want you can of course be stuck. Now sew the pennant with you. And so the process is repeated until all pennants are sewn. Of course, they can also pinned all the pennants before. If you only keep the fabric ribbon folded, then the pennant necklace sews almost by itself. Finally, leave a little ribbon for hanging and cut the fabric ribbon clean.

In only 10 steps you have finished your pennant chain. (Photo 19) Beautify your rooms, decorate the next birthday party a little more conspicuous or make in this way cute eyecatchers for the children's room of your little ones.

Tips for quick readers:
- Create a pattern
- Mark triangles
- Cut fabric
- Place 2 triangles one on top of the other and secure
- Sew the triangles together on the long sides
- cut off excess threads and far-reaching fabric
- Turn and work the tip carefully
- Fold the ribbon lengthwise and topstitch one piece
- Sew in pennants
- Stitch another piece