Crochet keyring - 3 ideas with instructions

- material
- Crochet Pattern - Coin pouch
- Crochet Pattern Smiley Pendant
- Instructions - crochet the lanyard
Not every key fits in every lock. But somehow they all have one thing in common: their appearance. To make it easier to recognize your own keys, you get different pendants. A crocheted keychain brings no superfluous weight and can be designed individually - so the ideal partner to bring order in our key collection.
This crochet pattern shows that a crocheted keychain is easy to implement even by beginners. You can read in good comprehensible steps, as a small bag is created, which incidentally serves to store a shopping coin. The second crocheted key chain is a cheerful smiley face. He is crocheted in simple Amigurumi technique, which can also implement beginners. You will also find the crochet pattern for a nice lanyard.
material
As always, when I sew figures, I grab cotton yarn. If you do not want to mass-produce immediately, the small pendants will need to be left with yarn. Needed:
coin purse:
- Yarn remains in any color combination
- 1 button
- key ring
- 1 matching crochet hook
- Sewing needle for sewing the threads
Amigurumi Smiley Pendant:
- Yarn remains in yellow, black and possibly another, any color
- key ring
- 1 matching crochet hook
- Sewing needle for sewing the threads
Lanyard:
- Yarn rests in any colors
- key ring
- 1 matching crochet hook
- Sewing needle for sewing the threads
Crochet Pattern - Coin pouch
The bag is crocheted from bottom to top, first in closed rounds and then in flowing rounds (spiral rounds) without transition.
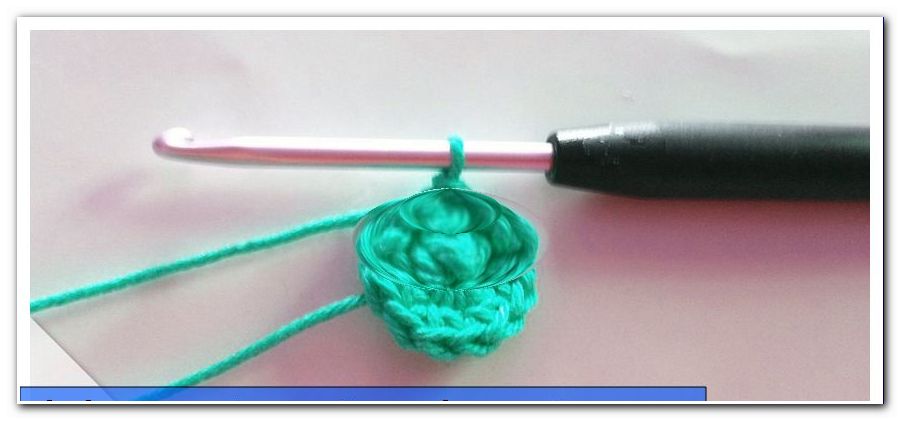
Round 1: Make a string of thread. (detailed instructions on how to crochet the thread ring) Crochet 6 strong stitches into the thread ring and finish this first round with a chain stitch.

Round 2: Mesh 1 is a transitional air mesh. In the further course of the round, each fixed stitch of the previous row is double-crocheted with strong stitches. In each stitch stitch in = 12 stitches. Close this round again with a chain stitch.
Round 3: Mesh 1 is again a transitional air mesh. In the further course of the round every second fixed stitch of the previous row is doubled = 18 fixed stitches. Round ending = Kettmasche.
Round 4 - 8: From round 4 you can continue to crochet the rounds as spiral rounds. This means that there is no transitional mesh at the beginning of the round nor a chain stitch at the end of the round. Simply crochet tight stitches into the mesh heads of the preliminary round until the spiral has screwed up for about 4 rounds. In the photo you can see the first puncture site after the warp of the round 3.

Rounds 9-12: If you want, you can change color at the beginning of Round 9. It goes even further in spiral rounds up to round 12.

Tab with buttonhole:
Apply crochet as soon as you reach the end of turn 12.
Crochet for the tab in rows.
Row 1: 1 Transition Air Mesh - 10 solid meshes

Row 2: Transition Air Mesh - skip the first stitch and crochet 1 tight stitch into the second stitch in the previous row. Continue in tight stitches until 2 stitches before the end of the row. The last two stitches are mixed together = 8 stitches remain.
Row 3: Transition Air Mesh - skip the first stitch and crochet 1 tight stitch into the second stitch in the previous row. Continue in tight stitches until 2 stitches before the end of the row. The last two stitches are mixed together = 6 stitches remain.
Row 4: Transition Air Mesh - then skip the first stitch and crochet 1 tight stitch into the second stitch of the previous row. This is followed by 4 air stitches for the buttonhole. The last two stitches are again solid stitches. They are being patted together.
Cut the thread, pull through the last stitch and sew well on the inside of the bag.

Now another loop is crocheted, through which a key ring can be pulled: take about 30 - 40 cm of the thread twice. Hook crochet hook into the thread bend. Use the crochet hook to pierce through the bag where you want to attach the loop and crochet with double thread to the next one stitch and then 9 stitches. Cut both threads and pull through the last loop. Close the loop by attaching the top end to the bag.
IMPORTANT: Also sew these threads well, so that the loop does not tear later, if then actually one or more keys hang on the trailer.

Finally, a button is sewn on the front and the key bag is ready. It is great for keeping a Euro or a shopping chip in it.

Crochet Pattern Smiley Pendant
The smiley pendant consists of two small circles (front and back), which are then crocheted together in one step.
Round 1: It's best to start working with a string of thread. (The appropriate instructions can be found here: Crochet thread ring). This avoids a hole forming in the center of the trailer.
Crochet 11 sticks in the string; then pull the thread ring together; the round end forms a chain stitch.

Round 2: The round starts with 3 transition air meshes. Then crochet 2 sticks into each chopstick of the preliminary round, doubling the number of stitches to 22. Cut off the working thread. Close the round with a slit stitch and pull the thread through the last stitch. Sew on the beginning and end thread on the back.
Crochet this circle again.

So that the trailer really smiles happy, a mouth is embroidered. Embroidered eyes complete the face. Alternatively, two small buttons can be sewn as eyes.

Now the two sides of the smiley pendant are put together. Lay the two circles on top of each other with their inner sides. With a contrasting color, crochet a round of tight stitches around the circles and crochet the two circles together. Pierce each through a stitch of the front and at the same time through a stitch on the back. A total of 33 fixed stitches crocheted around the two circles. In a stitch combination from the front and back so once pierce and pierce each in the next stitch combination twice. This order: 1 stitch, 2 stitches repeated in the round again and again. The photos show the first and second punctures.

At the end of the round, crochet a short chain (6 to 8 stitches).

Cut off the working thread, pull it through the last mesh of air and sew the chain of stitches as eyelet on the smiley pendant. I sewed the same trailer clip with it. But you can also retract later a split ring or keyring.

Instructions - crochet the lanyard
The lanyard is easy to crochet even for beginners. First, the band is crocheted with fixed stitches and then decorated with a crochet flower or a button.
Crochet ribbon:
Hit a chain of 4 pieces of air. Crochet then an additional air mesh as Übergangsluftmache and crochet 4 strong stitches. Apply the work. Now the ribbon is knitted up in simple rows. Each row consists of a transitional air mesh and 4 fixed meshes. Work after each row and crochet a new row until the ribbon has a length of about 15 cm. Then cut the thread and pull it through the last crocheted pigtail.

Flip both ends of the tape backwards, sh. Photo. Pull both ends of the thread through a sewing needle at the same time and sew both ends together so that the band has a small and a large loop.

Crochet the flower:
In order to be able to start equal to 5 flowers can be crocheted as an inner round 6 fixed stitches in a thread ring; Thereafter round ending: Kettmasche.

For the outer flower round, insert each into the back loop of these sturdy stitches. For the inner flower round, the front loop is then inserted:
Outer flower round: prick back - crochet crochet - crochet 4 stitches - stitch next stitch at the back - crochet crochet - crochet 4 stitches - crochet next stitch at the back - crochet crochet - crochet 4 loops - crochet next stitch at back - crochet crochet - 4 Crochet the loops - Crochet the next stitch at the back - Crochet the crochet - Crochet 4 loops - Knittes stitch.

Inner flower round: prick in front - crochet crochet - crochet 3 crochet stitches - stitch next crochet behind - crochet crochet - crochet 3 crochet stitches - crochet next stitch at back - crochet crochet - crochet 3 crochet stitches - crochet next stitch at back - crochet crochet - 3 Crochet the loops - Crochet the next stitch at the back - Crochet the crochet - Crochet 3 loops - Knittes stitch. The end thread is pulled through the last stitch and then backwards.

Then sew the flower to the lanyard and pull a keyring through the smaller of the two loops.

And "> Crochet your heart is how small hearts are crocheted, crocheting these hearts will make them wonderful keychains - the perfect gift idea for Mother's Day or birthday!