Building instructions for paper planes for printing

- Classic long-haul flyer
- Jet jet as a medium-haul aircraft
- Dull Glider as a pilot
- Guidance Video for the Blunt Glider: "Swallow"
Aircraft fascinate young and old. No wonder, then, that for generations paper planes have been made. All you need is a sheet of paper and a good folding guide. You certainly have the paper lying around at home somewhere. We take care of the good folding instructions. Simply print them out and start working on your personal jet!
The model airplane is not affordable at the moment "> Classic long-haul aircraft
Material: Din A4 sheet
Difficulty: very simple
Time required: a maximum of 5 minutes

Step 1: Place a Din A4 sheet in portrait orientation.


2nd step: Fold the sheet together along the side and open this fold again. You now have a clearly visible fold line in the middle. It will always play an important role in the following steps.


Step 3: Fold the top right corner to the center fold line, as well as the left.
Step 4: Fold the upper right edge created in step 3 to the central fold line.


5th step: Fold the left upper edge created in step 3 to the central fold line.
Step 6: Fold the construct together again on the long side.
Step 7: Flip the first wing outward by folding it out about one centimeter from the center.


Step 8: Apply the previously designed construct and fold the second wing analogous to the first one.
Step 9: Fold any stabilizers.

Tip: For example, flip the right and left ends of your flyer up or down.

Click here: To download the instructions
Jet jet as a medium-haul aircraft
Material: Din A4 sheet
Difficulty: very easy
Time required: a maximum of 5 minutes

Step 1: Grab a Din A4 sheet and lay it in portrait orientation.


2nd step: Now fold the paper together along the side.
Step 3: When you unfold the sheet, you will see a clear fold line in the middle. This forms an important marker for the following steps.


Step 4: Next, fold the top right corner to the center fold line. Then do the same with the upper left corner.


Step 5: Fold the right upper edge created in the fourth step to the central fold line. Repeat this on the left.
Tip: The attentive reader has certainly noticed that the steps to here are exactly the same as with the classic long-haul aircraft. However, things continue a little differently.


Step 6: Fold the right edge created in step 5 to the center fold line.
Step 7: Fold the left edge created in step 6 to the center fold line.
Step 9: Fold the construct together again on the long side.


Step 10: Flip the first wing over. The distance to the center should be approximately one centimeter, as in the long-haul aircraft.
Step 11: Turn your paper plane around and fold the second wing the same way as the first one. Ready is your jet!

Click here: To download the craft template
Dull Glider as a pilot
Material: Din A4 sheet
Difficulty: medium
Time required: a maximum of 10 minutes

Step 1: Place a Din A4 sheet in portrait orientation in front of you.
Step 2: Fold the upper right corner to the other side of the sheet.
Step 3: Open the sheet again.
Step 4: Fold the top left corner to the other side of the sheet.


Step 5: Open the sheet again. Now you see a folded cross on your paper.
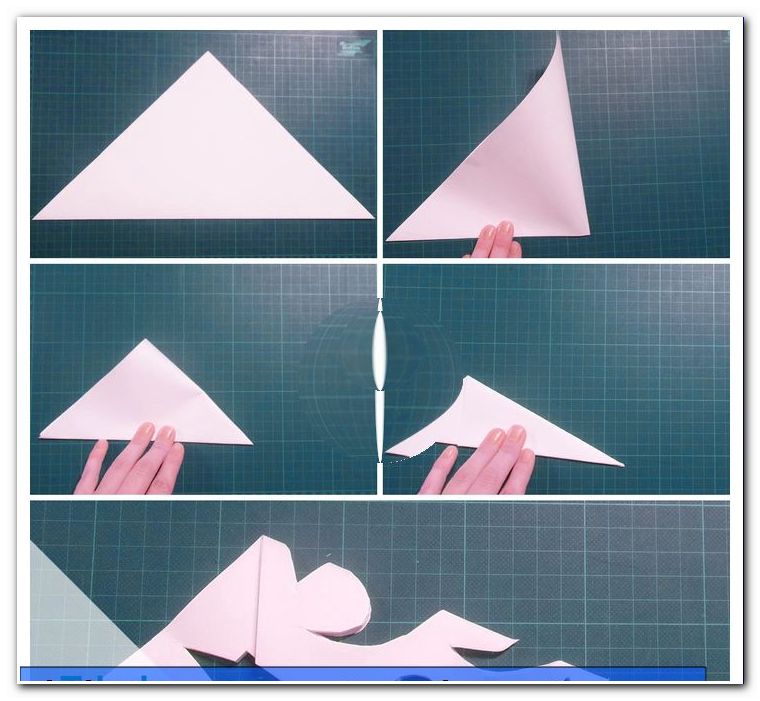
Step 6: This is followed by the trickiest step in the production of the aerobatic plane. Apply the sheet to the back. Fold the side triangles inwards. The center of the cross is refolded with your fingers. Fold the paper into a triangle.


Step 7: Fold down the right upper paper double layer of the triangle. Just fold the right corner to the top. Repeat this with the left side.


Step 8: Fold the now pointing down tips back up.


Step 9: Turn the paper over and fold back the remaining triangle left over in the previous step.


Step 10: Turn the blade over and fold the plane together for the first time.
Step 11: Flip down the first wing - at a distance of about one centimeter to the center of the aircraft, turn the flyer and flip the second wing in exactly the same way.


Step 12: Fold any stabilizers on the sides of the glider. You can also cut small stabilizers. Done is your art plane made of paper!


Tip: In order to visually enhance your paper planes, it is recommended to paint them or to use colored paper from the beginning.

Click here: To download the instructions
Guidance Video for the Blunt Glider: "Swallow"
The crafting of paper planes may be a bit tricky at the beginning. With a little practice soon, however, more complex variants succeed without any problems. And best of all, the effort and material costs are so low that you can basically start at any time, when you feel the urge. We hope you enjoy creating and flying your paper planes!
Tips for quick readers:
- Paper planes make paper with Din A4 paper
- No additional materials required
- Long-distance, medium-haul or aerobatics
- Workload for a maximum of 5 to 10 minutes
- Follow many small folding steps exactly
- Paint paper or use colored paper