Sew tulle skirt - free instructions for beginners

- Material and preparation
- Material quantity & pattern
- Cutting and sewing
- variants
- Quick guide
An all-time classic with style: the tulle skirt. There are many variants. It used to be worn as a petticoat to give more volume to dresses and skirts. Recently, however, one sees him more and more often as an independent garment.
In this guide, I show you how you can sew as a beginner a simple tulle skirt, the optically right makes her. I will tell you something about the different materials that can be used and also how you can make them unique from your tulle skirt.
Difficulty level 2/5
(suitable for beginners)
Material costs 1/5
(depending on the fabric selection between EUR 0, - from the remainder utilization and EUR 30, -)
Time expenditure 2/5
(including pattern about 2 hours)
Material and preparation
material selection
Since the sewing of a tulle skirt is described in this manual, it is natural to use tulle as the main material. But exceptions confirm the rule and since I need a petticoat for my daughter's carnival costume, which is still a baby, I wanted to use a particularly soft material. Of course, there are also very soft tulle types, but these cost a little more and I do not want to blow up the budget for a carnival costume. That's why I chose organza this time. So that the skirt is opaque and can be worn independently, I have also worried color matching lining. For the waistband I have a very wide, extra strong rubber band worried, so that the tulle skirt sits comfortably and can not slip so easily.
Material quantity & pattern

Depending on what size you sew and how many layers your tulle skirt should have, the material requirement varies as well. That's why I'm talking in advance on the pattern for the tulle skirt: You only need one cut part and can thus trim all layers.
First measure the hip circumference of the person who is to wear the tulle skirt. This is measured at the widest point of the Pos. This pattern is designed as a skirt, so first the radius has to be calculated. I need a waist circumference of 46 cm.

So I need a radius of 8.5 cm. If you're using a non-stretchy fabric, add 1 cm of goodness to it. Now start in a corner (90 degree angle) with your pattern. Measure directly from the corner of the radius (in my 8.5 cm) and mark this. Draw a quarter circle on the pattern at this distance. To do this you can either mark the distance several times and then draw a quarter circle freehand or use a compass.
Tip: If you do not have a compass, you can simply tie a piece of thread to a pencil. Then measure the length of the thread on the pin and hold the end exactly to the corner. Now you can draw a semicircle with the pen, if the thread remains under tension. Hold the pin as straight as possible so that the quadrant becomes even.
Now you need the skirt length. In my case, this results from the length of the costume skirt and is 25.5 cm. Simply measure from the waist down to where the skirt should end.
Tip: You can use the created section several times. Note, however, that the seam and hem allowances are not yet included and whether you have created them for stretchy or non-stretchy fabrics. The pattern is exactly one quarter of the skirt. If you want to use it for motivic fabrics that have a "top and bottom", you can divide so that the subject is not "upside down". You can also apply other divisions in this pattern.
The pattern is therefore already finished and can be cut along both circular lines.

Since the pattern for the tulle skirt is a quarter circle, the required amount of fabric PRO FABRIC can be calculated as follows:
[Radius + Rock Length + NZ (+ SZ)] x2
- 8.5 + 25.5 + 0.7 + 1 = 35.7 cm
- rounded up to 36 cm x 2 = 72 cm
So I need 72 x 72 cm per layer.
I would like to sew the fabric with three layers, so I need 144 x 144 cm from the organza. I shared it this way because most fabrics are 145 - 155 cm wide. So I know that I need at least 144 cm to full width. From this I could even cut four layers. This is too bulky in my case.

I also want to make the tulle skirt opaque, so that the little mouse can wear it even without a costume. Therefore, I also need a square of 72 x 72 cm from the lining material.
If you really do make the skirt out of tulle, in most cases you can do without a seam allowance and a seam allowance at the hem as tulle will not fray. But you definitely need the seam allowance at the waistband. This can vary between 0.7 and 1 cm, depending on what you have for a sewing machine.
If you - like me - sew the organza tulle skirt, add about 1 - 1.5 cm to the hem. In this case, put the hem inside once and stitch it with a matching yarn. For a tulle skirt for a girl or for adults, I would make the hem addition even wider and hit twice before quilting.
You can either trim the lining or simply make an evening out. (Sew with a wide zig-zag stitch along the edge - the needle stabs alternately into the fabric and next to it, thus preventing a fraying)
So think in advance how to make your skirt and cut according to the additions. Lay all squares with the same additions on top of each other and then fold them once along and once across.

Tip: If you want to sew more than four layers, I would not cut all the layers at the same time, but rather individual layers with a maximum of 4-5 layers each. That way you can work much more accurately.
Cutting and sewing
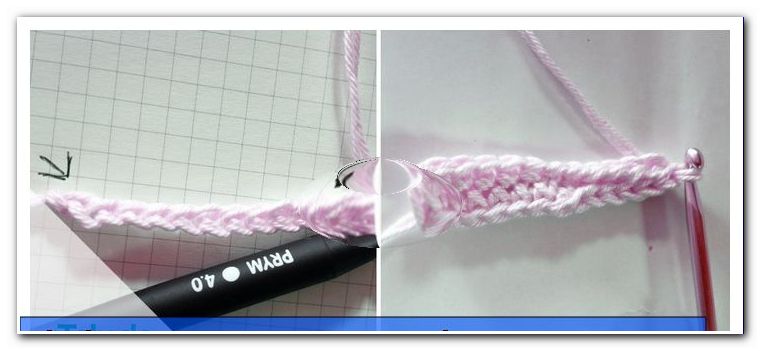
Now lay the pattern so that the small curve is in the corner, where there are no open edges and stick it with pins or fix it with Wonderclips.

Now cut with the appropriate seam allowances (above in any case - below as desired). When you unfold the fabric after cutting, you will see that a circle has been created with a hole in the middle. The photo looks out of focus due to the thin organza layers, which are slightly shifted.
Sew first any hems. Then place all pieces of fabric with the right side (ie the "nice" side) up on top of each other, starting with the lining material. Pin all fabric layers of the tulle skirt and sew them together within the seam allowance.

Now only the covenant is missing. Mark four points at equal intervals.
Tip: You can easily determine the four points by folding them accordingly. Lay the fabrics of the tulle skirt lengthways and once across each other. Just as for the cut earlier.
I have also closed the rubber for the abdominal collar to the ring and marked four points. Now I put the rubber right to right around the abdominal opening and put the four points together. How exactly this works I have already described in the article on the cuff sew here: cuffs - instructions

Tip: For this skirt, you really should use a firmer rubber band and no cuff fabric. The more layers you sew for the tulle skirt, the more he needs at the waistband. Cuff fabric is just too soft and yielding.
Now I start to sew at one of the points by sewing well. Then I stretch the rubber until the organza layers of the tulle skirt do not wrinkle any more and sew the rubber gradually under stretching.

Finally, I fold the elastic waistband up and the tulle skirt is ready!

variants
The easiest way to lend and modify your skirt is to use different seams, or even cut them at the hem with ripples or prongs and sew them together slightly offset. Here you can become very creative. For example, any skirt layer at the front may be slightly shorter from one layer to another. Or all the layers remain the same length and they gather the top layer, for example, eight places at equal intervals and attach flowers or loops.
You can also pimp on your skirt by sewing various decorative elements on or under the fabric layers, such as silver stars, shimmering snowflakes and much more.
Also by the use of different colors you can give your skirt the finishing touch. For example, if you're using "just" white tulle and would like to put an accent on it, you can make the petticoat in a pastel color. Neon colors can bring unusual combinations - even under black tulle.
Have fun trying!
Quick guide
1. Measure hip and skirt length
2. Make a cut, cut the elastic waistband
3. Cut skirt layers (consider NZ and SZ - plan in detail beforehand)
4. If necessary, sew or remake seams
5. Sew all layers together on the abdominal collar inside the NZ.
6. Mark 4 points on the waistband and rubber band
7. Sew on elastic waistband and fold up
8. Done!
The twisted pirate