Making candle wick yourself - making wick for oil lamps

- Turn candle wick
- Wick braid
- Extra tip: wick from nature
- Oil lamp - instructions
If you want to make classic wax candles or trendy oil lamps yourself, you can also make the wick yourself. This is far easier than expected. In our guide you will learn how to create a candle wick with little effort and in no time. As a small bonus, we also present a step-by-step guide to a functional oil lamp.
Turn candle wick
Everything you need to make a wick for wax candles or oil lamps is
- a simple cotton yarn,
- liquid (hot) wax or oil as well
- a scissors
Important note: The yarn used must necessarily be 100 percent pure cotton. You should refrain from using mixed fibers that also incorporate polyacrylic or polyamide synthetic threads. The reason for this is the fact that the synthetic fibers melt during firing, releasing toxic fumes that can be harmful to health. Accordingly, they are absolutely unsuitable as wicks for candles or oil lamps.
That's how it's done:
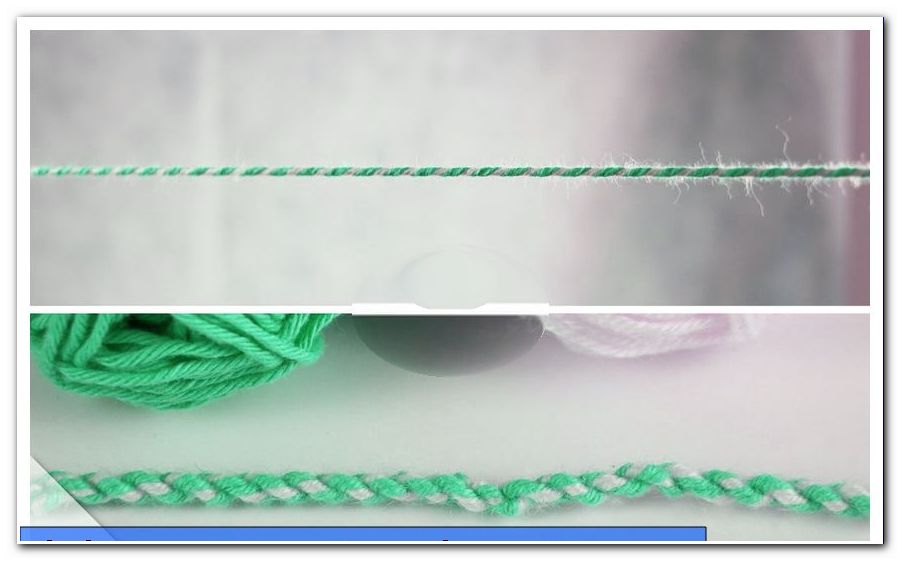
Step 1: Turn the yarn into a drawstring. Pay attention to the appropriate length. It depends on the size of your candle or oil lamp. In addition, the cord should not be too tight, otherwise there are problems later (see tip at the end with respect to the laces).
How to twist the cord into a cord, this article explains: Kordel make yourself.
Step 2: Close the cord with a knot.
Step 3: Soak the cord in hot candle wax (wax melt in the water bath on the stove, do not heat directly, for safety reasons) or in oil - depending on whether you want to create the wick for a wax candle or oil lamp).
Important: The cord must be properly saturated with wax or oil, so that the wick burns well and long in the end.
Step 4: Let the cord dry while hanging.
Note: The wick should just hang. Knot it best on a hanger with crossbar or fix it with a clothespin. Also put a newspaper or old rag underneath to catch any drops.
Step 5: Once the candle wick is completely dry, you can cut off the knot.
Tip: You do not have to make the cord yourself, if this is too uncomfortable for you. Alternatively, a no longer required laces or a cotton cord from a hoody in question. Note, however, that both variants are often quite close meshed and therefore especially difficult to absorb wax. To create a "balance", you should leave the shoelace or the pull cord for a few minutes in the wax bath.
Wick braid
Alternatively, there is the option not to twist the cotton yarn, but to braid. In this case, you need three cotton strands. These must not be too thin. If you have just very delicate threads ready, take several pieces together per strand. Basically, it is better if you get cotton in the right strength.
Here are indications of concrete measures (thicknesses) that are usually suitable:
- for a Ø up to 12 mm -> yarn with 24 threads
- for a Ø up to 18 mm -> yarn with 32 threads
- for a Ø up to 26 mm -> yarn with 46 threads
Tip: The larger the candle or oil lamp should be, the thicker the yarn must be.
If you want to make candles out of real beeswax, it is recommended to use even thicker yarn.
That's how it's done:
Step 1: Tie the three strands at the top.
2nd step: Interlace the strands as normal.
Step 3: Tie the "braid" below.
Tip: Again, it is important to make sure that the braid is not too tight. The reason is the same as described above for the laces and the pull cord.
Then again the same steps are to be done as with the cord: Let the wick soak in hot wax or in oil until it has completely soaked with the respective liquid. After the usual procedure, ie the drying and removal of the knot, the wick is ready and ready for use.
Here you can find out how to make candles yourself: making candles yourself and candles made of beeswax.
Extra tip: wick from nature
The different variants with the cotton yarn are the typical solutions. However, we would also like to introduce a nice alternative to nature lovers: in fact, you can simply "pick up" a more or less complete wick outside.
For this purpose, take a walk to the nearest lake and look for the so-called Flatter-Bulge. The plant grows everywhere, where it is moist. Thus, you have a good chance on a river to meet a suitable plant.

The trick is to harvest some stalks of the Flatter-Bulge. The mark from it can be wonderfully used as a wick. Use a pair of nails to peel the stalk from the stalk - until only the pith remains. It reminds a bit of foam optically and haptically.
Tip: The Mark of the flutter bulge is extremely absorbent. Therefore, it is ideal as a wick for candles or for oil lamps.
Oil lamp - instructions
At the end of the guidebook, we would like to provide you with a concrete idea for the production of an oil lamp. Try it - it's worth it!
Materials:
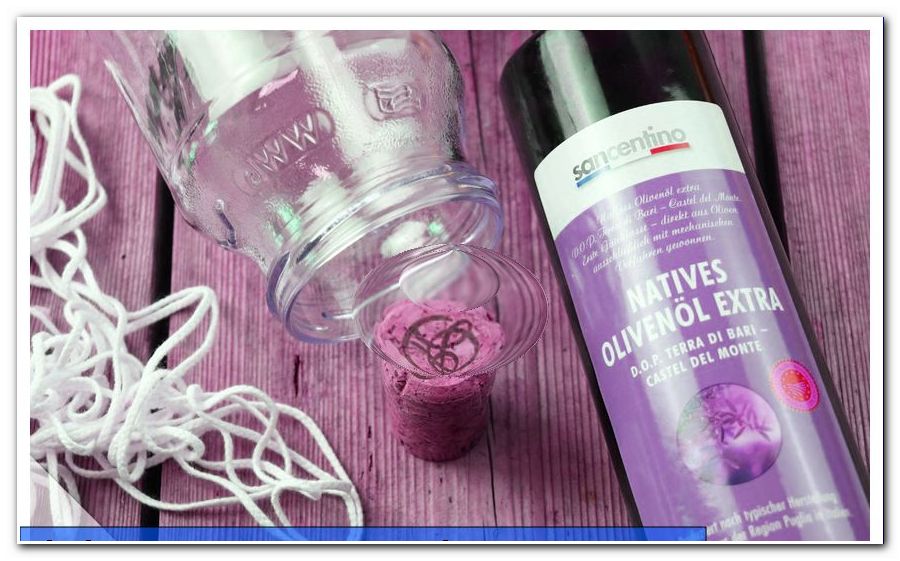
- small screw jar with wide opening
- candlewick
- Corks (from a wine bottle or craft cork from the craft shop)
- Bastelmesser
- scissors
- needle
- olive oil
That's how it's done:
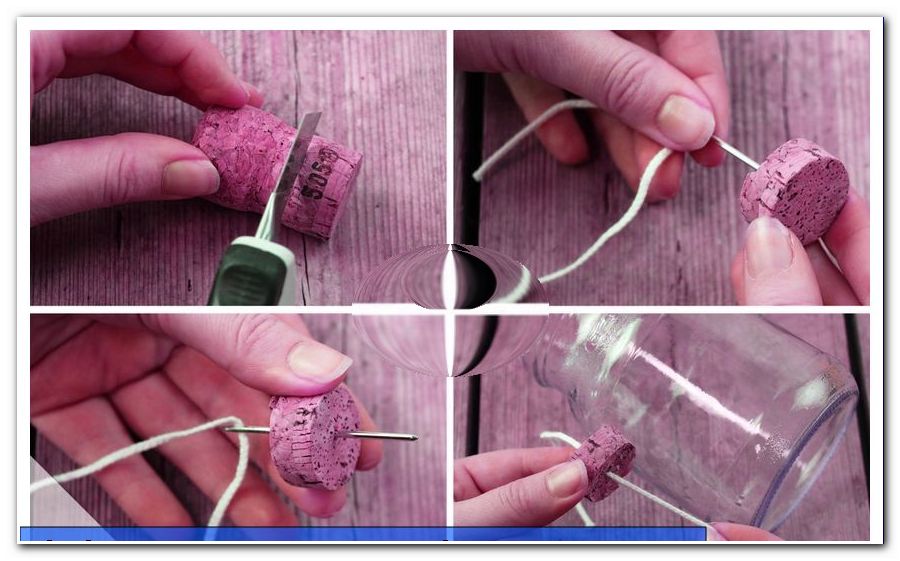
Step 1: Use the craft knife to cut off a small, flat piece of the cork. To do this, lay the cork lengthwise in front of you and make the cut at about one centimeter.
Tip: The cork piece should later ensure that the candle wick floats on the oil. It is important that it fits easily into the glass, but it does not turn out to be too tiny to be able to really carry the weight of the wick and not sink. That would not be in the sense of the inventor. After the first (wrong) attempts, you have the turn but quickly out.
Step 2: Make a hole in the middle of the cork with an arbitrary needle - on the flat side (not the rounded one).
Important: The hole must be big enough to fit through the candle wick. It must not be too big. The test will be done in the next step.
Step 3: Insert the wick through the hole using the needle. The former should not be farther than about 2.5 inches above the latter. Then hold up the cork on the yarn. If the cork slips down, the hole is too big and you should prepare a new cork element.
Step 4: Now cut the candle wick so that it fits into the glass. To estimate the length correctly, hold the cork with the wick on the container so that it is at about two-thirds of the glass height. The wick should reach from there to the glass bottom. So put the right cut.
Step 5: Fill the glass two-thirds with olive oil.
Tip: Olive oil is an excellent choice because it contains no harmful chemicals and burns clean. You do not have to be afraid of unpleasant odors.
Step 6: Place the cork with the candle wick centered on the oil.
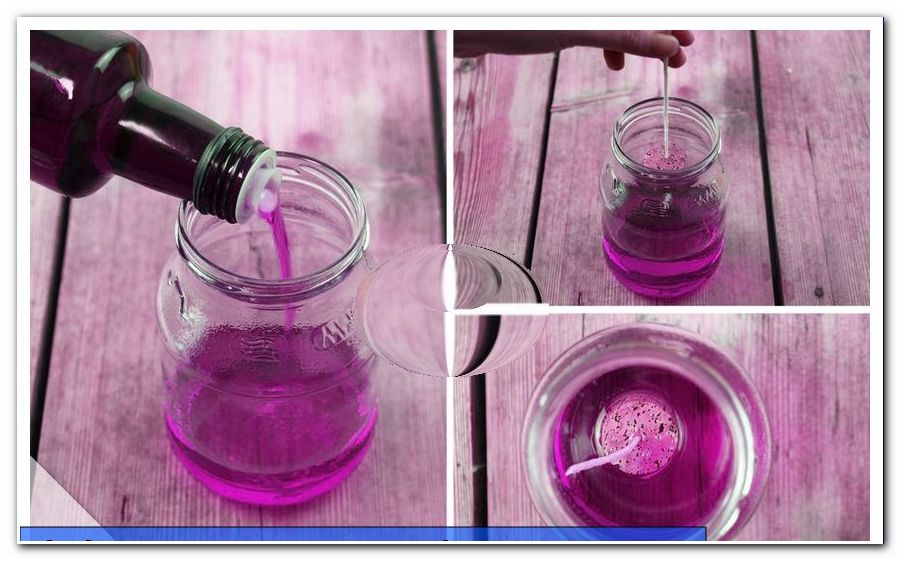
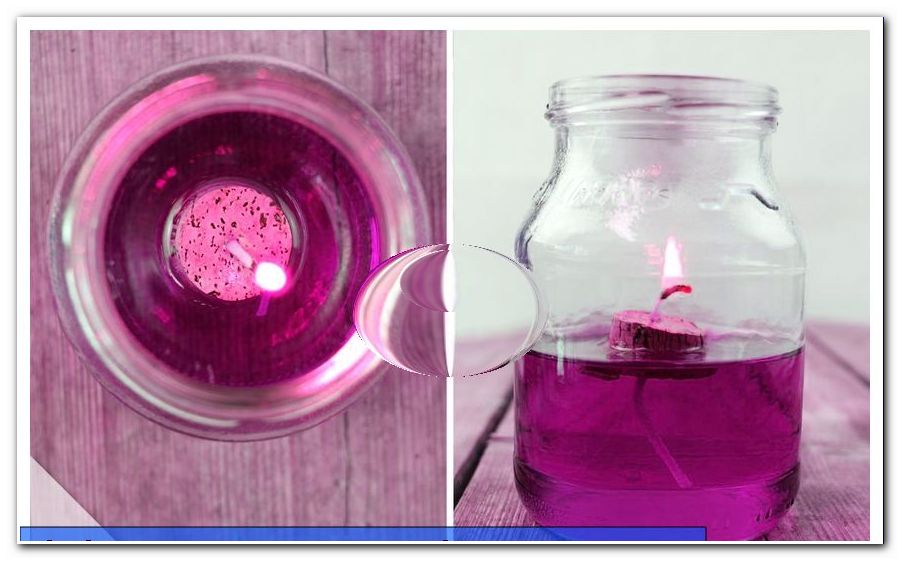
Wait another 10 to 15 minutes. So the candle wick has enough time to soak up the oil (in this case, you do not have to soak the wick before, ie during production, in oil!). Then you can light and enjoy your self-created oil lamp!
Of course, there is the possibility, the glass before the whole act something aufhübschen - about using napkin technology: napkin technology