Sewing passport cover - DIY cover for the maternity card

- Beautiful moments with the lovingly designed Mutterpasshülle
- material selection
- amount of material
- patterns
- cut out
- It is sewn - the preparations
- The basic form arises
- Turn, turn, turn
- Endspurt
What is more valuable than your own child ">
The time of pregnancy is exciting and is documented in the Mutterpass almost in detail. So why not this booklet - you can sew a passport cover yourself at lightning speed and this guide will show you how.
Difficulty level 1/5
(suitable for beginners)
Material costs 1/5
(depending on the choice of fabric between EUR 0, - from the remaining utilization and EUR 14, -)
Time expenditure 1/5
(including pattern about 1 hour)
Beautiful moments with the lovingly designed Mutterpasshülle
First of all I would like to say that the given measurements apply to the Austrian mother-child-pass. The vaccination certificate in Germany measures, for example, 9.3 cm x 13.2 cm. With this tutorial, however, all sorts of booklets and passports can be integrated. Simply measure the desired objects such as passport, vaccination certificate or a calendar and include seam allowances according to the following instructions.
material selection
Ideally, choose a non-stretchy fabric such as cotton or linen for the maternity pass. Of course, even stretchy fabrics can be processed, but then please reinforced with nonwoven and under very precise work, otherwise the fabric warps and the end result is not nice.

I opted for a simple plain-colored linen fabric in turquoise as the outer fabric and for a matching cotton fabric in gray with turquoise stars for the inside. Solid on the outside, because I would like to add ornaments to customize my shell.
amount of material
The amount of material depends of course on the particular beautifying object. It is best to measure width and height and add 3cm seam allowance (1.5cm per side). You need 1x outer fabric, 1x inner fabric, 2 large and 2 small side panels.
patterns
My mother-child-passport is inclusive plastic wrap (which I want to wrap) 22.5 cm wide (unfolded) and 17.5 cm high.
Accordingly, I need for the outer shell of a fabric piece, which is 25.5 cm wide and 20.5 cm high. The inner part should be a little narrower, but the same height. Thus, I take in the width of 22.5 cm and in height also 20.5 cm. The large side panels are also 20.5 cm high and are cut square - so they are also 20.5 cm wide. The small side parts should be about 2-3 cm narrower (depending on your taste). So for me it's 18.5 cm in width and the height is again the same with 20.5 cm:
| BASIC MASS | +3 cm seam allowance | W 22.5 x H 17.5 |
| 1x outer fabric | W 25.5 x H 20.5 | |
| 1x inner fabric | W 22.5 x H 20.5 | |
| 2x side panel large | B 20.5 x H 20.5 | |
| 2x side panel small | B 18.5 x H 20.5 |
Tip: For motives, as always, think again, with which side is sewn up, so that the subject is then the right way around on your sewing. Best of all hang up!
cut out
Cut out all 6 parts needed for the mother-child pass. If necessary, the outer fabric is reinforced with non-woven fabric so that it is more robust. In my case, this is not necessary, since in addition a plastic cover is under the fabric.
Tip: If you want to reinforce the outer fabric with non-woven fabric, I recommend in this case NOT to reinforce the seam allowances, otherwise the seams become too thick due to the multiple fabric layers.
It is sewn - the preparations
First of all, please iron all parts well so that the seams become straight and you can work properly. Then fold all four sides exactly in the middle in width and iron them too. Now place a large and a small side piece together so that the open sides are exactly in line with each other. Now mark where you want a division of the page in pockets. In my picture, I have about three-thirds of the page, so at the bottom of a compartment for the eCard is created and in the upper area for ultrasound imaging space. You are also welcome to halve this page. Pin the appropriate place with a pin and sew it with a simple straight stitch. Remember to sew!

Tip: If you want to decorate the outer fabric with applications or similar, you should do this now, because you will not be able to approach this area later.
The basic form arises
Now place the fabric part of the outside with the right (ie the beautiful) side up in front of you. Place the two side parts exactly at the edges and fix them with a few pins.
Tip: If the pocket for the eCard in the magazine should be inside lower left, then make sure that it is attached to the bottom right in this step.
Now sew these two edges at a distance of 0.5-0.75 cm with a simple straight stitch. Make sure that all fabric edges are flush with each other and no wrinkles occur when sewing.

Now place the fabric part of the inside in the middle. On the right and left missing 1-2 cm depending on the cut, so you can see the side seams. This is deliberately chosen and represents the later turning openings. Now stick the next seams at the top and bottom with pins and sew them again with a simple straight stitch. Do not forget to sew on! Now cut all corners at an angle so that the edges do not become too bulging.

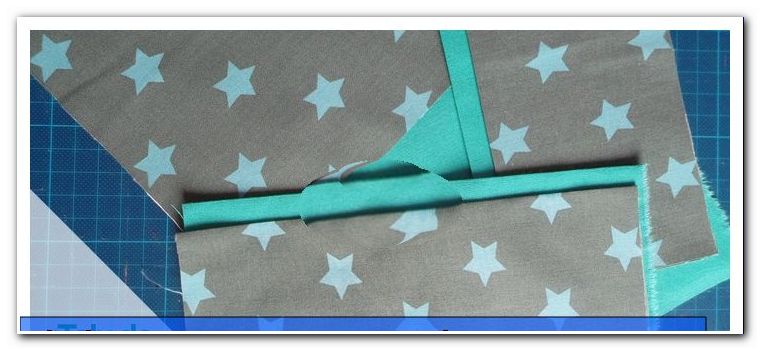
Turn, turn, turn
The scissors on the photo show that there are still two openings, one on the right and one on the left. Through one of these openings you now turn your workpiece. Now flip the side panels right and left, and your mother pass cover is almost done!

Tip: Try to insert your desired object to see if all relations fit.
Endspurt
Iron once more!

And done!
Unless you have applied or used a motif fabric. In my case, that certain something is missing. I chose two plotter designs from the online store. For those who have a plotter at home, it is not necessary to explain the details of the next steps, but for those who have not yet come to the taste, here's a little digression:
Tip: Also for the plotter professionals: MIRRORS !!! For all motifs that are not transferred using transfer film, the same applies: it must be mirrored. Especially if you want to write something, it is otherwise mirrored and annoyed green and blue!
First, decide on a suitable motif or write a text in the desired font, MIRROR and send it to his plotter, which now cuts it out of the slide. That looks like this: Yes, I know, you do not recognize much, except the colors. After the weeding it looks quite different!

Iron on - and ready!
Tip: The processing of the films is always described exactly according to the manufacturer / seller. However, I like to put a cotton cloth or a piece of cotton residue between the film and the iron. In addition, I iron again after removing the film with pressure over it - again with cotton in between, then the subject lasts longer. Ideally, the piece is then washed with a maximum of 40 ° C.

With this individual passport you have a lasting memory of the pregnancy. Later, you can pass on the passport cover to your children - so this unique piece will remain in the family.
Quick Guide:
1. Make a cut for inside and outside pocket and side panels.
2. Crop with seam allowance
3. Dividing side parts for "pockets"
4. If necessary, decorate the outer fabric, then attach the side panels
5. Fit the inner fabric, turn it over, fold over the side panels and, if necessary, plumb
6. Ironing - done!
The twisted pirate