New / retrofit roof windows yourself - instructions

- Take measurements and draw
- Record window correctly
- Provide access to the roof structure
- Cover the roof and remove the substructure
- Fit roof battens for window frames
- Prepare the frame
- Install the frame
- Install the under-roof
- Mount roofing frame
- Roof cover
- launch work
A skylight is in many cases the only way to bring daylight into a room upstairs. If the room is not on the first side of the house and also has no expansion with row of windows, so the daylight must come through the skylight. If this was not taken into consideration during the construction of the house, or if the attic is removed, then a roof window can be retrofitted.
Installing a skylight is certainly not one of the simplest household chores, but it is possible without special knowledge or tools. We will give you detailed instructions on how to retrofit a skylight, even if your roof is already covered and does not really support retrofitting. You should plan some time, but you can follow our instructions without any problems, as the installation in each roof is the same. It also makes no difference whether you want to improve a specific room, or the installation takes place in the attic. The following instructions will give you light on each upper floor.
material
- wooden slats
- screw
- windowpane
- Frame with mounting bracket
- under roof
- Cover frame with lead apron
- Tool
- Cordless Screwdriver
- pencil
- ruler
- stapler
- Cuttermesser
- gloves
- (Stitch) Saw
Take measurements and draw
In the first step you think about the position of the window. This should be located at the top edge 1.85 - 2.20 meters from the floor. At the lower edge of the window, this distance is 0.90 - 1.10 meters, depending on the size of the window area. This height is chosen so that it is possible to look outside while sitting. When drawing in, make sure that the opening is 40-60 mm wider than the skylight. In the height of this measure is 45 mm. If the measurements are correct, you can draw them on the ceiling paneling, as the installation is done completely from the inside of the house.

Tip: Since the drawing still has to be moved, work carefully and in pencil.
Record window correctly
The next task is to locate the rafters so less work is done. You should first make a smaller hole inside the pre-mark, so you can get an overview of the cavity behind it. Cut the hole with a jigsaw. Now locate the rafters, as they should be processed as little as possible. Measured from the first rafter, re-draw the dimensions of the window so that you have to remove a maximum of one rafter for the window to fit.
Tip: Ideally, choose a window width that fits relatively precisely between two rafters. This will save you later work steps.
Provide access to the roof structure
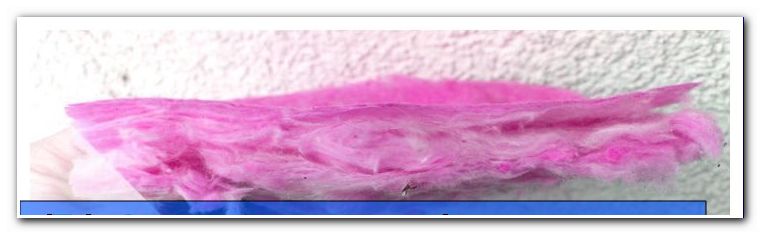
Once the window has been drawn, saw the complete cutout into the roof cladding. You start at the already cut out hole and cut through from here to the pencil drawings. The result is a rectangle in the cladding, which will become your workplace. Ideally, a rafter is now free, which you remove with the saw to the length of the new window. The next rafters on each side can remain if the window fits exactly in between. You will also find an insulation material and a connection apron. You also remove both, so that only the roof battens and bricks are visible.
Tip: To remove the insulation material, wear work gloves, as the fabric may attack the skin.
Cover the roof and remove the substructure
Start by covering the roof. To do this, gently push a first brick out of the composite and pull it in towards you. Then cover the roof brick by brick. Please do not pry bricks any more than absolutely necessary, as you will have to cover them up afterwards. Now you have a look at the free roof battens. Saw them through like the rafters. Finally, a peephole should now have emerged in which no further interference points can be seen.

Tip: Secure the roof from the outside so that no bricks can fall on passers-by or parked cars.
Fit roof battens for window frames
Roof battens that have just been laboriously removed must now be reinstalled in the right place. Attach so-called support slats to the existing roof battens. These must be mounted exactly where the frame will rest. Precise work and accurate measuring are especially important here. Ideally, the frame has the width of the exposed rafters, since in such a case, only at the lower and upper edge support slats must be mounted.
Tip: If the frame does not fit between two rafters, build a stable substructure out of support slats. The frame must always be able to rest everywhere.
Prepare the frame
First, remove the sash from the frame. To do this, open the window and release the hinge. Afterwards, the wing can be removed so that the frame can be processed. Now screw on the mounting brackets. These must be 10 cm away from a frame corner. In addition, the side with 2 holes must be on the frame and the side with 3 holes on the battens. If your frame has an insulation frame, attach it at the latest now.
Tip: Remove the casement a few meters from the workstation so that it is secured against breakage.
Install the frame
Slide the prepared frame through the roof opening and place it on the roof battens. In a first step, attach the screws to the lower edge of the support bar. Now make sure about the fit of the frame. For rigorous testing, you should install the window sash and test whether the new roof window can be easily opened and closed. If this is the case, further screws can be screwed into the mounting bracket. Then remove the window and tighten all screws.
Install the under-roof

A kind of fine work is the attachment of the under-roof, also called connection apron. The under-roof protects against rainwater and weather conditions. Cut a piece of awning and put it loosely from the outside around the window. Now start at the lower edge of the frame by pulling the foil under the battens on the frame. If the cladding is clean, it is attached to the frame with sufficient staple needles. Then repeat this process on the sides and make sure the rafters stay under the roof. In the upper area, it is important that the cladding is under the old sub-roof so that the rain can run from top to bottom without getting under the cladding.
Tip: Pay attention to a tight fit of the connection apron, as this absolutely waterproof must be attached.
Mount roofing frame
The roofing frame is the weather-independent connection between the window frame and the under-roof. The roofing frame consists of several components, which you install as instructed. There are different models here. Normally, first attach the lead apron to the lower edge of the frame, which collects and distributes the rain from the window pane. Then insert the lower part of the covering frame, followed by side panels and upper cover. Depending on the construction kit, supplied clips and clips are available here.

Tip: Since the models are different and a general guide can not be given, look for the purchase of a product with a good description.
Roof cover
The frame is now fully assembled so that the roof can be covered again. Since the frame is higher, or not necessarily fit to the bricks, they may need to be cut. First, lay the side tiles. It is important to ensure that the brick is very close to the covering frame everywhere and only a small gap remains. The tile must rest in any case and must not stand higher than the roofing frame. Any foam parts or insulation can be cut or shortened if they interfere with roofing. Then cover the roof at the top and bottom edges.
launch work
Make sure that all work on the outside has been completed correctly and weatherproof. In any case, the bricks have to lie correctly and form a bond with the roofing frame, which does not cause many cavities. You can use a bucket of water to test whether the next rain is correct and, if necessary, improve the quality of the bricks or the insulation afterwards. In the last step you only have to install the window sash and thus complete the work.
Tips for quick readers
- Draw window with desired position on roof cladding
- Cut hole in the roof lining
- Locate rafters and re-draw windows
- Cut hole by window
- Remove slats, insulation material, connection apron and bricks
- Slats construction, so that frame fits exactly
- Molding frame with mounting brackets
- Fasten the frame to the slatted construction
- Temporarily insert and test window sash
- Accurately apply the underbody and tackle
- Mount the roofing frame around the window
- Cover the roof flush with the window
- if necessary, trim bricks, foams or insulation
- to test for proper drainage
- Insert the window sash