Knit edge stitches - learned quickly

- The knot edge
- Fixed variant
- The Swiss border
- Entangled knit style
- The Kettrand
- Entangled mesh
- The seam border
- Verkreuzrand
- structure edge
- English rib edge
- Join edge stitches
- Sew together with half stitches
- Sew together with whole stitches
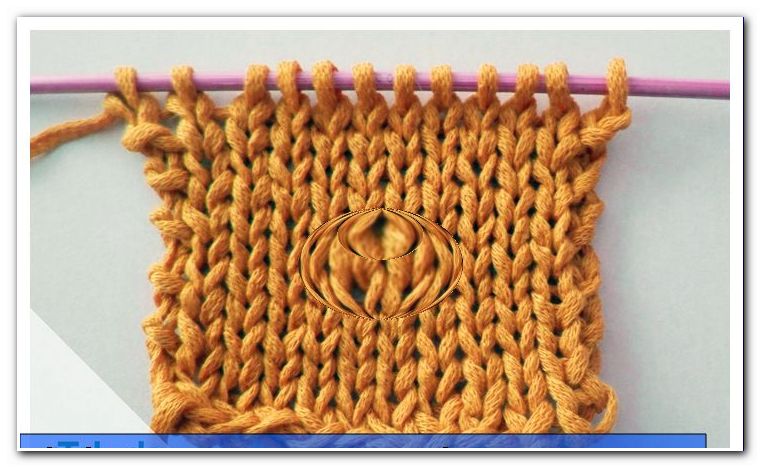
The first and last stitch of a row of knitting is called edge stitch and can be worked in different ways. Get to know the differences of the knitting variants and find out which edge stitch is most suitable for which knitting project.
Everything has a beginning and an end - as well as every row of knits. These so-called edge stitches must serve different processing purposes and be worked accordingly. For example, the edges of a scarf should be visually smooth and without holes, while individual sweater or jacket parts can handle a loose knit edge. Edge stitches are interlaced either on the right or on the right, knitted on the left or left, or simply lifted off the needle. These possibilities can be combined in many different ways.
You need this:
- Wool for knitting
- Circular Needle or Needle Game
- scissors
- Time and joy of knitting

The knot edge
To be able to knit this shape of the edge stitch, the first and the last stitch of a row are always knitted to the right. As a result, a left-hand stitch comes to lie on a right-hand stitch, and in the next row, a right-hand stitch, and so on. The edge stitches visually form a light knot profile, which ensures a stable knitting edge.
Fixed variant
Knot edges are well suited for knitwear whose edges are not sewn, but remain open, as in scarves or headbands. If you knit loosely, the variation of the right-hand knit stitches will help you to get a clean and tight-knit edge. For this, the first and the last edge stitch in each row are knitted on the right side. The twisted mesh offers less volume and is therefore stronger and more durable. For heavy wool garments, such as coats, this mesh variant is very well suited because the edge stitches can not expand through the stitching and weight of the wool.
In the right-hand knit pattern, the needle does not stick as usual from the left into the front loop leg. The needle comes in this case from the right and goes to the left going between the front and the back thread into the stitch to get the knitting thread.

Tip: In general, all the knitted edge stitches can be worked in an entangled manner to create a solid edge. Depending on the material and knitting technical strength, the edge may be optically slightly irregular, thereby cross-knitted Randmaschenvariationen are more suitable for later assembly.

The Swiss border
In this knitting technique, the edge stitches in each row are knitted on the left. This results visually also a nodular edge structure, which is close fitting.

Entangled knit style
Even the left-hand edge stitches can be knit as a variation in an entangled way. As a result, the edge is a little firmer and more durable. Knit a left-hand edge stitch by running the right-hand needle around the back stitch and inserting it from left to right. Go through the thread and you're done. Do this again at the start and end edge stitch in each row.
The Kettrand
The so-called Kettrand gets its name from the fact that the edge stitches visually look like a chained row of stitches. This Randmaschenvariante is very voluminous and when sewing knitting parts should be tried, whether one or both mesh members of the edge stitch should be used for sewing.
At the beginning of each row the edge stitch is knitted on the right, at the end of the row the edge stitch is lifted off as for left knitting. The work is turned and the first edge stitch is knit again to the right, while the last stitch at the end of the row is lifted off to the left again.

On the sides of the knitted part is clearly visible the crochet structure of the stitches. An edge stitch always stands for two rows of knitting. For the height of a knit you must double the number of edge stitches to determine the total number of rows.

Entangled mesh
Since the individual edge stitches at the edge of the warp pull over two rows, these stitches are larger and thus looser. To create a little more firmness here, offers the entangled Abknicken. To do this, knit each start edge stitch crossed right. At the end of each row, the edge stitch is lifted off to the left. This means that you go with the right knitting needle behind the last edge stitch and pierce from left to right in this stitch. Pull from the left needle and the stitch has twisted. A comparison of normal Kettrand and the Kettrand with entangled stitches shows a clear visual difference.

The seam border
At the seam edge, in the back row, knit the edge stitch at the beginning and at the end of the row to the right. The work is turned and in the back row both edge stitches are knitted on the left. In this way, the entire piece of knitting is worked. If you want to make this edge variant firmer, knit all stitches in an interlaced fashion. The right-knitted edge stitches of the rows are knitted on the right, the left-hand knitted edge stitches of the back rows are left-folded. In this way, the edge stitches are solid again.

Verkreuzrand
In this type of edge stitch knitting, the first two stitches are crossed at the beginning of the back row as in knitting pigtails. To do this, first prick the needle into the second stitch as you would to the right knit. You may need to loosen the stitch first with the needle tip. The work thread is taken over the first stitch and pulled through the second stitch, which remains on the left needle. Now plunge into the first stitch to the right knit and catch up with the thread. Then slide both stitches from the left needle. Work all other stitches in the pattern until two more stitches are left on the needle. First you need to knit the edge stitch by working it to the right. Pull the thread through and then knit the other stitch (penultimate stitch on the needle) normal to the right. In the back rows both edge stitches are worked left.
For a firmer version, you can knit the left-hand knitted edge stitches in each back row in an interlaced fashion.

structure edge
These edges are created by doubling and knitting stitches. At the beginning of the row you have to knit an additional stitch from the edge stitch, while at the end of the row you knit the penultimate stitch with the edge stitch to compensate.
To do this, knit the edge stitch on the right side of the row without letting it slide off the left needle. Now stitch again into the edge stitch as if to knit right-hand (insert into the stitch from the right), pull the thread through and let both stitches slide off the needle. At the end of the row the last but one stitch is knitted together with the edge stitch on the left. This creates a very solid border.

English rib edge
For a clean edge in the patent design, the first and last three stitches are worked in a special way. For a specimen, beat twenty stitches including edge stitches. The edge stitch is lifted off like left-hand knitting. The second stitch is lifted together with an envelope on the left side. To do this, go from the right into the second stitch and simply lift it from the left needle while the work thread comes to lie around the stitch at the same time.

The next stitch is knitted on the right, the next stitch is lifted off left with the envelope. The edge stitch at the end of the row is knitted on the right. Turn the work over. Raise edge stitch as for left knitting. The following stitch is a left stitch, which is lifted off to the left along with an envelope. Knit the following stitch with your envelope on the right side, take off the next stitch on the left side with an envelope and this until the end of the row. Knit the edge stitch right there.

Knit a few rows in this patent sample.

You can see that the edge stitches in this knitting look like the edge of the warp. In comparison, you now knit the special patent pattern edge and then have the choice of which version you can inspire.
The first and last three stitches are required for this edge variant. According to the pattern, the edge stitch at the beginning of the row would be a right stitch. Therefore, knit the edge stitch right. The second stitch is a left stitch. This is now lifted without an envelope to the left of the needle. The following right stitch is knitted together with its envelope on the right. It continues in the normal patent pattern until only three stitches remain on the needle. The third stitch is a left stitch, which is lifted off to the left without an envelope. The thread lies in front of the stitch. Knitting the following right stitch with its envelope on the right side and take off the edge stitch on the left side without the envelope.

Turn the work over. Knit the edge stitch on the right. Lift off the following left stitch without flap on the left. Knit the next stitch on the right. Finish the series except for the last three stitches in the patent sample. Take off the following left stitch without thread on the left, lift off the next stitch on the right and the edge stitch on the left. In this way proceed all other rows. The left stitches are always lifted off to the left without thread, the right stitches are knitted on the right. The edge mesh variant for the patent sample is ready.

Join edge stitches
To knit parts to connect at their sides, the edge stitches are sewn together in the mattress stitch. Half or all of the edge stitch can be used for this. For thick wool, it is recommended to sew half stitches together so that the inner seam does not become too thick.
Sew together with half stitches
Lay the knit piece flat on the table and turn the edge stitch so that both stitches are visible. For sewing, use only the outer thread. To do this, pierce the edge stitch from top to bottom and come up in the overlying stitch from below.
Now change to the second piece of knitting and stab at the same height in the edge stitch from top to bottom and come back up a row higher in the overlying edge stitch.
Then change back to the other piece of knitting. In this way, sew both pieces together.

Sew together with whole stitches
You proceed in the same way as when stitching with half stitches, but this time you do not stab into the edge stitch, but between the edge stitch and the adjacent first stitch.
The thread comes here again from above and stings next to the edge stitch in the fabric. The needle is passed under the transverse thread, which connects the edge stitch with the first stitch and back behind it.

They change over to the other piece of knitting and also pierce the fabric next to the edge stitch, pass the needle under the transverse thread and then up again. You change again to the other piece of knit and connect the knitted pieces together.

Tip: For thick wool, always connect both knitted parts with one transverse thread each. For very thin wool, you can not only infiltrate a transverse thread after piercing between the edge stitch and the first stitch, but only bring the thread back up after two transverse threads. In this way, you go two rows higher in your work. For thick wool, each row in the piece of knit must be gathered and tied, as otherwise the piece would contract when stitched together. The exception is the so-called Smoke effect, in which, for example, sleeves are ruffled by the simultaneous combination of several rows.