Build subwoofer housing yourself - DIY instructions

- Subwoofer vs. speaker
- The variety of subwoofers
- Active and passive subwoofers
- housing principles
- Closed bassbox
- bass reflex
- Bandpass enclosure
- Frontfire and Downfire
- The chassis
- How to build a subwoofer enclosure
- Step 1: Prepare MDF boards
- Step 2: Prepare chassis installation
- Step 3: Integrate struts
- Step 4: Glue the housing
- Step 5: Embellish the case
- Step 6: Installing the electronics
If you are skilled and technically gifted, you can build a subwoofer yourself and thus save a lot of money for the costs of a brand box. In this tutorial you will learn the most important basics of the topic. Following is a step-by-step guide to building yourself the case.
Bass makes life more beautiful, especially in terms of the home theater, the hi-fi system and the car. A subwoofer is the right device to enjoy beautiful bass. But why buy, if you can make the good piece yourself "> Subwoofer vs. speaker
A subwoofer reproduces so-called low-frequency sound waves. The frequency usually ranges from 30 to 160 Hz.
Sound is a wave that propagates in the air at high speed from a sound source. We can not see them but hear or sometimes even feel pressure on our skin. To visualize sound, you can compare it to waves in the water that arise when someone throws a stone into it. The waves spread in a circular pattern around the point of immersion and continue to move away, weakening and eventually drying up.

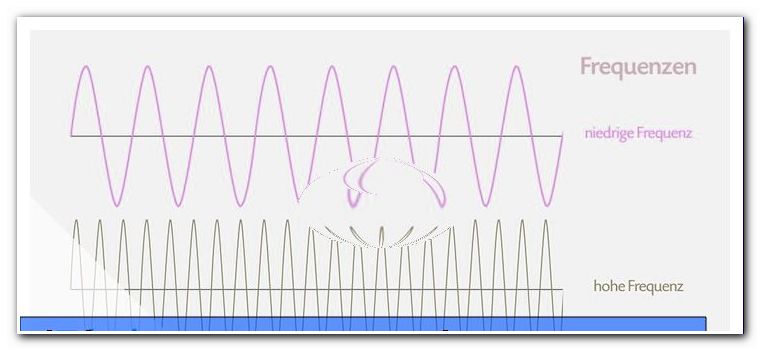
The frequency refers to the number of oscillations of such a sound wave per second. A vibration is the ups and downs of the wave. The unit in which it is given is called Hertz (Hz). Thus, a designation of "80 Hz" means that a sound wave oscillates at this frequency 80 times a second, a wave at "6, 000 Hz" oscillates 6, 000 times a second, and so on. Humans can only perceive frequencies between 20 and 20, 000 hertz. The lower the frequency of a sound, the lower it sounds in our ears. Low frequencies below 150 Hz are perceived as bass. If you build a subwoofer, build a speaker that can reproduce low sound frequencies.
The variety of subwoofers
Before you build a bass box yourself, you should know the most important designs. Only then will you find the right construction principle for your personal circumstances.
Active and passive subwoofers
Subwoofers are distinguished by their design. First of all, there are active and passive boxes. These variants differ in that a passive subwoofer is controlled via a central system through which he and other speakers receive all orders. So he is a pure player. On an active model you regulate the settings directly, without the detour via the system. The reason is an integrated power amp in the active subwoofer that lacks the passive. An active subwoofer allows a more accurate bass experience, but it also requires more technical know-how from you to set up.
housing principles
There are also structural differences in the housing types. The most important types are the closed housing, the bass reflex box and the bandpass housing.
Closed bassbox
A closed bass box is the simplest design and, as the name implies, completely enclosed. The desired bass escapes largely on the chassis. At every other housing location, however, it is strongly damped. Incidentally, the chassis is the round part of the subwoofer, which, together with a movable membrane, produces the desired sound and gives the box and other speakers the typical appearance. The chassis is colloquially also called plate.

| advantages | disadvantage |
|
|
bass reflex
In a bass reflex box, the bass is amplified via one or more resonator channels (also called bass reflex channels). In a closed box, a part of the bass is always "lost" through the back wall because the air pressure can not only be released to the front. With this principle, the pressure can be used in addition.
In the bass reflex cabinet, the sound is first reversed to subsequently escape from the resonator channel. He is still strengthening. The reason for this is a simple physical principle that you might know from an empty glass bottle: the soft rushing sound of a surprisingly loud and clear sound.

Bass reflex speakers provide a much more immersive bass experience than a closed subwoofer. However, the construction requires a high degree of computational skills and technical understanding, because all components must be exactly matched to each other, for example, the length and the diameter of the channel. For proper tuning of the components, it is advisable to use a computer software, so you get a good balanced sound.
| advantages | disadvantage |
|
|
Bandpass enclosure
An even crisper bass experience allows for a bandpass enclosure. In this variant, you will not see the chassis from the outside because it is inside the case. The sound thus penetrates only via resonator channels to the outside. The band-pass enclosure contains a simple closed subwoofer, with another housing connected to its (chassis) front, which contains only one resonator channel. The extraordinary design succeeds in reducing unwanted rumbling, which can occur in other types of speakers. Although this principle has advantages, it is only worthwhile if the desired frequency range is very narrow. Outside the area, there are unfortunately ugly distortions that spoil the listening pleasure.

Frontfire and Downfire
In addition, the direction of the sound output of a subwoofer is crucial. You have the choice between Frontfire and Downfire subwoofers. The Frontfire transmits the sound pressure to the room air. In a downfire model, the chassis is recessed into the bottom of the case where it emits sound towards the floor. As a result, the building substance absorbs the sound pressure, where it also spreads circular. The advantage is that the bass is additionally made noticeable in this way. Watching movies makes you hear the rumble and quiver instead of just hearing it.

Tip: In old buildings with wooden floors you do not have much of the bass of a downfire subwoofer, but your neighbors. In that case, you better choose a frontfire.
The chassis
The bass of your subwoofer is not only deciding the design of the case, but also the chassis with the diaphragm. The chassis is funnel-shaped and immobile, while the membrane has the same shape, but can move back and forth. This movement is called stroke or simply deflection. The stroke generates the sound waves, which then propagate in space. The hub may vary in length depending on the chassis. The deeper the bass should be, the more stroke the subwoofer must have. Also, the diameter of the chassis is a relevant factor for this. Chassis and hub so decide which frequencies can occur and the volume depends directly on it. 
A subwoofer chassis should have a diameter of 12 to 18 inches. A high-quality model in addition to large diameter and stroke also brings high lifting speeds. Because the faster the stroke, the more distortion-free the bass sounds.
Tip: Keep in mind that a chassis with a fast hub is correspondingly expensive. As a beginner you should better choose a used or a simple chassis, so that you can gain initial experience.
How to build a subwoofer enclosure
Our model is an active version, the case is closed and it is a frontfire. Without the electronics, you can expect a small box with costs of around 50 euros. Cheap subwoofers including electronics can be built even from 150 euros. But just like the branded goods, the prices are open at the top. Including drying times you can finish this case on a weekend.
You need the following material:
- MDF panels for the housing
- Quick-setting wood glue
- insulating wool
- MDF Primer
- Finished paint and clearcoat
- Spikes, tennis balls or other feet
- a power amp and a chassis
You also need these tools and tools:
- tension belts
- House Moulder
- drilling machine
- jigsaw
- soldering iron
- abrasive paper
- spatula
- towels
Step 1: Prepare MDF boards
To build the housing, use 19 to 22 mm thick MDF boards. They bring the necessary weight, do not swing too much with the bass and are relatively cheap for these properties. At the hardware store, you can usually have your panels cut to size for free. Speaking of cutting: In order to make your bassbox look appealing afterwards, you should bevel the edges of the front to 45 °. All other edges can remain without such angles. The back later carries the final stage, here a suitable opening should be cut out. 
Step 2: Prepare chassis installation
This is followed by the processing of the front side with the angled sides. You need a circular mill. Securely secure the wood by firmly clamping it. Draw the outer diameter of the chassis onto the wood with a pencil so that it sits exactly in the middle of the front. Then cut the milling path into the wood. It has to be so deep that the chassis fits in perfectly. Using a jig saw, you can now cut an opening in the wood after setting a hole. The exact dimensions for the opening can be found on your selected chassis.
Step 3: Integrate struts
It is also worth installing struts to keep the case vibrating as little as possible during use. Take two narrow MDF boards and cut them so that they extend from one side to the other in the housing. Brace the top with the bottom and the two side walls together. Leave enough space for the back of the chassis!
Tip: If you do not like the bracing, you can also line the inside with bitumen mats. They have a similar effect on the vibration stability of the box.
Step 4: Glue the housing
In the next step, everything is glued together. Dispense with screws. Their effect is small, and you do not have to deal with the resulting bumps. Choose a strong wood glue that sets in 15 to 20 minutes. Start with the gluing on the back, which you will gradually attach to all sides. Be generous with the wood glue. You are welcome to seal the inside edges with a thick layer of glue so that no sound escapes. Make sure that all corners are tight, as this will have a positive effect on the sound quality of your subwoofer. Then glue the braces. Only at the end follows the front. Before you let the glue set, apply tension straps for pressing and remove all glue overhangs on the outside.

Step 5: Embellish the case
After the setting time has passed, you can visually beautify the case from the outside:
- Sand off protrusions and bumps
- Seal any holes and edges with MDF primer
- paint with a finished paint, for example in black
- Perfecting with clear coat, in one to three layers
Tip: Choose a matte clear if you want to use the subwoofer for home theater. A shiny paint can lead to disturbing reflections.
In addition, attach the spikes tip-down to the bottom of the subwoofer. They make sure that the bass is not distributed in the house like a downfire subwoofer. As a cheaper option, you can also halve tennis balls and attach to the bottom. This has the same effect. 
Step 6: Installing the electronics
Now it goes on with the installation of the amplifier, for which you have provided in the back wall with an opening. Power amps are usually attached to the wood with small screws, so most likely you just need to screw them on. Before you also install the chassis, fill the empty space of the box with insulating wool. The wool will make your bass sound cleaner. However, you should leave the direct environment of the back of the chassis untouched, so make sure you have sufficient clearance. Lastly, all you have to do is solder the chassis to the power amp and screw it to the case.