Crochet letters - Free crochet ABC instructions

- Material and preparation
- foreknowledge
- Crochet the letters
- I, J, T
- A, V
- H
- P, B, R
- C, G
- D, S
- O, Q, U
- L, E, F
- M, W
- N, Z
- K, X, Y
With labels, objects can be very creative individualize. In children, it is often convenient to note the name so that in school or kindergarten no confusion happen. Crocheted letters are particularly suitable for labeling textiles because they are easy to read and wash.
This guide is about making flat letters. This means that the alphabet presented here is very suitable for sewing. Maybe you have a nice headband or a knitted sweater "> Material and preparation
Material:
- Wool (leftovers)
- matching crochet hook
- scissors
The material for the letters should be based entirely on the intended use of the letters. Since only a very small amount of wool is needed for a single letter, the alphabet is also great for consuming wool remnants. For orientation: Use a cotton yarn for the needle size 3 - 4, the letters are about 7 cm high.

Note: The thicker the wool you use, the larger and wider the letters become.
foreknowledge
- stitches
- rod
- chain stitches
- half sticks
- strong stitches
In addition to previous knowledge, crochet techniques are explained here, which often repeat themselves over the different letters:
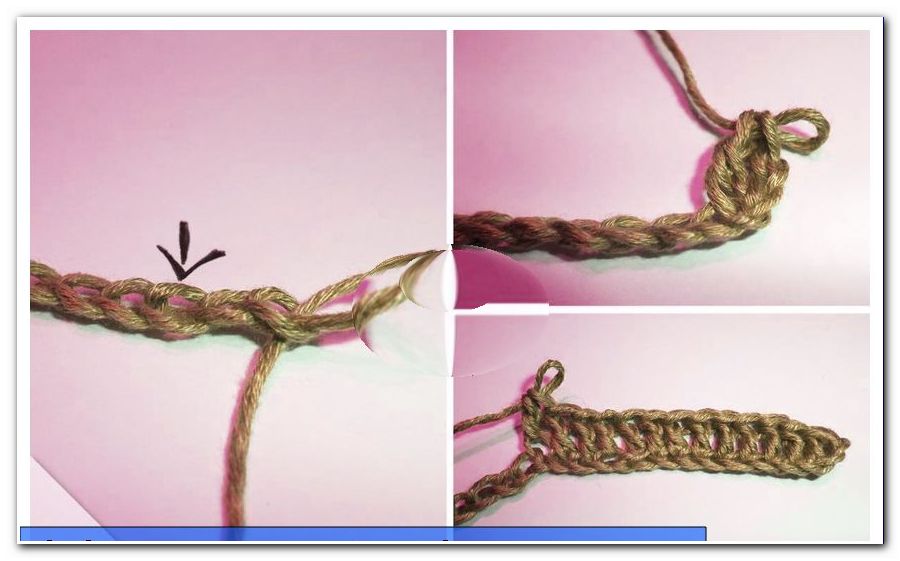
1. Make a straight line
Each letter (except O) starts with a straight line of chopsticks. For this you first make an air chain in the specified length. Then crochet the first stick in the third last stitch. When counting to the third last stitch, the loop on the crochet hook is not considered a stitch! For a straight line a crochet is now crocheted into each additional air mesh.
2nd curve to the left:
For a turn to the left you have to work several rods in a single air mesh. The more rods you put in a loop, the steeper the curve becomes.

3rd curve to the right:
If you want to make a curve to the right, you have to crochet several air stitches into a single stick. Hold the half of the stick if you have 2 stitches on the needle. Then continue with the rollover and get the thread through the next stitch. Again crochet only 2 stitches together and continue with the next stitch until the indicated number is reached. For example, if you need to crochet 5 stitches together, you should end up with 6 loops on the needle. These are all crocheted together in the last step.

4. Connect edges:
For some letters it is necessary to connect two straight lines at right angles. For this you have to work a total of 3 chain stitches.

The first comes in the specified mesh. The second warp stitch is worked through the middle of the stick and the next stitch on the straight. Crochet the last chain stitch into the lower corner of the stick and the 3rd stitch on the line.

This last step is often obsolete, as you have already started with your chain of links on the straight.

5. Rewrite on an edge:
If you want to start a letter on a long edge, pierce through the specified stitch from top to bottom. Get the thread through and work a chain stitch. Now the thread is tight and you can continue.
In this tutorial, you will not find the letters sorted alphabetically, but in groups with a similar look and crocheting style. Sometimes the manual may seem a bit ambiguous. It usually helps to put the already crocheted on the table in front of you and to imagine what the finished letter should look like.
Tip: To smooth the letters, wet them and place them on a pillow or towel to dry.
Crochet the letters
I, J, T

I
For the I you need a chain with 15 air meshes. In the back row work 13 sticks.
J
Make a 14 mesh loop of mesh. Crochet 2 sticks in each of the first 4 air stitches. In the following 8 stitches comes one stick each.
T
You start with a 14-mesh air chain. In this you work 12 sticks. Proceed directly with 8 meshes, into which 6 sticks come. Now use the 12th chopsticks from the first straight as the base for the next 3 chopsticks. Work 2 sticks in the middle of the transverse stick as evenly as possible. The third chopstick gets its base on the far left in the corner. This is followed by another chain with 8 air stitches and 6 sticks in the back row. Secure the edge of the last stick with a chain stitch so that a "T" is visible.

A, V

A
You start with a chain of 39. Crochet 15 single sticks, then 6 sticks into an airlock and 16 other single sticks. Now put on the left thigh inside in the 7th stitch from below again. Make 4 meshes and attach them with a chain stitch in the 8th stitch from the bottom of the right side of the thigh. Work one stitch at a time into the two overlying stitches. Now go back to the left thigh with 4 sticks and fasten everything with a chain stitch.
V
For the "V" follow exactly the instructions for the "A", only omit the cross connection.
H
For this you make 2x the "I". Repeat in the 5th stitch from the bottom and crochet 5 air stitches. Fasten the chain stitch in the 5th stitch from the bottom of the second I. Crochet 2 warp stitches up along the edge. From the 7th stitch starting from the bottom, make 5 sticks in the air mesh. Secure the top edge of the left leg with a chain stitch.
P, B, R

P
Start with 37 air meshes. In these come 12 sticks. Crochet the following 5 stitches into a stick. This is followed by 3 simple sticks. Then work together 6x 2 stitches into a stick. After 3 more simple sticks, attach the end from the 4th stitch below the corner downwards.
B
Make a "P". Turn it with the belly to the bottom left. Now crochet a tight stitch in the bottom of the last crocheted stick. This is followed by half a stick and a whole stick in the next two stitches. Make 9 airmesh. Secure the chain with a chain stitch in the 3rd stitch from the bottom of the starting straight. Work a warp stitch in the 2nd and the bottom stitch. From there it goes back with 3 sticks and then 6x two sticks per stitch. Attach the end to the top bow with a slit stitch.
R
Crochet a "P". Turn the "P" with the belly to the bottom left. Work a tight stitch in the last crocheted chopsticks. In the next stitch comes half and in the next a whole stick. This is followed by 8 air stitches, in which you crochet 6 sticks back. Fix the end with a chain stitch.
C, G

C
Crochet 1 and 2 sticks alternately in a 26 mesh loop at the beginning. After another 8 simple chopsticks another 4x change of 1 and 2 sticks takes place.
G
Crochet a "C" into a 29-mesh chain. There are 3 stitches left. In the first you work 6 sticks, in the next two each a single one.
D, S

D
Start with 44 air meshes. Then crochet 12 sticks. In the following, 5 stitches are crocheted into a stick. Now comes 2x in succession: 3 simple sticks and 4x 2 stitches, which are combined to form a stick. Finish the "D" with 3 sticks. The end is attached with 3 Kettmaschen in the first 3 sticks.
S
First crochet a 34 mesh loop of air. In this 5x 1 and 2 sticks come in alternation. This is followed by 2 normal chopsticks. Then 10x 2 stitches are combined into a stick.
O, Q, U

O
Join 32 meshes with a slit stitch into a ring. Make 3 air meshes to represent the first chopstick. In the next air mesh on the ring come two sticks. This is followed by 9 simple sticks. Then take 1 and 2 sticks alternately 4 times. After 8 more simple chopsticks, 3x two sticks, each with a single stick in between. Close the outside of the round with a slit stitch in the first chopsticks.
Q
Make an "O". There, where you close the circle, begins a chain with 5 air meshes. Crochet 3 sticks back and fix the extension with a chain stitch.

U
In the 30 mesh loop, work 10 sticks. This is followed by 4x alternately 2 and 1 sticks in a stitch. Finish the "U" with 10 simple sticks.

L, E, F

L
Start with 23 airmeshes. Work in these 6 sticks. Gather the next 5 stitches into a stick. This is followed by another 10 sticks.
e
For the "E" you start, as with the "L", but only with 20 air meshes. So you can crochet only 7 sticks last. Then it goes on with 8 air mesh, come in the 6 sticks. Another 3 sticks work with the top of the 7 sticks as base (see "T"). In the 3rd stitch from the bottom, put on 6 stitches again. 4 sticks are crocheted into these and fixed with a chain stitch in the 3rd stitch from above.
F
The "F" is in principle an "E" without the lower bar. Start with a chain of 12 stitches. After 10 sticks follow the instructions for "E" starting at the 8 air stitches.
M, W

These two letters are crocheted exactly the same. Only the result is rotated once by 180 °. It starts with 49 air meshes. After 13 sticks, crochet 6 loops together in a stick. This is followed by 4 simple sticks and 6 sticks in a loop. Work 4 sticks in the following stitches and then gather 6 stitches into a single stick. After another 13 sticks the letter is ready.
N, Z

N
These two letters are almost identical. The "N" starts with 49 air meshes. After 13 sticks crochet 6 stitches together. Now work 14 sticks and then 6 sticks in a stitch. Last come 13 sticks.
Z
For the Z, hit 43 stitches. The procedure is identical to the "N". However, at the beginning and at the end, 10 instead of 13 are sufficient.
K, X, Y

K
Make an "I". On the right side, put in the 5th stitch from the bottom with a new slit stitch. In the stitch above make a sturdy stitch, about half a turn and a stitch higher a whole stick. This is followed by 7 stitches in which you crochet 5 sticks. Fix the end with a chain stitch. Re-attach a second time with a slit stitch in the tight loop. In the following 10-mesh chain, work 8 sticks. Fix the end with a chain stitch 2 stitches to the right of the beginning of the chain stitch.
X
Start with 18 airmeshes. Crochet 16 sticks. Resteat from the bottom on the right side in the 7th stitch with 9 air stitches. Back you work 7 chopsticks that are attached with a chain stitch at the exit edge. Make another warp stitch in the middle of the adjacent stick and another in the opposite edge. There it continues with 9 air mesh, come in the 7 sticks. Again, fix the end with a chain stitch.
Y
In a 19-mesh chain, work 6 single sticks. Then make 5 stitches into a stick and make 6 more sticks. Reseat the 5 crocheted stitches in the 2nd stitch from the left. This is followed by a chain of 10 mesh and 8 sticks in the back row. Attach the end with a chain stitch in the 2nd stitch to the right of the beginning of the chain stitch.