Crochet cute turtle - guide for beginners

- Preparation and material
- Turtle - crochet pattern for beginners
- tank
- legs
- head
- Sew together the tanks
- Sew on legs and head
- Crochet pattern for a mesh ring
Artful, enchanting and simply sweet - this is how a new crochet wave develops that not only appeals to lovers of crochet hooks. Anyone who sees these small and large works of art, which are always individually and sometimes even idiosyncratically crocheted, has the desire to become an artist of such crocodiles as well. We will show you step by step how beginners can crochet an amigurumi turtle.
Crocodile - a new hobby
Amigurumi is the name of the new crochet trend. He comes from Japan and prepares the big as well as the little ones. There are many ways to use these crocodiles. Be it as a decoration that begins with an animal, for example, and ends in a collection of all crochet models. Or you can give away the self-crocheted Amigurumi animal as a keychain or as a deco for the car of your friend, process it into a small brooch, make a very personal pacifier chain or pram chain for the baby or simply put the crochet as a gift on a gift package, There are endless possibilities to give yourself and loved ones a pleasure.
Preparation and material
... for a turtle
Special crochet skills are not necessary for crocheted animals. If you are a novice crochet knit mesh, Knittmaschen and fixed stitches, the rest is only counting work of the stitches and the rounds.
You can always choose the size of the turtle yourself. Our example can be scaled down and enlarged as you would like. It will simply crochet less stitches and fewer turns. But if you want to work a bigger turtle, simply increase the basic pattern of the tank and crochet more laps. The principle of this crochet pattern is always the same, so you can not go wrong.

For the material we decided to use a mercerised and gassed cotton yarn. This yarn not only has a fine shine, it is also very easy to work with and gives a very nice stitch pattern. The yarn size is suitable for a crochet hook number 3 to 3.5. If you want to crochet a very small animal, then you should also use a correspondingly fine yarn with a thin crochet hook.
Of course you can also crochet such a turtle as a giant turtle for the nursery. You can either use a thick wool as a yarn and for particularly large animals, a textile yarn, which is also known under the name Zpagetti yarn.
image
You need this for a crocheted animal:
- Colorful cotton yarn
- Crochet hook suitable for yarn thickness
- darning needle
- Filling wool or filling wadding
Tip: An Amigurumi crochet animal has a fixed mesh character. That is, do not use too thick needles when crocheting, otherwise the animal will be too loose and too bulky and has no firm hold. This crochet technique may be a little bit tighter so it does not collapse so easily.
Beginners should first crochet a test round
If you are crocheting an animal for the first time according to a crochet pattern, you may want to use a discarded crochet thread and start a test turtle. It is easier for beginners to crochet, try out and lose their nerve to start the next attempt. Once you have learned the technique, you can really get started with the original yarn.
Tip: Before starting work, cut a few stitch markers. Use a different colored yarn, the length of the marker is eight centimeters.
Turtle - crochet pattern for beginners
tank
We start with the tank. This is worked from the center. In the first rounds, a circular area is created, which is always enlarged.
For this you crochet a mesh ring, it is called also thread ring or magic ring. For those who do not know this mesh, we will describe it in more detail at the end of the article.
If this thread ring is too complicated for you, then crochet a slightly larger air mesh as the first stitch. Then insert the following stitches into this air mesh. You only have to make sure that you crochet the middle and an outer thread, and not just use an outer thread of the air mesh as a mesh ring.
ring of chains
Crochet 7 stitches in this loop.
Close the circle with a slit stitch in the first tight stitch. So only 6 fixed stitches remain, on which the further rounds build up.
Crochet 1 air mesh as the start of the new round.
Now crochet two stich stitches into each stitch, so that you have 12 stitches in a circle. Also finish this circle with a chain stitch.

Before you start the next round, place a stitch marker between the warp stitch and the next set stitch.
With this stitch marker, you now always know when the round is over and a new round begins. This stitch marker moves from round to round.

Now work the next rounds according to the following crochet pattern:
In the first stitch, crochet 2 stitches, in the next stitch only 1 stitch, then again 2 stitches in the stitch of the preliminary round, and then 1 stitch again. (II corresponds to 2 stitches and each dash represents a single stitch)
II - II - II - II - II - II - You now have 18 meshes in a circle.
They start with a double-stitched stitch each round and end with a normal plain stitch.

No crochet stitches will be crocheted at the end of the round. You only move the stitch marker.
Also use the stitch markers to always put them between the rapports within one lap. For example: You start with a stitch marker red. Then crochet 2 stitches into a stitch, then a crochet stitch. Before crocheting the next double stitch, put a stitch marker again. So then sit at the end of a round six stitch markers.

Tip: If you are unsure when the next round begins, simply select a different color for the first stitch marker. Nothing can go wrong. Because only by counting it can quickly come to an error.
Next round:
Two strong stitches in a stitch, then two normal stitches. The round ends again with a normal right stitch.
II - - II - - II - - II - - II - - II - - ... ..
Take the stitch marker and start with a double stitch again. This time, crochet 3 normal stitches between the double stitches.
II - - - II - - - II - - - II - - - II - - - II - - - ......
Again take the stitch marker to the next row.
In this round, crochet 4 normal stiches between the double stitches.
II - - - - II - - - - II - - - - II - - - - II - - - - II .......
To crochet the following rounds:
II - - - - - II - - - - - II - - - - - II - - - - - II - - - - - ........ (5 fixed stitches)
II - - - - - - II - - - - - - II - - - - - - II - - - - - - II - - - - - - ......... (6 fixed stitches)
II - - - - - - - II - - - - - - - II - - - - - - - II - - - - - - - - ......... (7 fixed stitches)
II - - - - - - - - II - - - - - - - - II - - - - - - - - II - - - - - - - - ... .... (8 fixed stitches)
Tip: If you want to crochet a larger turtle, just simply extend the middle stitches around a tight stitch. So, according to our model, the next round would be: II - - - - - - - - - II - - - - - - - - - II ... .. (9 fixed stitches).
They have now crocheted a round surface, which develops into the tank with the following rounds.
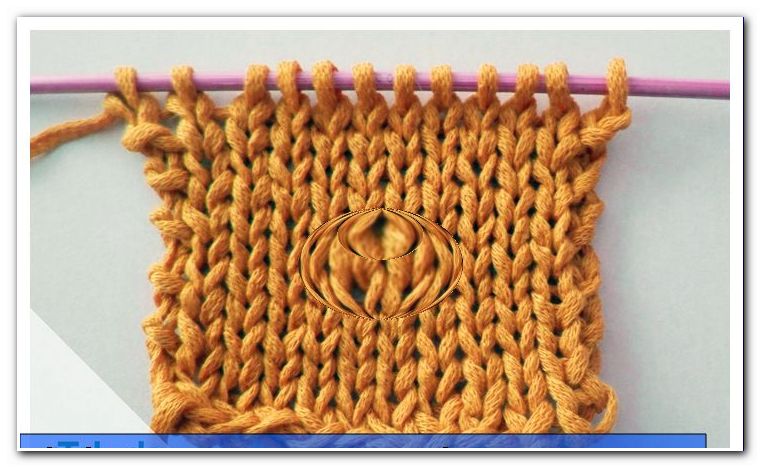
The next three rounds are crocheted only with fixed stitches, without stitches. These three rounds give the tank the certain tank height.

Tip: If you want to crochet a high tank, you simply have to crochet 1 to 2 turns of sturdy stitches.
Now we crochet a reinforced armor.
To do this, prick into the lower middle stitch and off again at the next stitch hole and crochet a tight stitch as normal. Thus, the stitch turns outward and results in a solid and beautiful tank edge.

The next stitch is inserted in the hole from which the previous stitch was crocheted. If you were to stab in the next and the next stitch, there would be unwanted weakening.

In the following round, do not stab in the back part of the fixed stitches, as you can see in the picture. So the turtle gets a solid armor finish.
At the end of the round, cut the thread down to 20 centimeters and simply pull through the stitch.

Tank bottom
The tank bottom is crocheted just like the tank itself. You crochet as many rounds with the same increments as you crocheted for the tank. For example, if you crocheted your last round with 9 stitches between the double stitches, you must also finish the bottom piece with this stitch count.

legs
Also for the legs you start again with a mesh ring, in which 7 fixed loops are crocheted.
With a chain stitch in the first tight stitch, close the circle.
On the next round, crochet 3 times double stitches to make 10 stitches in a circle.
II - II - II - -
Crochet 8 rows of these 10 stitches.
After the last row cut thread again and pull through the stitch

head
The head is also worked on the same principle as the tank and the legs.
Crochet 6 stitches in a loop.
Close the ring with a chain stitch.
Crochet two crochet stitches into each single crochet of the preliminary round so that you have 12 stitches in the round.
Increase the next round so that the round ends with 18 stitches.
II - II - II - II - II - II -
Then crochet 10 rounds only with sturdy stitches.

Sew together the tanks
The tank is now sewn together with the lower part of the tank. At the same time you take an aerial mesh from the tank and an aerial mesh from the bottom of the tank.
Tip: Use a pin to put the top and bottom together at four points. This will make the suture even and you will recognize immediately if you have sewn too tightly or too loosely.
Before sewing the last third together, fill the tank well with the filling cotton or filling wool. The tank should then sit properly tight.
Now sew the remaining stitches together.
Sew on legs and head
Do the same with your legs and head. Stuff all parts vigorously with filling wool, sew and sew to the body.
The little tail
For the little tail, crochet again into a loop of 3 stitches.
Close the small ring with a chain stitch.
Now crochet 3 rows of strong stitches and crochet two stitches together in the last round. That's how the little pointed tail is made.
Now comes the big moment when you sew all the legs and the head of the crochet on the tank.

We crocheted our turtle another hat. Also this hat is crocheted and sewn according to the technique of a circle so far learned.
Whether you give the turtle another face is up to you.
You can also crochet a flower on the tank or put a scarf on the crocheted animal. You are sure to find even more delightful little things to give the turtle a special look.

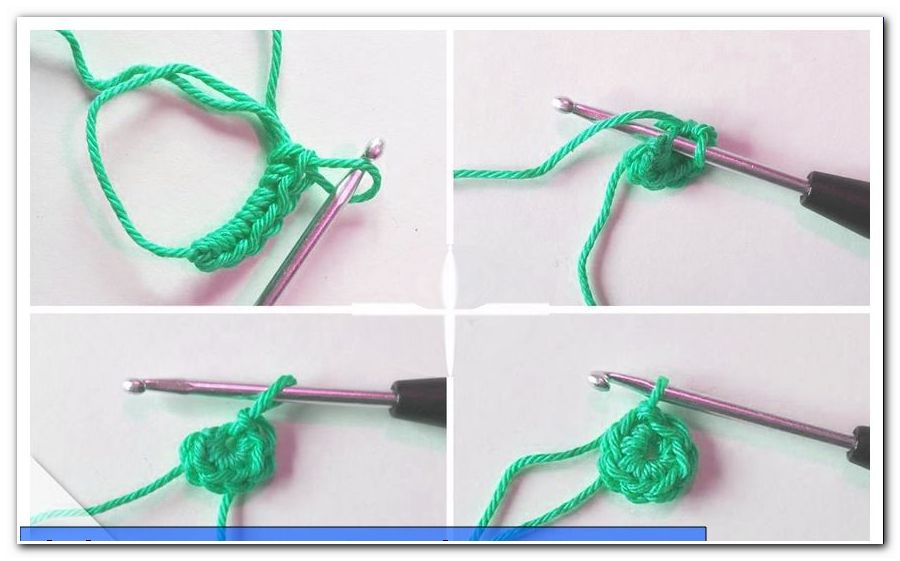
Crochet pattern for a mesh ring
Pass the beginning of the thread over the index finger of the left hand to the thumb, and wrap it around the thumb twice. Now get the thread from the index finger with the crochet hook under the thumb thread. It creates a noose. In this noose you make an air mesh. Above the thumb are now two threads. These two threads are the basis for the tight stitches that you will crochet into this ring.
1 of 4


When you've crocheted all the stitches, pull the loop around the short thread into a circle. The fixed stitches are combined with a chain stitch into a whole circle. Now begins the first series of increase.
If this thread ring is too complicated for you, try the following mesh ring:
Crochet a mesh of air that will not contract but stay a little larger. You can now crochet the tight stitches you need for a circle into these meshes. Also close this circle with a chain stitch.