Sewing Birthday Crown - Pattern & Pattern for Fabric Crown

- Preparation and material
- Sew birthday crown
Today I would like to show you how you can sew a great birthday crown with some small fabric scraps. Perfect for the birthday party of your little sweetheart or as a souvenir for the classmates: The birthday crown is easy to sew and a real eye-catcher!
The crown can then be decorated with all sorts of decorations. Small bows, hearts or simply the number of years of the birthday child make excellent on the front and give the crown even more "Pep".
The pattern is designed for a very small child with about 38 cm head circumference . Take a look at our sizing chart, expand the template and sew the birthday crown in the right size for your little sweetheart!
Preparation and material
You need this for a birthday crown:
- two different cotton fabrics
- batting
- a little piece of Velcro
- Ribbons or other accessories
- scissors
- pen
- our pattern

Difficulty level 1/5
Also suitable for beginners
Cost of materials 1/5
Fabric remnants and a little Velcro
Time expenditure 2/5
about 1 h
Step 1: First print out our enclosed pattern on A4 paper. In the print settings, a print size of 100% must always be set, otherwise the pattern may be too small.
Sewing pattern - birthday crown
ATTENTION: The seam allowance is already included in the pattern!
Step 2: Now glue the two sheets together with Tesafilm. Depending on the size, the pattern must now be enlarged! The crown is originally intended for a head circumference of 38 cm. Based on our size chart, you can now determine the required extension:
| Older | head circumference | extension |
| Babies up to 2 months | about 37-38 cm | 0 cm |
| 1 - 3 months | about 39 cm | 2 cm |
| 3 - 6 months | about 40 - 41 cm | 3-4 cm |
| 6 - 8 months | about 41 - 43 cm | 4-6 cm |
| 8 - 10 months | about 43 - 45 cm | 6-8 cm |
| 10 - 12 months | about 45 - 48 cm | 8-11 cm |
| 12 - 18 months | about 48 - 50 cm | 11 - 13 cm |
| 18 months | about 50 - 51 cm | 13 - 14 cm |
| 2 years - 3 years | about 51 - 53 cm | 14 - 16 cm |
| 3 years - 6 years | about 53 - 56 cm | 16-19 cm |
| 6 years - 8 years | about 56 cm | 19 cm |
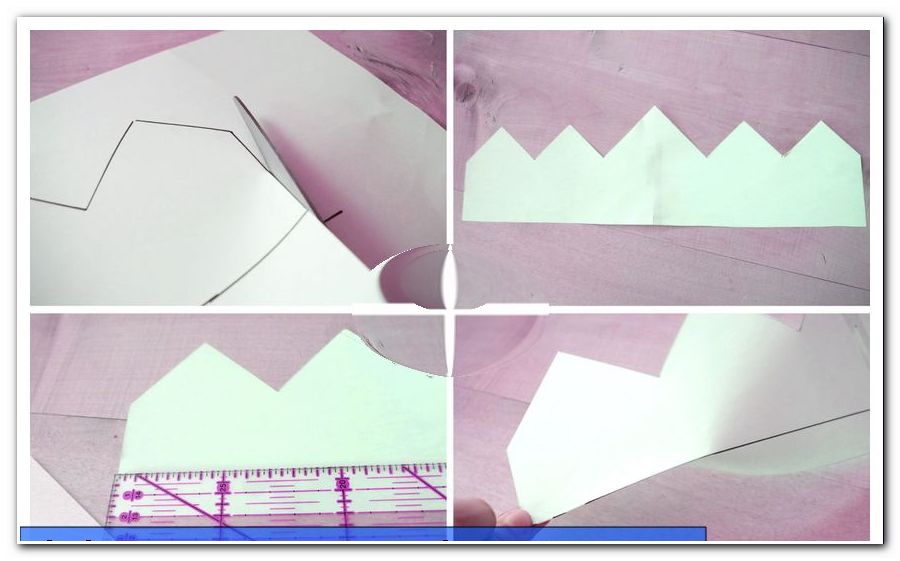
Step 3: For the extension, divide the length to be added by two and add to the right and left of the crown. The peaks just continue along the lines.
Example: For a two-year-old, add 7 cm of length on both sides (14 cm: 2).
Now the pattern can be cut out.
4th step: I would like to make the front of our birthday crown in two different fabrics, so that the lower part has a different color. To do this, I draw a line on the pattern approximately 2 cm above the lower side.
Step 5: At the line just drawn, I now fold the pattern backwards and place it on the fabric that I want to process at the top of the front. Now draw along the pattern on the fabric and add at the bottom about 0.5 cm, so that the front does not get too small by the additional seam.
Step 6: Now draw the 2 cm wide strip onto the second fabric, which is processed at the bottom at the front. Again, add 0.5 cm for the seam allowance!

Step 7: After the pattern has been unfolded, draw it once again on the fabric for the back and on the volume fleece.

Step 8: Now cut out all fabric or nonwoven parts with the cloth scissors or the rotary cutter.
9th step: The volume fleece must still be trimmed a little: For this purpose cut off the fleece about 1 cm along the edges again, so that it is not in the way later when sewing. Then the fleece can be ironed on the left side (!) Of the back of the crown.

The birthday crown we sew now on the sewing machine to an end!
Sew birthday crown
Step 1: First, we sew the two fabrics together on the front. Place both pieces of fabric together at the edge right to the right and put the fabrics together with pins or Wonderclips. Now sew the line with the straight stitch of the sewing machine.

Step 2: To attach a nice ribbon on the front side, place it over the just closed seam and stitch over it once with the straight stitch. The ribbon can be cut off at the edge of the crown.
Step 3: In order for the crown to be closed at the back of the head, the Velcro fasteners must be attached at this point. The first part is stuck on the fabric of the front left, the second part on the back RIGHT.

Tip: Sometimes it helps to hold the half finished crown to the head to correctly determine the position of the hook and loop fasteners.
Step 4: Now use the straight stitch to stitch the hook and loop fasteners to the fabrics.
5th step: Now the front and back can already be sewn together. Lay the crown on right to right and pin all edges. With the straight stitch, you sew now once around the crown, leaving an approximately 8 cm large opening at the back.

Step 6: Afterwards, the birthday crown can be turned to the right. Pull the fabric through the turning opening and try to pull the corners out as far as possible.
Tip: Sometimes it helps to help with a knitting needle or a stick in the corners.

Step 7: So that the fabric crown has a nice flat edge, we now quilt around the crown again with a short edge. To close the reversal opening, push both sides of the fabric in with your fingers and stitch with the straight stitch over them.

Of course, the birthday crown can be further spiced up: For example, a number can be cut from the fabric on the back and sewn on the front (under the big spikes) or glued with textile glue.

I wish you a lot of fun sewing the fabric crown!