Paper Ceiling - Wallpaper Selection, Cost & DIY Guide

- need
- Wallpaper selection & costs
- 1. Woodchip
- 2. Non-woven wallpaper
- 3. Liquid woodchip
- Paper DIY instructions to the ceiling
- preparation
- Tool and material
- Cut tracks
- To mark
- Paste
- Attach wallpaper
- Remove supernatants
- To brush
The right wallpaper selection for the ceiling can make papering much easier, but unfortunately also increases the costs not insignificant. The alternative is to invest in the hire of a capable worker helper, which also makes wallpapering the walls considerably easier, and painting the ceiling also (anyway the more convenient alternative).
Papering a blanket sounds uncomfortable and unpleasant, but there are some tricks that can make your job much easier, from skilful wallpaper choices to the use of effective work aids. If "Papering the ceiling" still sounds unpleasant using all the tricks, you might want to do without:
need
Do you really have to paper the ceiling ">
By the way: If wallpaper is supposed to be on the ceiling only because you do not want to see the misery any more: the blanket has to be prepared before wallpapering in the same way as it has to be prepared if it is to be painted. Sometimes painting is also the better and faster option.
More convenient alternatives
If - to match the walls - a coarse structure is desired on the ceiling, which still does not necessarily have to be made by "wallpapering overhead", you can also brush or liquid Raufaser take.
Coating plaster is finer, liquid woodchip brings out really eye-catching structure in many variations, and overhead work on the ceiling is of course also due here, but at least only with a roll or trowel and not with long unwieldy wallpapers.
The advantage of the "liquid wallpaper" should also be that there are no shocks from train to train, which are supposed to be visible on the ceiling at some point, because dirt and dust accumulate there. If, after a while, enough dust particles settle and the wallpaper joints have become visible again, the entire room with walls and ceilings must be renovated. Antistatic liquid wallpaper will extend this renovation cycle to three times the time. With a liquid wallpaper you will also have extensive decor variants available, you can do it with quite a bit of work really "colorful".
Wallpaper selection & costs
If it should be wallpaper on the ceiling, you can also make the work easier by choosing the wallpaper, unfortunately "at the expense":
1. Woodchip
Conventional classic woodchip wallpaper is available for 52 cents square meters, z. B. in webs of 25 mx 0.53 cm. For the ceiling of a room of 5 x 5 m you need 10 sheets á 5 m, so 2 rolls for under 15, - € + 1 package normal wallpaper paste for less than 5, - €. Pure from the material you are here with less than 20, - € here.
Of course you will have to buy some tools and odds and ends, but since this is not possible anyway, because many things are being lent when renovating, these costs have simply been ruthlessly suppressed in favor of the clarity of the comparison, excuse me.
The advantages of conventional woodchip lie just in their restraint:
- Simple, classic, never wrong
- Must be accepted in good condition by each Nachmieter
- Adapts to each institution
- Inexpensive, ecological, made of paper
The disadvantage is especially on the ceiling overhead work when mounting, also conventional woodchip is usually not pure white and is usually painted over white.
However, if you paint the walls later in color, you can leave the (usually slightly grayish) woodchip as it is.
2. Non-woven wallpaper
The ordinary non-woven wallpaper costs € 1.78 per square meter, z. B. in webs of 10 mx 0.53 cm. For the ceiling of a room of 5 x 5 m you need 10 sheets of 5 m each, so 5 rolls for 47, 25 € + 2 packages of non-woven wallpaper paste for 10, - €. Pure from the material you are here with around 60, - € here.
The non-woven wallpaper has huge advantages:
- Non-woven wallpaper can be brought from the roll to the ceiling
- makes overhead work easier
- Non-woven wallpaper is not pure white, but does not necessarily have to be painted over
The disadvantages:
- the manufacturer's information usually does not reveal which ingredients exactly made the non-woven wallpaper
- Workmanship is exhausting because the wallpaper is stuck vertically and on impact
- The webs must be pressed bubble-free with a rubber roller or a wallpapering spatula
- Minimal Tapetennah seam changes or seam openings occur more often
3. Liquid woodchip
A relatively new trend is liquid wallpaper, for this seemingly very comfortable trend (which completely frees from the unpleasant balancing with wallpaper strips overhead), many people are basically willing to pay a little more. However, it can be a lot more and with the "comfortable" it is such a thing.

The liquid wallpapers are given some advantages.
- You do not have to attach overhead wallpaper sheets to the ceiling
- Liquid wallpaper can be repaired later (but also applies to conventional woodchip wallpaper)
- antistatic (dust does not hang so easily, also applies to conventional woodchip)
- sound-absorbing and heat-insulating
- hardly inflammable
Disadvantage:
- long drying time (2 to 4 days)
- can come to drips during processing
These were the basic variants of the three options paper, fleece, liquid wallpaper, you can spend in each of these variants, of course, a lot more money for your wallpaper. If you occasionally need to go to a big city, but maybe a lot less, with normal woodchip, you'll likely get any room size for little money by small ad.
However, one thing must not be concealed: non-woven wallpapers are offered in really wild designs, you can bring real mood in your living room to the ceiling.
Paper DIY instructions to the ceiling
preparation
The old wallpaper must be off and the surface must be smooth and dry, clean, load-bearing and absorbent.
Tool and material
- Wallpaper scraper
- Wallpapering base
- Papering table for cutting
- pencil
- ruler
- Cutter knife
- wallpaper
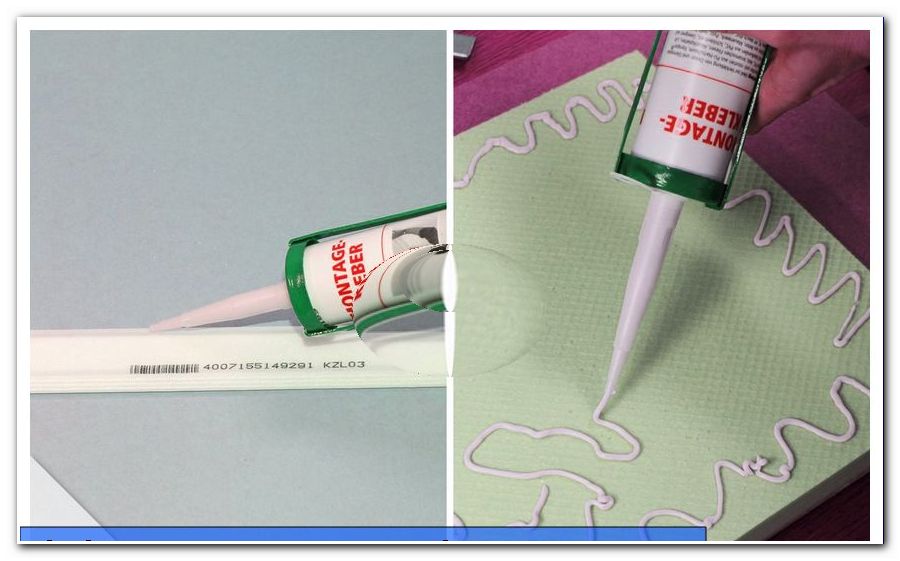
- wallpaper paste
- bucket
- stir stick
- Wallpapering brush, roller
- Quast
- Paste roll with a sufficiently long style
- Ladder or 2 ladders with buldings or scaffolding
- Chalk line
- seam roller
The best way to do this is to put the tool in a nice, big toolbox. B. cardboard, which can be disposed of after wallpapering.
Cut tracks
The ceiling is papered longitudinally to the incident light, ie the paths run with the light (you would paper across the incidence of light, you would see every seam later).
The entire sheets for the ceiling can be precut and stored in an empty room, if one is available. If not, you will have to cut track by rail, in case of doubt, the better solution in an environment full of all kinds of renovation materials. The webs are cut plus 5 cm supernatant.
To mark
Do not assume that the walls are exactly perpendicular to each other. Better take the chalk line, stretch it along the ceiling for two and draw an orientation line for the first lane about 50 cm to the wall (about 1 cm narrower than the wallpaper) on the ceiling. Thus, the first lane can be aligned absolutely straight, the next follow the default.
Paste
Now you can touch and pull the wallpaper paste and then pre-glue the blanket. This increases on the one hand the initial liability, on the other hand, the tracks can be better corrected in an emergency.
Then you can paste the first web (in the case of nonwoven wallpaper, possibly only the blanket). This is possible with the paste brush or faster and easier with a pasteboard device.

If the wallpaper is pasted, it is folded, so the paste is better in the paper. Turn from both sides in thirds and then again:
In the description of the used wallpaper you will find an indication of the time that this wallpaper has to soak.
Recommendation:
- thin wallpaper around 5 min
- normal wallpaper about 10 min
- Heavy wallpaper like woodchip 15 to 20 min
Attach wallpaper
The wallpaper can be applied, preferably in pairs. Adjust the distance, open the wallpaper strip piece by piece, press it with the wallpapering brush and smooth it out with a brush or roller. Be sure to plan along a small protrusion along the way.

This is how it works now, train by train, always on impact with the previous train. Except for highly artistic patterns, which should not be brought to the ceiling by do-it-yourselfers, there is no overlapping papering, which you will never get invisible later on.

In between, the seam roller is used, always over the seams and like once over the surface.
The last track almost never fits exactly (no, fate is not against you, that's just normal), it should be tailored to fit below.
Remove supernatants
If the ceiling is completely wallpapered, it should be allowed to dry a bit. Then you can cut off the overhangs all around, preferably with a cutter knife along an installation rail (if necessary, a facade spatula). If that does not work out well, you can use stucco-like decorative profiles made of hard foam, which are glued to the transition between the ceiling and the wall after wallpapering.
To brush
Now the wallpaper may finally dry, after 12 to 24 hours it can be painted.

Meaningful support
A much needed support in wallpapering is a second person, lone fighters can soon expect neck pain, if they work overhead for a long time.
In addition: Normally more or less annoyed people balance on two ladders when ceilinging. Often in attitudes that are already showering renovations-supporting friends, renovation-supporting relatives shudder even more.
Remember, most accidents happen in the household - so you should at least work with two ladders between which you set a building floor of the appropriate height, or even better rent a scaffold. These are available from 15, - € per day in the next hardware store.