Crochet reindeer | Crochet free tutorial for Rudolf as Amigurumi

- Material and preparation
- The hull
- The legs
- The head
- The reindeer antlers
- The tail
- sew together
Who pulls the sleigh from Santa Claus ">
It's not hard at all to crochet a cute reindeer piece by piece. In the style of Amigurumi - a crochet method from Japan - make first head, torso and legs as individual pieces. Also antlers and a tail are crocheted. In the end, you put everything together to a delightful reindeer. At Amigurumi you always crochet in rounds. We will briefly explain the basics of this technique before starting with the actual instructions.
Material and preparation
Material for Rudolf:
- Crochet yarn in dark brown and beige
- matching crochet hook
- red yarn
- Safety eyes OR black embroidery thread and embroidery needle
- wool needle
- filling material

Cotton yarn is widely used in crocheting amigurumi. Also for this free tutorial we have used yarn of 100% cotton with a running length of 125 m to 50 g . This fits a crochet hook 3.5 mm . In the end, Rudolf has a size of about 14 cm .
Prior knowledge:
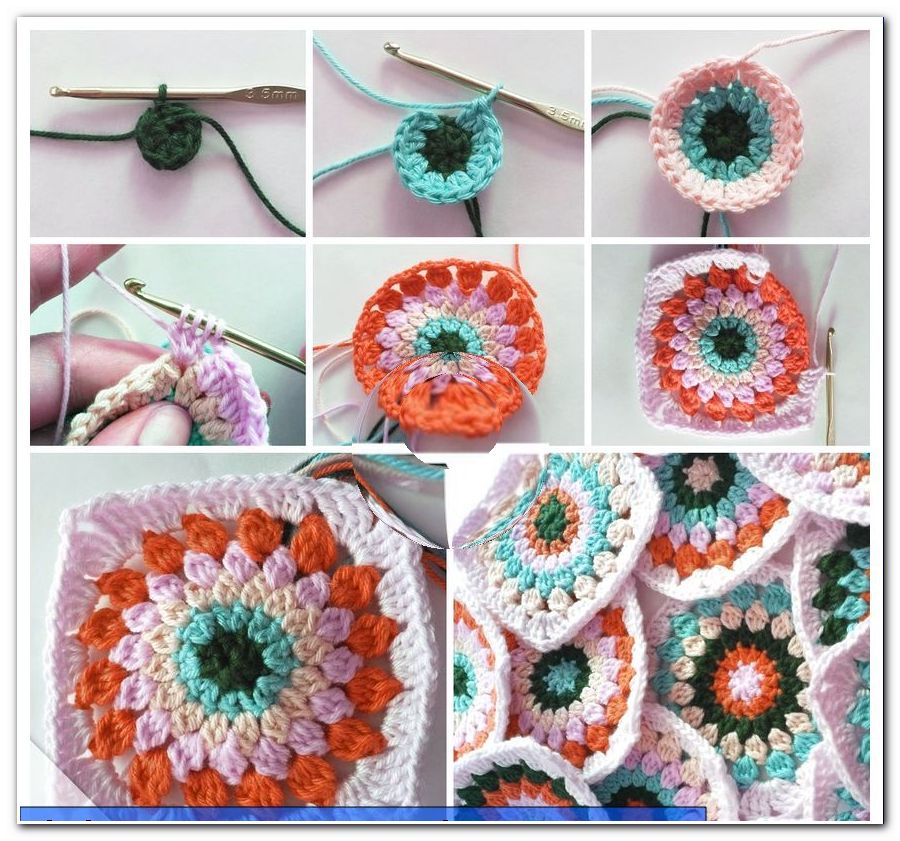
- thread ring
- Fixed stitches
- Increase and decrease stitches
The Amigurumi we crochet the items in rounds. Usually, the beginning consists of a thread ring with six fixed stitches. In the next round, stitches are then taken, taken off or the number of stitches is retained. You take stitches by crocheting two stitches in a stitch. The decreases are due to the combination of two stitches. You pick the thread first through the one, then through the second stitch.
Finish the stitch by pulling the thread through all three loops on the needle. The increases and decreases are always distributed evenly over a round. In this free tutorial we describe all parts to the reindeer crocheting round by round. At the end of each line in brackets is the total number of stitches after the round.
Tip: A stitch marker helps you to recognize the beginning and end of a round.
The hull
Crochet the hull for the reindeer
This is the largest part of Rudolf. The first round is a dark brown thread ring with 6 fixed stitches.
Round 2: You double every stitch. (12)
Round 3: You double every 2nd stitch. (18)
Round 4: You double every 3rd stitch. (24)

Round 5: You double every 4th stitch. (30)
Round 6: Crochet a tight stitch in each stitch. (30)
Round 7: You double every 5th stitch. (36)

Round 8 - 13: Crochet one stitch into each stitch. (36)

Round 14: You put together every 5th and 6th stitch. (30)
Round 15-18 : Crochet one stitch at a time into each stitch. (30)
Round 19: Crochet every 4th and 5th stitch together. (24)

Round 20: You summarize every 3rd and 4th stitch. (18)
Round 21: You summarize every 2nd and 3rd stitch. (12)

Now stuff the body with the filling cotton. Make him so full that he is stable, but not hard.

Round 22: Crochet 2 stitches together. (6)

After the last stitch cut the thread so that you still have enough to sew on. Pull the thread through the last stitch and thread it into the wool needle. Pierce once all the way through the outer limb of all six remaining stitches.

Now when you tighten the thread, the small hole closes. Sew and knot the remaining thread. Crochet Amigurumi is really not hard - the body for your reindeer is already done!

The legs
Crochet legs à la Amigurumi
Now take the beige yarn. We start again with a thread ring with 6 fixed stitches.

Round 2: You double every stitch. (12)
Round 3: You double every 2nd stitch. (18)
Round 4 -7: Crochet a sturdy stitch into each stitch. Change to the dark brown yarn after the 5th round. (18)

Round 8: Crochet every 5th and 6th stitch together. (15)
Round 9: You make a tight loop in each stitch. (15)
Round 10: You summarize every 4th and 5th stitch. (12)
Round 11: Crochet a stitch per stitch. (12)

Round 12: Crochet every 3rd and 4th stitch together. (9)
Round 13 & 14: Crochet a tight stitch in each stitch. (9)
The leg is almost done now. Even stuff it with the filling cotton. Take the crochet hook to help. If the opening is too small for you, you can still stuff a lot after the 11th round. Pull the generously cut thread through the last stitch. With him you will later sew the leg to the trunk. Overall, you need four such legs.

The head
Also start the head with the beige yarn. Make a thread ring with 6 fixed stitches.
Round 2: You double every stitch. (12)
Round 3: You double every 2nd stitch. (18)
Round 4: You double every 3rd stitch. (24)

Round 5 & 6: Make a tight stitch in each stitch. (24)
Round 7: Switch to the dark brown yarn. Continue to make a stitch in each stitch. (24)

Round 8 - 11: Again, crochet one stitch per stitch in these rounds. (24)

Round 12: Summarize every 3rd and 4th stitch. (18)
Round 13 & 14: Crochet a stitch in each stitch. (18)
Round 15: Crochet every 2nd and 3rd stitch together. (12)
If you use safety eyes, you should now attach them. The right place is between the 11th and 12th round, about 4 stitches far apart. If you would rather embroider, you can do it in the end.
Tip: If Rudolf is only used as a decoration, you can also use pins with big, black heads as eyes.
Now stuff the head with the filling cotton.

Round 16: Combine two stitches each. (6) Close the head in the same way as described on the hull.
The reindeer antlers
This free tutorial describes how to make the antlers out of three parts each. The following instructions must be crocheted twice - for a left and a right antler.
Begin the main piece with a thread ring with 6 fixed stitches in beige. Crochet 10 more rounds with 6 fixed stitches each.

Crochet the two smaller pieces with a 5-thread mesh thread ring. The longer piece is crocheted 5 rounds, the shorter piece only 2 rounds.

The tail
Crochet the tail in dark brown. You start with 6 fixed stitches in a thread ring . This is followed by another round with 6 fixed stitches . Then double every 3rd stitch so that there are now 8 stitches in the round. Crochet 4 more rounds with 8 stitches. The tail is neither stuffed nor sewn.

sew together
Put the amigurumi together
The crochet reindeer is coming to an end. You have already made all the individual parts. Finally, this free tutorial explains how to put all the pieces together. For this you need the wool needle and scissors .
First, sew your legs . The front and hind legs should each be very close together, so that the reindeer is stable. The tail needs only a few stitches to secure it securely. Just sew the top edge just above the middle of the back piece. By the way, the rear part is the bigger end of the trunk.

Then the head comes on the hull. Sew the back half of the head with the bottom onto the narrower end of the body.

Now put the antlers together. In principle, you can assemble the individual parts the way you like them best. We sewed the longer part about midway on the main branch, so that the antlers look like forked. The shorter part starts almost at the bottom edge.
When both pieces of antler are joined together, they are sewn on the back of the head on the left and right. So to speak, the icing on the cake is the red nose . Double the red yarn and prick the side next to the nose. Between the 4th and 6th round of the head, make a straight stitch over 3 stitches from left to right a few times. Then prick off at the injection site. Knot the ends of the thread, cut the thread and carefully press the knot into the head.

Now Rudolf is clearly visible!