Making frog stars - Instructions for folding in 21 steps

- material
- Bastelanleitung
- Instructional Video
Froebel stars fit wonderfully into the Christmas season and are also suitable as pretty decorative elements. With the following instructions you can create your own star - in only 23 steps. Optionally, you either sculpt a model with flat bottom as a gift ornament. With a few additional steps, a three-dimensional froebel star is created.
Easily make decorative frog stars yourself
Once you have internalized the principle, you can quickly and easily make your own Fröbelsterne in all conceivable sizes with this guide - the procedure remains the same.
Difficulty: 1/5 (5 is the hardest level)
Time required: about 20 minutes, as an absolute beginner maybe a little more
Material costs: the paper strips are usually sold in colorful sets for around 10 euros
material
- 4 strips of paper at least 50 cm long and 1.5 - 2 cm wide (available in colorful * origami paper quality in a craft shop or online)
- scissors

* For a solid color model, choose four stripes, each with the same design. Those who like it more striking can combine four different patterns and colors. Both results in a nice result.
Bastelanleitung
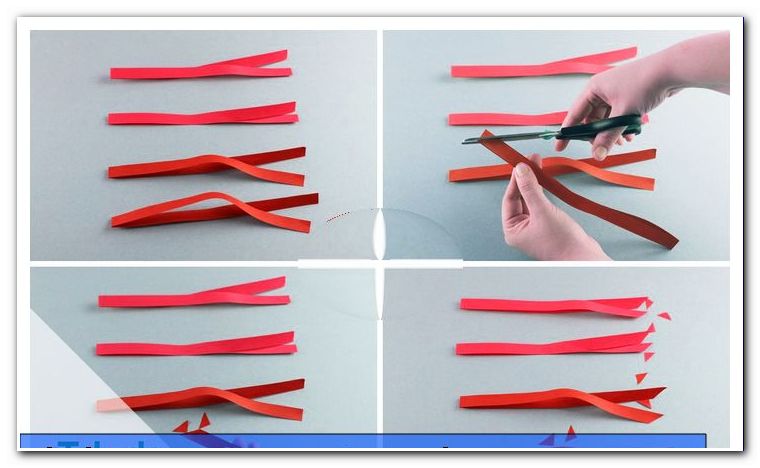
Step 1: First fold each strip once so that you halve it lengthwise.
Step 2: Then cut open the open corners of the strips at an angle - so that at each end a right triangle as a remnant falls off.
Step 3: Now take a strip and lay it in front of you with the edge closed.
Step 4: Position a second strip parallel to the first one. The closed edge of the second, however, is directed away from your body - this time the cut corner points to you.
Step 5: Now comes strip number 3. Take it horizontally in front of you and push its left-facing trimmed corners through the closed loop of the first strip. The second strip, which is already in front of you, you draw on the same principle by the closed side of the third.
Tip: Beginners can mark the stripes with numbers. Such a "test star" works wonders for understanding, making it easier to work on upcoming trials.
Step 6: The last strip is parallel to its predecessor, ie horizontally. However, one closed page looks to the left and the open to the right. This fourth strip includes the first and is pushed through the second.

Step 7: Now you can merge the strips to fix the base of your frog star: Simply push the parallel strips side by side (so that their edges touch each other) and at the same time lengthwise - finally a tightly connected cross with a central square should result !

Step 8: Fold a leg of strip number 1 down. The fold ends with the adjacent horizontal strip.
Step 9: Continue counterclockwise: Lay the upper part of the left strip to the right.
Step 10: And now the lower part of the strip pointing to your body moves upwards - fold over towards strip number 1. Press firmly on each of the folded edges.
Step 11: Attention, the right strip gets a special role. He is not like his predecessors simply folded, but also pushed through the opening, which has formed part strip number 1 when folding down. Pull through to the end and press firmly.
Tip: what opening ">
Step 12: Now the base of the Froebel star is created. In front of you is a cross with square in the middle. The "arms" of this cross consist of two adjacent strips. Now it's time for the Pikes: Start at the bottom left and fold this strip under yourself on the left side. The diagonal folded edge forms a triangle. Result: There are now three stripes to the left and only a single one remains down in the direction of your body.
Step 13: Now move the strip you are currently using over yourself (not down through) to be parallel to the former strip number 1. The folding edge again forms the typical triangle.
Step 14: The same strip is still on: Now fold it inwards. He now lies down on the square.
Step 15: It's the first wave! To fix the strip, thread it along the known pattern through the lower left square (ie the one from which it originates quasi).
Step 16: Turn the construct clockwise so that two more stripes are down and pointing towards you. Now repeat 12 to 15 with the appropriate strip. Then repeat the steps with the remaining two pages.
Step 17: Then repeat steps 13 through 16 on the back of the star as well - four times, starting at the bottom left, then turning the star clockwise by fifteen minutes, and proceeding to the next stripe. The star should look like this:
Step 18: Now there is another cross in front of you. Now sort the strips so that they are no longer over themselves. Just fold it over in the opposite direction on the imaginary extension.
Step 19: The froebel star is still flat. For its typical three-dimensional shape, take the exit strip on the lower left again and fold it up to the left. Then lift it up so it is perpendicular to the table. Its end first leads you to the left side of your body and then pulls it through the adjacent square right below. This creates the first frog tip.
Tip: If the tip does not straighten, you may have pulled the strip in question in the wrong direction through the square flap. Can be easily repaired!
Step 20: Repeat step 21 three more times with the other stripes. If you want to stick the star on a gift, you're done - simply cut off the remaining pieces with scissors.
Step 21: Otherwise, turn the froebel star backwards and repeat step 18, the sorting of the stripes, on the back. After that you also shape the individual tips on this page as in step 19. In this case, of course, only cut off the excess after step 21.
Instructional Video
Tips for quick readers:
- Put 4 folds to a cross
- to fold again and again
- pull through square tabs
- Form corners
- Lay frog tips
- Cut off overlapping folds