Crochet Easter baskets - Free instructions for an Easter basket

- Material and preparation
- pattern
- Crochet Easter baskets
- The handle
- chicken
- The head
- flowers
- Crochet yellow Easter basket
- The floor
- The handle
When spring knocks, the sun warms the day and the bees buzz around the first flowers, it will not be long before Easter. And what could be better than enjoying the family and yourself on this day with a lovingly filled Easter basket.
Crochet at the Easter basket, then the anticipation of the festival gets its first momentum. And with the fresh colors of the yarn spring is greeted at the same time. The Easter basket has a great tradition in Christian families. He is filled on Easter with eggs, bread and Easter biscuits and brought to the church for blessing.
Easter baskets for children
But at least as important a function fulfills the Easter basket in the children. They take the basket and look for the many colorful eggs that are hidden in the garden or in the house for them. At the end of the Easter basket is well filled with goodies. But even friends like to be surprised with a filled Easter basket. And if it was then even crocheted, then the joy is guaranteed very large.
You do not have to be a pro to crochet an Easter basket. Even with sturdy stitches and half-sticks, a simple and pretty nest can be conjured up. In our instructions, we have again thought of the beginner crocheting friends.
Two different Easter baskets
We crocheted two different Easter baskets for you. Once simple, only with fixed stitches and half sticks . But you can give the basket its own touch with fresh colors and small sewn-on accessories. It does not matter if you crochet these little patches yourself or cut out and sew them out of felt. Both possibilities let the Easter basket shine.

The second Easter basket we present is a bit more demanding in terms of processing. But with a little practice even beginners can shine with it. The sticks are processed in this basket as a relief stick and the pattern is very expressive.
Material and preparation
For both Easter baskets, we decided on a thin ribbon yarn made from a polyester-viscose blend. The reason was the stability of the yarn. But also thin cotton ribbon yarns are perfect for crocheting.
If you want to crochet a very stable Easter basket, you can also work with jute yarn. This gives them a somewhat rustic character. Another option is to crochet the cups with a stronger cotton blended yarn. In a well-stocked wool shop you will surely get the right advice.
To make the basket even more stable, both baskets were needle size 4, although the recommended needle size was 6 mm. But the thinner needle makes the crochet work very firm and stable.
To crochet for our Easter basket you need:
- 100 grams of viscose-polyester yarn 135 m / 150 g barrel length
- Wolleste for the little accessories
- Crochet hook 4 mm
- Crochet hook 2.5-3 mm
- possibly a cardboard box for soil reinforcement
- maybe some wire for the handle
- darning needle
- sewing needle

pattern
Basic pattern for the two-colored Easter basket
In this Easter basket we worked with two colors . The crocheted pattern consists only of fixed stitches and half sticks. If you are already a bit out of practice, you will find an exact stitch guide in our category "Learn Crochet". Both types of mesh are depicted.
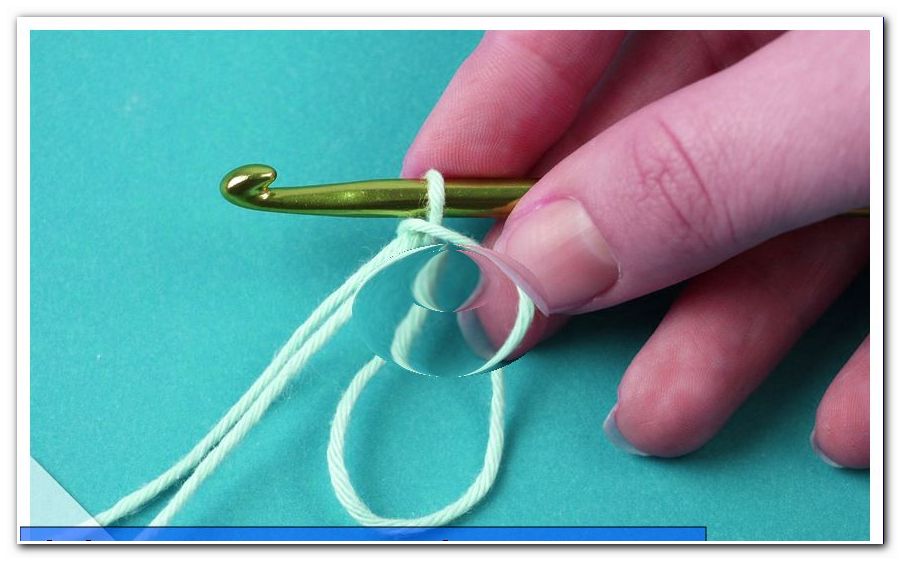
This also applies to the thread ring. You can also find this in "Learn Crochet" under "Thread Ring - How to Crochet a Magic Ring". If you do not like the thread ring, you can also start with an air mesh circle .
How to work the air mesh circle:
- Cast on 4 pieces of air

- Close the circle with a chain stitch
- Crochet the first 6 stitches in this circle
- it continues after the second round

Crochet Easter baskets
The whole basket is crocheted in one piece . Only the handle is an extra part. Starting with the ground and working straight up to the desired size.

- thread ring
1st round: Crochet 8 sts in the thread ring.

2nd round: Double all fixed stitches.

3rd round: double every 2nd stitch.

4th round: double every 3rd stitch.

5th round: double every 4th stitch.
6th round: crochet normally, without increase.
Round 7 : Increase every 5th stitch.
Round 8 : Increase every 6th stitch.
Round 9 : Increase every 7th stitch.
Round 10 : Crochet this round without increasing.
Round 11 : Increase every 8th stitch.
12th round: Crochet without increase.
Round 13 : Increase every 9th stitch = There are now 80 stitches in the round.

The bottom of the Easter basket is now finished crochet. Now crochet upwards.
14th round: From this round to work with half-chopsticks until the end. We do not sting in the two stitch loops of the preliminary round in the entire 14th round, but only in the rear mesh link.
- in the 1st stitch crochet 2 half sticks
- the 2nd stitch is skipped
- in the 3rd stitch again 2 half sticks
- the 4th stitch is skipped

Crochet the entire round in this order.

Round 15 - Round 18: Continue working with green yarn . Now only half rods are crocheted without any increase.

Round 19 - Round 23: We worked these rounds with yellow yarn . After the last stitch in the round there is still a tight stitch and a warp stitch. This is how an inconspicuous conclusion succeeds.

Sew the work threads . The handle to the Easter basket. To be able to wear the basket, of course, a handle is needed. Especially when children are looking for their eggs.
The handle
Cast on 68 stitches . These air meshes are crocheted on both sides, ie in rounds. So there are no back and forth rows like the basket. The end faces are worked in the corners with 2 fixed stitches each.
- Crochet 2 rounds in green,
- the outer rows in yellow.
Sew the work threads and sew the handle to the basket. We have used a tear-resistant twine. The Easter basket is almost finished. Now you can decorate it to your heart's . We crocheted a chicken and small flowers. You can use yarn remnants for this.
chicken

The body with two wings.
- thread ring
1st round: 6 tight stitches in the thread ring.
2nd round: double all stitches = 12 stitches .
3rd round: double every 2nd stitch = 18 stitches .
4th round: double every 3rd stitch = 24 stitches .
5th round: double every 4th stitch = 30 stitches .
6th round:
- 1 fixed loop
- double the second stitch
- 3 fixed stitches
- Skip 1 stitch
- Crochet 7 sticks in the next stitch (= wings)
- Skip 1 stitch
- 2 strong stitches
- double the coming stitch
- 4 fixed stitches
- double the coming stitch
- 4 fixed stitches
- double the coming stitch
- 2 strong stitches
- Skip 1 stitch
- Crochet 7 sticks in the following stitch (= 2. wings)
- Pass 1 stitch
Work until the opposite wing only fixed mesh. Finish the round with a warp stitch. Sew on work thread .
The head
The head begins like the body with a thread ring . It is crocheted until the 4th round, which corresponds to 24 stitches in the round, just like the body of the chicken. The 4th round ends with a chain stitch. Sew on work thread .

For the small comb, take red yarn. Pull the yarn through a loop in the last round.
- 1 fixed loop
- Crochet a slit stitch in the next stitch, work a picot on this slit stitch
- Crochet 1 picot = 3 stitches

- Crochet a tight stitch in the first loop of air
- work a tight knit in the coming stitch
- Crochet a slit stitch in the next stitch
- 1 picot
- 1 fixed loop
- 1 slit stitch
- 1 more picot working

Now the head is sewn onto the body and eyes and beak are given to the face of the chicken.
flowers
The flowers are crocheted quickly and easily.
- thread ring
1st round: Crochet 12 stitches into the thread ring. Close the round with a chain stitch.
2nd round:
- 1 air mesh
- in the following stitch * 1 half stick
- 2 sticks
- 1 half chopsticks work
- crochet a warp stitch in the following fixed stitch *
In this order, from * asterisks to asterisks *, work the entire round. Finish the round with a warp stitch.

Crochet as many chicken and flowers as you want to sew on your Easter basket .
Crochet yellow Easter basket

This Easter basket has a weaving pattern that gives it a vivid and lively character. The pattern is crocheted with chopsticks, which are not inserted as usual in the preliminary round. They are stung around the stitch of the previous round. These sticks are also called relief sticks.
How to crochet relief sticks in rounds
The basis for the preliminary round of Reliefstäbchen in rounds are chopsticks. Then build on these lowered stitches (relief sticks).
For our pattern we always work 4 sticks with the same puncture. Four times the puncture is in front and four times behind. These 8 stitches are repeated throughout the round. If you want to work another size, it is important that the number of stitches in the last round is divisible by 8.
Relief sticks from the front
1st round: Crochet only chopsticks.
2nd round:
- Crochet 2 pieces of air as riser pockets
- Put the work thread on the needle
- so from the front to stitch the loop of the preliminary round

Put another thread on the needle and pull it completely behind the stitch. There are now 3 loops on the needle. Pick up the three loops like a chopsticks.

4 relief sticks work according to this description.
Reliefstäbchen from behind
The next 4 relief sticks are inserted from back to front. Put the work thread on the needle. Now from back to front to prick the loop of the preliminary round.

Put the working thread on the needle, pull it in front of the stitch and continue to cut it like a stick.

Crochet this wicker Easter basket.

The floor
- thread ring
1st round - 13th round: crochet tight stitches. The round counts 80 stitches.
14th round:
- 2 sticks are crocheted into the 1st stitch
- the 2nd stitch is skipped
- in the 3rd stitch again 2 sticks
- the 4th stitch is skipped
Crochet the entire round in this order . Always work in a loop 2 sticks and skip the next stitch. The round ends with a chain stitch.

15th round: crochet 2 air stitches as climbing air stitches. These air meshes serve only to reach the working height. They are not counted as mesh. From this round the braid pattern starts with the relief sticks.
They work:
- 4 relief sticks in front
- 4 relief sticks behind
Crochet the entire round in this order . Each round ends with a chain stitch in the climbing scarf.
Lap 16: It starts with 2 climbing air meshes for the working height . Crochet this round as round 15.
17th round and 18th round: In these two rounds the relief stitches are exchanged. The stitches that have been cut in the previous two rounds now become relief stitches that are inserted from the back.
If the relief stitches were previously in the two rounds, work is done over them. And crochet over the loops.

Round 19 and Round 20: These two rounds are worked like rounds 15 and 16 . The Easter basket is almost finished.

The handle
The width of the handle is 6 sticks . They work in rows back and forth. Sew on the handle on the inside of the basket.

Now both Easter baskets only have to be filled with delicious treats. Easter can come.