Instructions: Napkins Fold for Christmas - Stars, Angels & Co

- Fold star out of a napkin
- manual
- Instructional Video
- Napkin angels fold
- manual
- Instructional Video
- Christmas boots from a napkin
- manual
- Instructional Video
- Fold napkin: fir-tree
- manual
- Instructional Video
Christmas time is coming soon - happy time, the beautiful table decoration is not far away. At Christmas, we like to decorate the tree, the living room and of course the banquet table. Christmas napkins should not be missed. In this tutorial, we show you how to fold Christmas napkins - so you fold a Christmas tree, angel, boots and Christmas tree.
Folding napkins is no longer just a task for the catering trade, but is also becoming increasingly popular in one's own four walls - especially at big festivals such as Christmas. Of course, it is sufficient if every guest finds a classically folded napkin on his place, but Christmas napkins are a real eye-catcher. It does not matter whether you are folding high-quality fabric napkins or paper napkins - these folding techniques always make for great enthusiasm.
Fold star out of a napkin
The Christmas star belongs to Christmas like cookies and Christmas tree. So why not just integrate it into your table decoration "> 
manual
Step 1: Place the unfolded paper napkin in front of you at the beginning. If you want to fold a printed napkin, with a nice and not so nice side, the beautiful side should now be down.
Step 2: Fold the lower and upper half of the napkin towards the center line. Turn the napkin and repeat this again. The last two folds are opened again and you can see that the napkin is now divided into eight squares.
Step 3: Now fold the napkin in zig-zag. Start with the bottom edge. This will be folded up to the next lines. Then turn the napkin to the back and fold this piece up again until the next fold. Repeat this process repeatedly until the napkin is completely folded. You can now see the zigzag pattern on the side.
Step 4: The napkin should now lie in front of you so that the top zig-zag layer is open at the bottom. Lift this layer to the left and push the top edge inward to see a triangle. The situation is taken once again, so to speak. Repeat with all layers on the left side.
Step 5: Then repeat step 4 also on the right side.
Step 6: The napkin star then only has to be unfolded. With paper clips, the open points on the ground can be connected to each other - this results in a closed star. The napkin poinsettia is ready!
1 of 7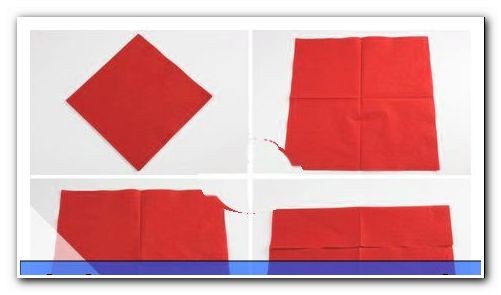


Instructional Video
Napkin angels fold
To noble table decorations at Christmas, the napkin angels are particularly suitable. Choose romantic or even stylish white napkins made of fabric or paper. With just a few simple steps, you can fold a napkin angel at lightning speed.

manual
Step 1: At the beginning, unfold the napkin unfolded and square in front of you - the printed, beautiful side points downwards.
Step 2: Then fold the square into a triangle along a diagonal.
Step 3: Then fold the right-angled tip straight down so it touches the bottom edge.
Step 4: Take the left and right tips and fold them up so that their edges are centered - creating a square.
5th step: Now the napkin is turned on the backside. Two individual tips are now visible. Fold it upwards so that the napkin becomes a triangle.
Step 6: Then turn the napkin over again - the middle tip should point down. Flip it up so that the top protrudes two centimeters above the top edge.
Step 7: Now the napkin angel can be folded up. Lift the angel off the table and fold the wings backwards. Shape the body of the angel with your fingers. Then fix the wings with a paper clip - done!
1 out of 5


Instructional Video
Christmas boots from a napkin
These Christmas boots are funny and cute at the same time. You can fold the napkin boots from both paper and cloth napkins. We especially like the table decoration if you fold each guest two napkins. The boots are small and could be lost a little bit individually.

manual
Step 1: First, unfold the paper napkin. The napkin should be in front of you with the open side down.
Step 2: Now fold down the upper edge in the middle. Then fold the right and left sides down so that their upper edges meet in the middle.
Step 3: Then fold in the sides again so that the outside edges are centered and straight.
4th step: Now the napkin triangle is turned so that the tip points to the left. Fold down the top half of the kink the finger is pointing down. Hide this half under the bottom.
5th step: Then fold up the half that is now on top. On the left is now a very pointed end - this is the boot tip.
Step 6: Now the napkin is turned on the backside. Turn the napkin so that the tip of the boot points to the left again. Then fold down the small, rear tip, which is located on the right side down. The tip should go to the bottom edge.
Step 7: The boot is now ready. Pass the right end to the left and hide it in the tab on the left side. Now only the boot tip has to be bent upwards and the Christmas napkin boot is ready! The boot opening is even suitable for hiding small sweets in it.
1 of 6


Instructional Video
Fold napkin: fir-tree
A rustic variant of the Christmas napkin is the Christmas tree. Of course, green napkins are the only right choice. Small Christmas balls complete the decoration. Unfortunately, you will need paper napkins for this Christmas tree.

manual
Step 1: First put the napkin closed on the table in front of you. The closed corner points upwards.
Step 2: Then take the down-facing tip and the first layer of paper napkin and fold them up. Fold the tip only so far until a margin of about 2 cm is left.
Step 3: Repeat with the next three layers, leaving the same distance from the previous layer when folding
Step 4: Then turn the napkin on the back. Hold each fold firmly with your fingers so that nothing falls apart.
5th step: Then fold the right and left half of the napkin inwards so that the outer edges meet in the middle and straight. Fold these folds well with your fingers.
Step 6: Now turn the Christmas tree by 180 ° and apply it to the back. Then place each individual layer upwards. The tips are always hidden under the previous location.
Now the individual layers are laid up. For this, pin the tips under the previous position. Finally, the layers are still all straightened and the napkin-fir tree is ready!
1 of 4