Make your own lantern - 3 DIY templates for (small) children
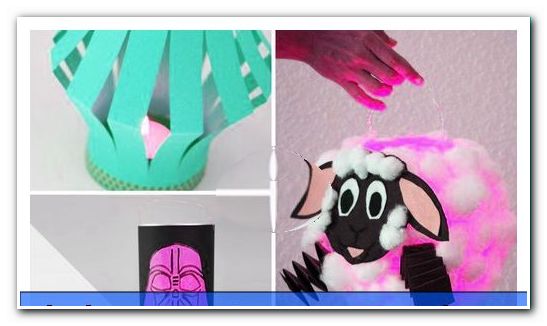
- Make instructions for the lantern
- Tinker Chinese paper lantern
- Star Wars Lantern - Crafting Template
- Tinker balloon lanterns: cloud sheep
Lantern parades are some of the most beautiful childhood memories - the glow of the yellow lights in the dark, the singing of songs and also the crafting of their own lanterns are a wonderful experience for children every year. In this guide, we show you and your children how quickly you can make lanterns of all kinds yourself.
Every year in mid-November, on the 11th of November, to be exact, many people in Germany commemorate St. Martin. For the children, this evening is a very special spectacle, as you can dance with homemade lanterns and lanterns singing through the streets. The parents also enjoy this time very much. Songs like "I go with my lantern ..." or the Martinslied sound then through the streets. A suitable lantern must not be missing there.
Make instructions for the lantern
At your discretion, you can design different lanterns and lanterns with your little ones. It does not take much for that. We show you how you can make simple but beautiful lanterns from a balloon, a cappuccino can or even just with paper. Your children will be thrilled!
Tinker Chinese paper lantern
Do you and your children spontaneously want to take part in a lantern parade, but no lantern at home "> 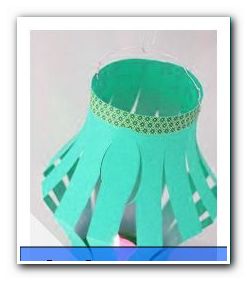
You need:
- Construction paper in A4 format
- scissors
- glue
- plastic lid
- hot glue
- craft wire
- wooden stick
- Roulladennadel
Difficulty: easy
Cost: under 5 €
Time required: 20 - 30 minutes
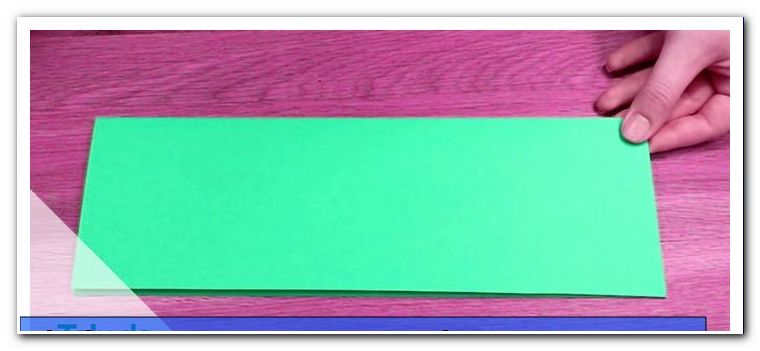
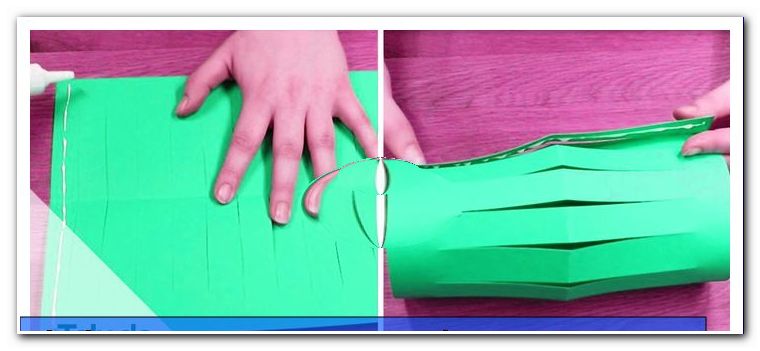
Step 1: Start by picking up the construction paper. Put it in landscape format on the table. Which color you use is entirely up to you.

Step 2: Now fold the paper lengthwise and centered. Tighten the fold neatly with your fingers.
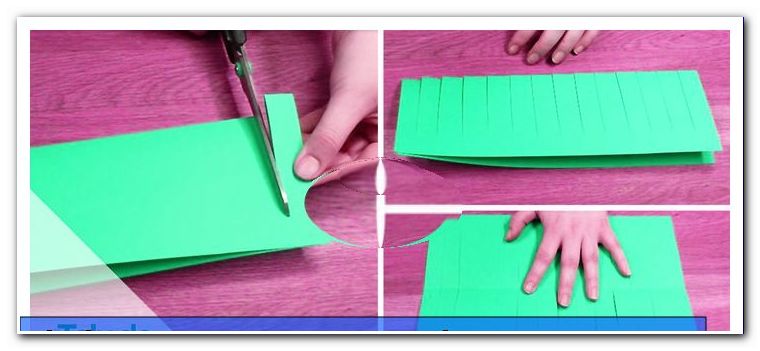
 Step 3: Now, cut from the closed side of the paper about 2 cm wide strips. Attention! Do not cut the strips off, but stop a few inches before.
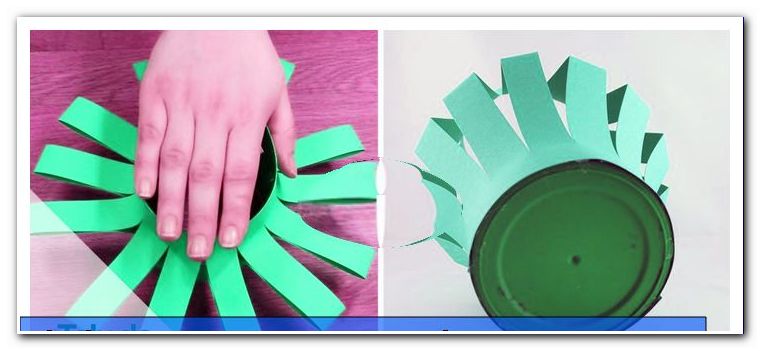
Step 4: Now the lantern is glued together. Take the plastic lid to the hand. Paint one edge of the paper, as well as the lid with glue. Then pass the paper around the lid and glue the ends together.
Tip: Hold everything together well with fingers until the glue has completely dried. If necessary, you can clamp the ends together with clamps.
Step 5: Then push the lantern together with the palm of your hand - this creates this lampshade effect.
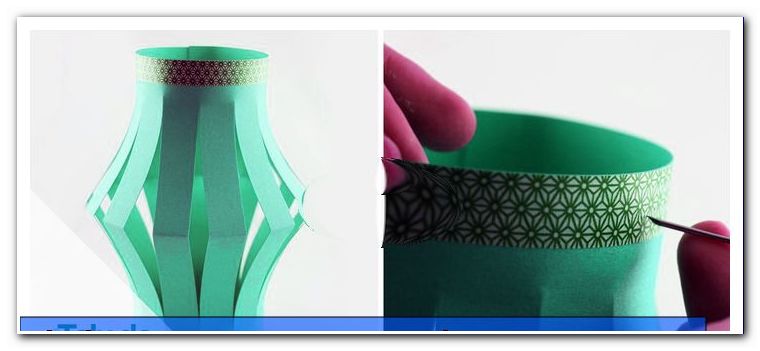
Step 6: Now the lantern can still be decorated. We used Wahsi Tape at the top and bottom. This tape is available in different colors and with the most colorful patterns to buy in almost every craft store. Then prick two opposite holes in the top of the lantern. A Roulladennadel is best for this.
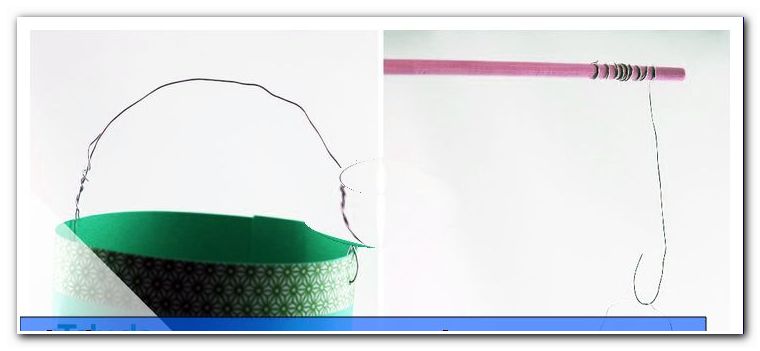
Step 7: Now cut off a piece of craft wire and thread it through the two holes. The ends of the wire are well twisted together. Already have a suspension. Also attach some wire to the wooden stick. Wrap this around the rod several times and form a small hook from the end.
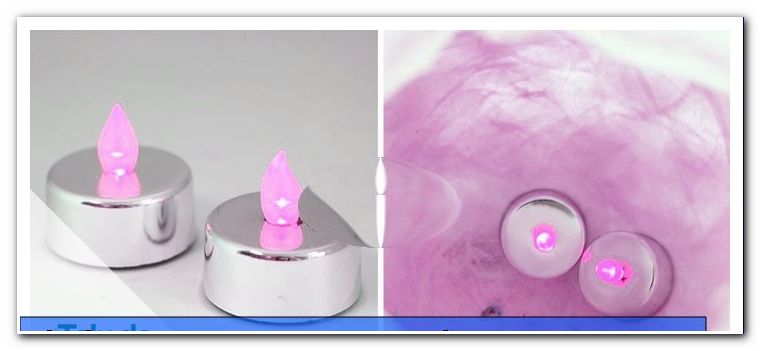
Done is the Chinese paper lamp! Now you can put a tealight in the lantern - with a little clay on the underside of the tealight, nothing slips. If open fire is too dangerous for you, which is quite understandable with a paper lantern, you can also use electric tealights. Nothing can happen.
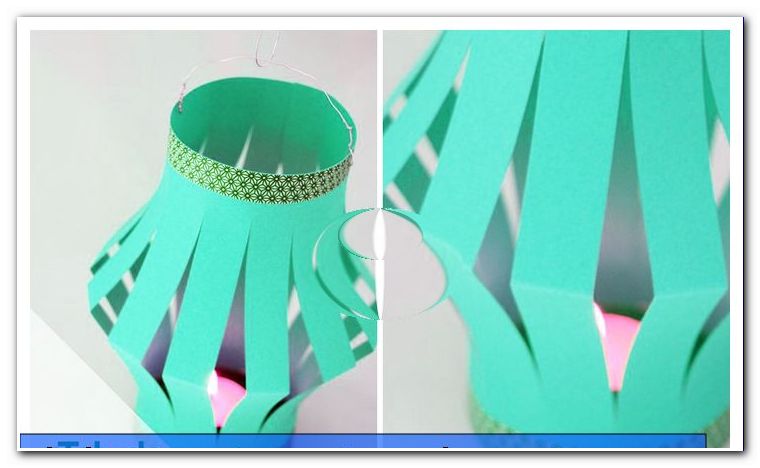
With this oriental lantern, you will ensure a real eye-catcher during the lantern procession. With decorative stones, glitter or gold effects you can give it even more shine à la "Thousand and One Nights".
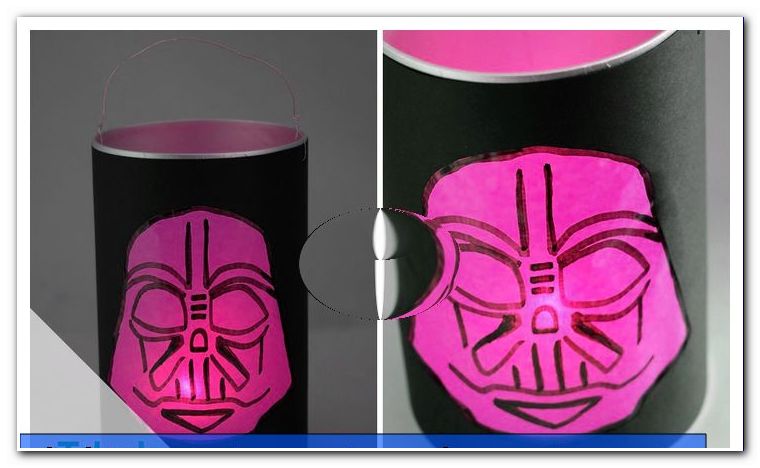
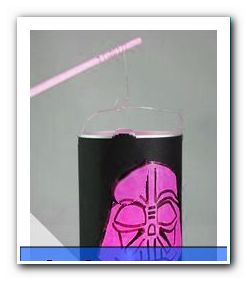 Star Wars Lantern - Crafting Template
 Star Wars Lantern - Crafting Template
 You need:
- Star Wars - Crafting Template
- Clay board in A3 format
- glue
- Scissors, craft knife
- Black felt-tip pen
- Transparent Paper
- wooden stick
- craft wire
- Cappuccino tin
- tape measure
- punch
Difficulty: Children could use the help of parents when cutting - otherwise easy to retool
Cost: 5 - 7 €
Time required: 0.5 h

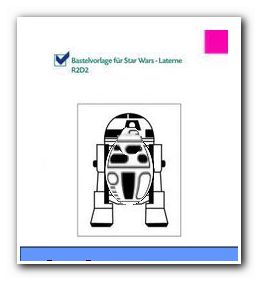
Step 1: First, print out one of our Star Wars crafting templates - either Darth Vader or R2D2.
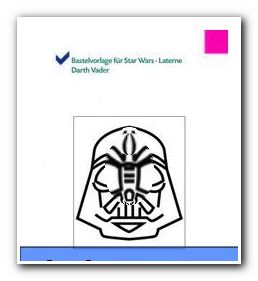
- Click here to download the template - Darth Vader
- Click here: To download the template - R2D2
Tip: If you want to put a completely different subject on the lantern, you can find all the pictures on the Internet that you can use as a template. Simply print this and proceed as follows. When printing, you only have to make sure that the picture fits in height on the cardboard box.
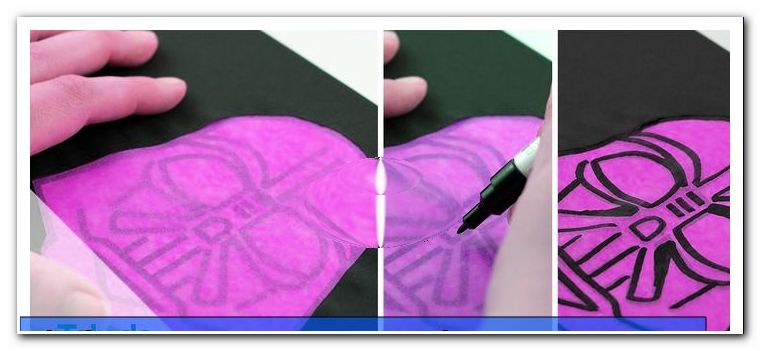
Step 2: Cut out the template. Then outline the outlines in the middle of the cappuccino can - simply frame the template with a well-identifiable felt-tip pen. Leave about the same amount of space at the top and bottom - that's enough.
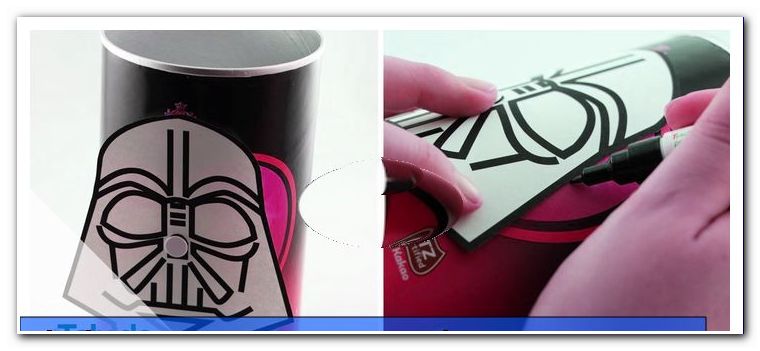
Tip: To prevent the template from slipping, you can attach it with a thumbtack in the middle.
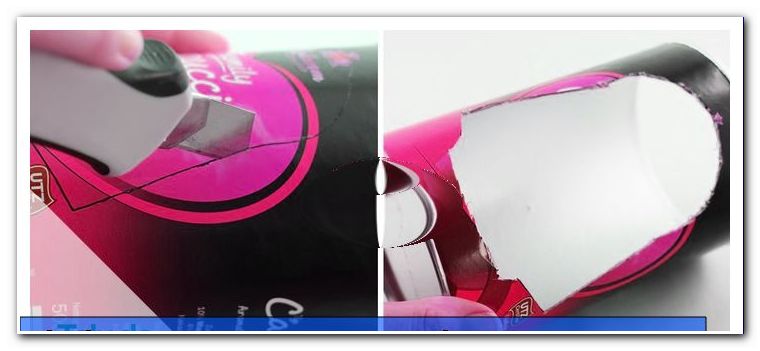
Step 3: Now carefully cut out the outline with the craft knife. You should do this task for your children.
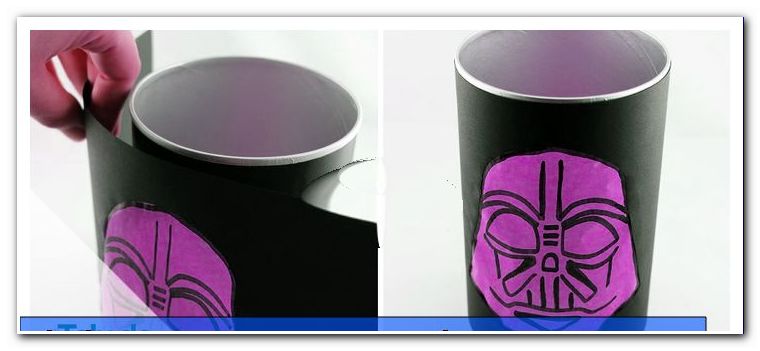
Step 4: Now measure the circumference of the can, as well as the height. Transfer the measurements to the A3 construction paper and cut out a strip of the appropriate size.
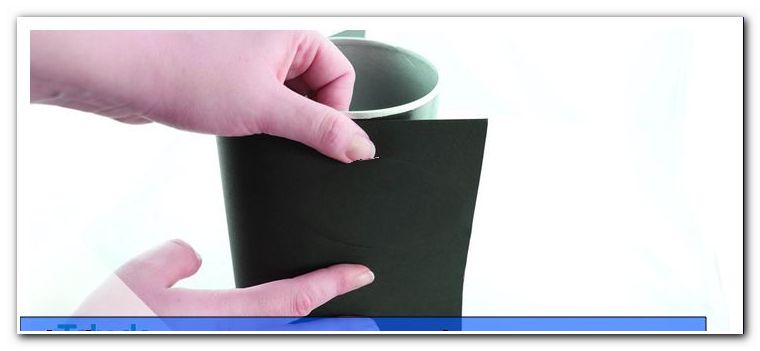
Tip: Add a few centimeters of glue to the perimeter - so make sure that the paper covers everything at the end.
Step 5: Now put the strip of construction paper into the can. Mark the top and bottom of the cut hole on the paper. Then take the strip out again and surround, exactly matching the markings, the craft template. Cut them clean with scissors.
Step 6: Then glue a piece of tracing paper to one of the sides of the clay paper. Brush the edges clean with glue so that nothing spills out. The tracing paper must completely cover the cutout.
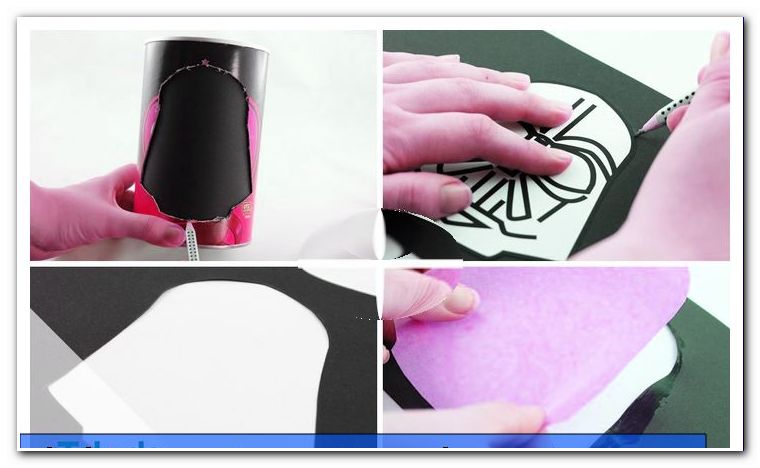
Step 7: Next, place the original and the tracing paper exactly on top of each other - trace the lines with the gibber felt-tip pen.
Step 8: Now glue the strip to the tin with glue. Coat the page with glue that you just painted in step 6. Place the cutout in the construction paper exactly on the cutout of the can. So the light of the candle can shine through later.
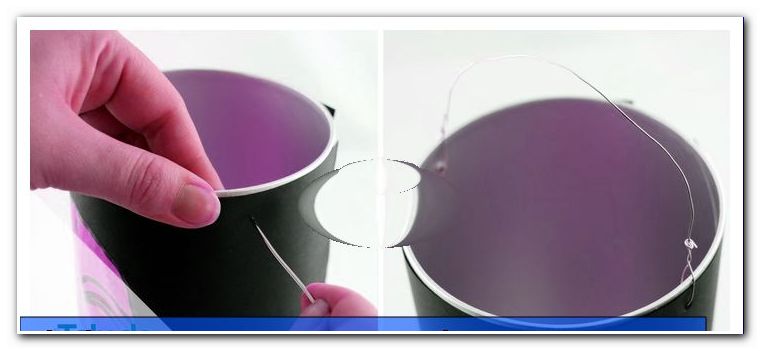
Step 9: Now the lantern needs a suspension. Punch the can twice at the top - the holes should be exactly opposite. Either pick a hole or pierce a hole with a roulade needle.
Step 10: Make a hanger with craft wire - just thread a piece of wire through both holes and twist it tightly.
Step 11: Attach a piece of wire to the wooden rod, about 20 cm. Wrap the end of the rod with the wire a few times, leaving a rest of about 10 cm. From this rest you form a hook.
Now you can attach the hook to the suspension of the lantern - finished is the home made Star Wars lantern!
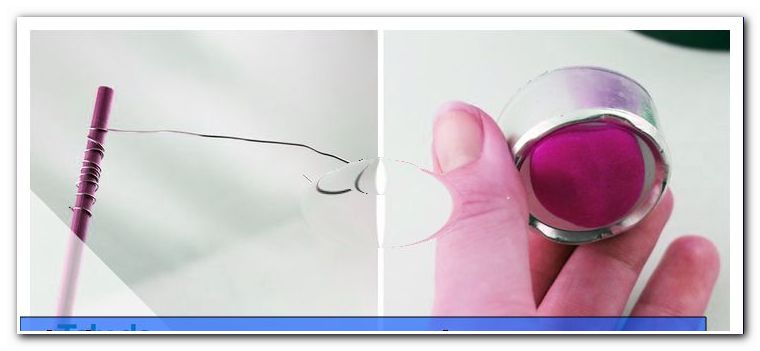
Of course, a candle has to be placed in the lantern. Attach a piece of putty to the bottom of a tealight and light the candle. Then place the candle in the middle of the tin - the candle will not slip through the clay.
Especially your guys will love this Star Wars lantern. In itself, this crafting instructions but as already described versatile applicable. Depending on your wishes, you can also print a princess, cute animals or even monsters as templates for the lantern. Ultimately, the template should not be too delicate and contain simple contours and lines.
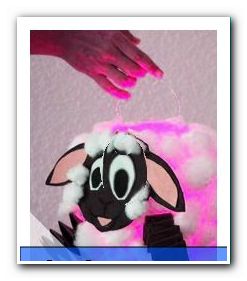
Tinker balloon lanterns: cloud sheep
 You need:
- balloon
- wallpaper paste
- brush
- paper towels
- construction paper
- Bastelfilz
- wadding
- craft wire
- Working creatively
- Hot glue gun
- scissors
- Piece of cardboard
Difficulty: elaborate, but simple
Cost: 7 - 10 €
Time required : 2 h crafting time + 1 day drying time
Step 1: In the beginning, prepare the framework of your lantern. You can make this lantern with the same principle you use to make papier-mâché figures. Blow up a balloon in the desired lantern size and knot the opening. Then stir the wallpaper paste in the correct mixing ratio (see packaging). Brush the balloon with the paste and spread the scraps of paper on the paste - these snippets are easy to tear with your hands.
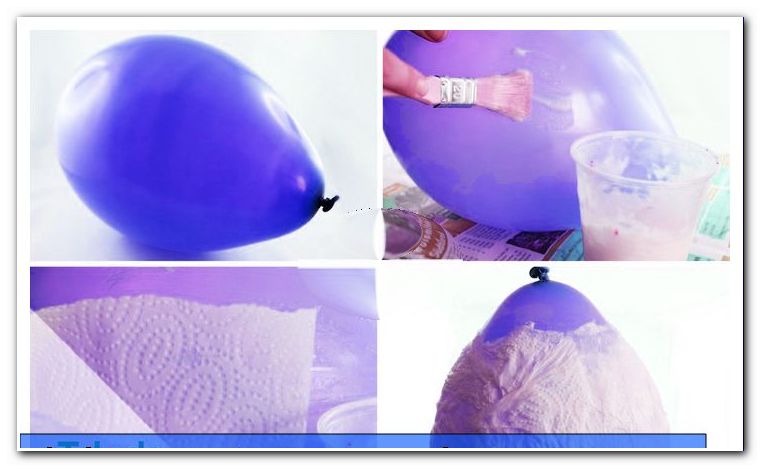
Tip: kitchen paper consists of several layers. If you separate these three layers, the lantern can be made even more transparent. The individual layers become thinner and more translucent.
Paste the balloon with 2 to 3 layers of kitchen paper, always paste and paper alternately. You can omit the game around the knot, which later becomes the opening of the lantern.
Now the balloon has to dry. Attach a twine to the knot and securely hang the pasted balloon to a location where it will not fall. Let the balloon dry for 1 day.
Step 2: Now the balloon can be processed further. Poke the balloon with a needle and let the air out. What remains is a papier-mâché peel.

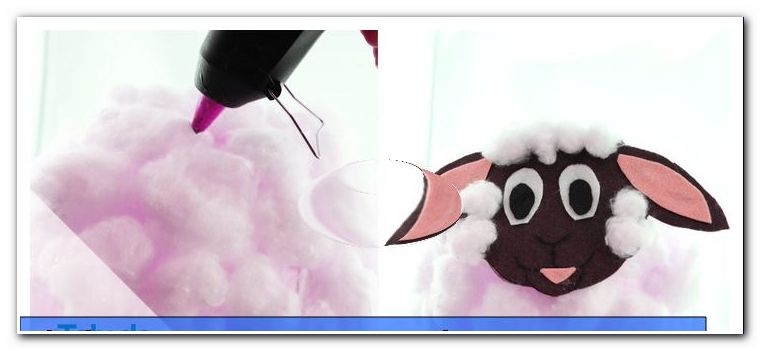
Step 3: Now the lantern is decorated. A sheep needs sheep wool - this is best presented with white cotton wool. Form small cotton balls from the cotton wool. Of course, you can also directly buy cotton balls, which are usually more expensive, but are also available in other colors. Fix the small pieces of hot glue all over the lantern until finally every spot is covered.

Tip: You can leave a few millimeters between the bulges. These vacancies will be particularly beautiful later.
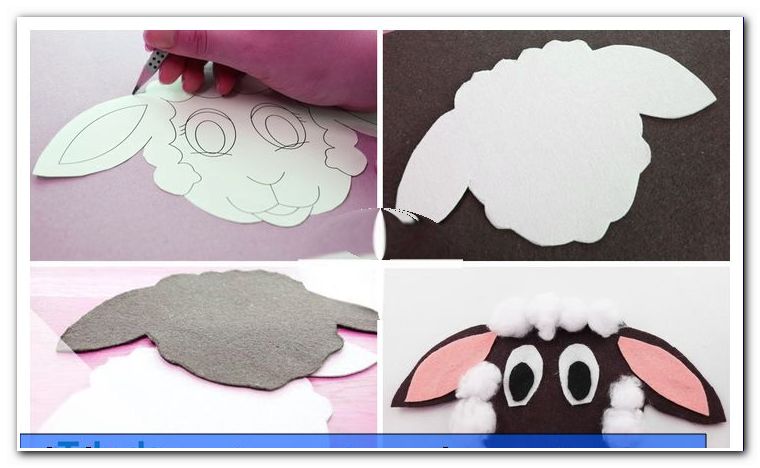
Step 4: Now the sheep needs a face too. For this you can work with our craft template. This we have painted and not painted out here for you:
- Click here: sheep in colorful
- Click here: Sheep to color
When you print the template, you can attach it to the lantern with your cut-out, your kids can paint their own face, or you can use the template as a template.
Sketch the outlines of the face on a piece of cardboard and on a piece of brown craft felt. Cut out both variants with scissors and glue them together. Finally, the sheep needs eyes, ears and a mouth. Cut them out of craft felt and fix them on the face. Small cotton balls can also be added.
Step 5: Now attach the face to the front of the lantern - hot glue is also the best choice here.
Step 6: For the feet, two in this case, fold two witch steps. For this you need 2 x 2 strips of construction paper with a size of 4 cm x 42 cm. Glue two stripes together as in the picture. Then fold the strips back and forth alternately. The end is also attached with glue. Repeat this with the other two strips. Done are the feet. These are now attached to the lantern, preferably below, left and right of the face.

Step 7: As a suspension for the lantern stick, pierce two opposite holes in the paper at the opening of the lantern. Thread craft wire through the holes and you have quickly made a suspension.
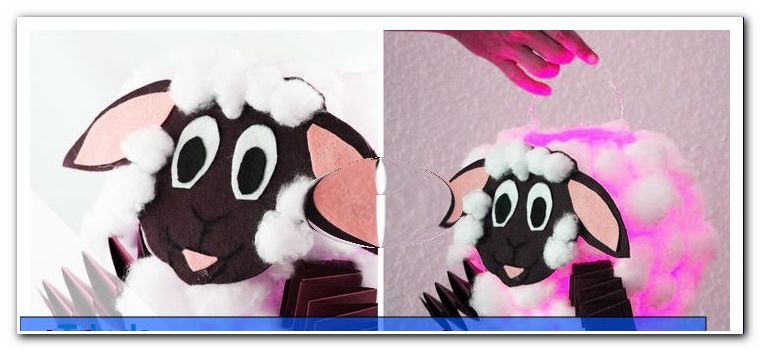
Done is the cloud sheep - is not it sweet ">