Sew Baby Gown - Free DIY Guide for Beginners

- Material and preparation
- patterns
- Sew baby dress
- Streif Edge finish
- Quick guide
Sometimes I just do not find the right pattern, so are you "> In this tutorial, you'll learn how to sew a baby dress, so how to make or customize a baby dress to best fit your needs I will also tell you how it works with the sleeves, in case you want to sew them on - I sewed my version without it, but next time I definitely want long sleeves!
Difficulty level 2/5
(with this guide even beginners with some patience can sew a baby dress)
Material costs 2/5
(depending on taste and fund, but with such small pieces rather cheaper)
Time required 1.5 / 5
(if the cut must be made completely about 2-2, 5 h - otherwise 1 h)
Material and preparation
The material selection
Basically, I use to baby dress sew only harmless fabrics, like stretchy. However, all thinner, stretchy materials are conceivable. If you want to sew from non-stretchy fabrics, you must either sew on a zipper or leave 1-2 cm of clearance at all seam allowances.
I chose "Art deCat". A wonderfully soft organic jersey from here:
Organic Jersey
The amount of material
For smaller sizes, 0.5m of fabric can be used to full width even with sleeves. For the older children, depending on the desired length also 0, 60-0, 8 m. Measure your child from the shoulder to the desired length. Add about 1 cm seam allowance to the shoulder at the top. In the middle you need the seam allowance double, at the bottom about 2.5 cm for the hem.
Something "leeway" is always good for patterned fabrics, so that the motif is then nicely centered.
patterns
How to make the cut for a top, you can already sew in my T-shirt sewing yourself T-shirt sewing here. If you are not sure yet, you can either take off the cut of a well fitting shirt (here I have shown how it is done with underpants, the principle is the same: sewing boxer shorts) or you simply take the pattern of a matching shirt, the you have finished buying.
Note: For clarity, I've drawn the changes again on a sketch, so my finger looks so big on the photos! You will hardly be able to sew a baby dress that small, except for the doll mum.
Starting from a normal, sleeveless t-shirt cut I've made the following changes: The neckline I have narrowed a bit, because he is often quite far in the girls' shirts and I wanted a more closed cut. The shoulders should be rounded, so I pulled the neckline up a bit and then dropped the shoulders over it. I wanted to integrate the short sleeves into the cut, so I have to add a piece to the side.

Currently VoKuHiLa is modern again and has been around for a while. I do not like it too much, but I would like to add a hint. Since I want to curl the front and back parts to achieve more freedom of movement, I have added a split that divides the upper part in about 2/3 of the sleeve height. For the sleeves, I first put a straight line at right angles to the sleeve hole, measure the desired length, then again 90 degrees, this time upwards and then draw back the slope to the other corner point.

This sleeve style is kept very simple, the material break is at the top. The length I measured directly on the child. The cut can be made to any length.

Tip: Before cutting, please think again about where seam allowances and hem allowances need to be added. Seam allowances: everywhere, except at the hem - there about 2.5 cm! The neckline I will border, so I can cut it without seam allowance.
Because I have a little Pummelfee and the dress should be comfortable, I want to frill front and back. This only affects the lower part of the dress. For these two parts, I measure 6 cm from the Stoffbug inwards and lay the pattern there. Then it is cropped normally. Afterwards, I also measure 6 cm from the sleeves on both sides and mark this spot.

Sew baby dress
I sew now with a lockstitch from mark to mark (on front and back). Only one end may be sewn, otherwise you can not pull the thread! I put the upper and lower parts together on the side 6 cm right to the right (ie with the motif sides to each other).

Then I carefully pull on one of the threads and push the resulting folds piece by piece, so that they are evenly distributed. Finally, I put a pin at the beginning and wrap the long thread in figure-eight loops on it, so that nothing can slip. If everything is fine, you can fix the length several times.

Then it is sewn with a stretchable stitch (zig-zag). The auxiliary seam can now be removed. Then iron the seam allowance up and topstitch from the outside.

Tip: If you want to be very precise and want to have the wrinkles exactly, sew two stitching seams next to each other with a slight gap, pull on the thread at both seams and adjust everything and sew the main seam between these two auxiliary seams.
Now you can proceed in two different ways: either close only one shoulder seam and sew the strip cleansing directly, as described here: strip cleansing or you now close both seams and read below how the strip cleansing is sewn on closed shoulder seams.
So I put both shoulders together right side to right and sewn together.
If you want to sew long sleeves, you should do that now! To do so, open the dress so that it lies with the motif side up in front of you. Lay the sleeve with the motif side down and sew both parts together with a stretch stitch. Then the side seams are closed. For long sleeves, sew the undersides of the sleeves together with the side seams. Now you can already see how the dress will look like.
For the hem, I fold the bottom edge of the dress in about 2.5 cm inwards and iron over it. Following is also stitched here. If you do not have a coverlock, you can also use a decorative stitch of your sewing machine, use the twin needle or as I stitch here, just twice side by side stitching.

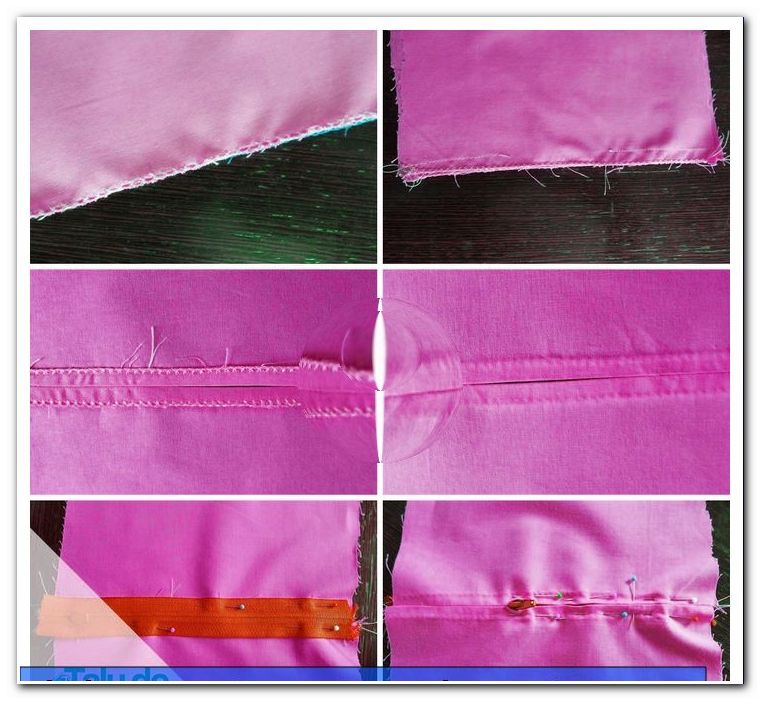
Streif Edge finish
Cut a long strip of jersey fabric 4 cm wide. The strip should be placed at least once around the neckline. Stick the strip slightly over the shoulder seam, but start sewing a few centimeters and sew at the beginning. Again, a zig-zag stitch is used to keep the seam elastic. During sewing, also lightly pull on the strip (not on the neckline itself) so that it is sewn stretched. A few inches before the end you sew again and take the fabric off the machine.

Lay the two protruding ends straight along the fabric. At the level of the shoulder seam cut straight through both stripes. Lay the new ends right side together and sew them together with normal seam allowance. Fold the seam allowances apart. Due to the missing seam allowance, the rest of the strip can now be sewn slightly stretched.

Lay the new seam on the shoulder seam and fix it on both sides, so that nothing can slip. Here you can see the missing seam. This will now be closed. You sew up the beginning and the end again, so that nothing can be solved.

Now fold the strip upwards and then over the seam allowance to the back. Stick both layers of fabric together and sew exactly in the seam shadow, ie where the two fabrics meet. If there is too much left over from the strip, you can cut it back to 1mm before the seam. (Do not cut back on webware!)

Tip: Beginners use a narrow zig-zag stitch for this purpose. With a little practice and feeling, however, the fabric can also be stretched and sewn together more precisely with a straight stitch. So the seam is as good as invisible afterwards.

On the sleeves, we worked the seam allowance inside and ironed on. If you are unsure, you can also fix with pins. Then quilt from the outside with a stretch stitch.
Of course, a little decoration should not be missing:
I used a green fabric flower to iron on here. Since my little mouse likes to play with it, I sew the flower in addition to the edge.

And now we are done sewing with the baby dress!

Have fun sewing!
Quick guide
1. Create, remove or prepare and adapt pattern
2. Place parts on cutting 6cm from the material break
3. Cut with seam allowances and hem allowance (possibly except for neckline)
4. Mark each 6cm from the sides
5. Sew between the marks, sew only one side (beginning OR end)
6. Place the upper part on the lower part and put it together at the side 6 cm
7. Curl the center section until the length fits, pin
8. Sew top and bottom together (front and back are treated equally)
9. Iron seam allowances to the top and topstitch
10. Close shoulder seams (or a shoulder seam and strip spray variant 1)
11. Close side seams (or sew sleeves in and then close with sides)
12. Iron in hem and topstitch
13. Sew strip sweeping on the neckline
14. Attach deco.
15. And we're done sewing with the baby dress!
The twisted pirate