Knit the wrong patent - DIY pattern for patent samples

- material
- preparation
- Instructions for the stitches
- Knit right edge stitch
- Attach left edge stitch
- Knit right-hand stitch
- Knit left stitch
- Instructions for the knitting pattern
- First row
- Second row
Matching the scarf and the hat to the winter clothes or making the feel-good pullover without having to spend a small fortune in the shops - these are just two reasons why many like to use the knitting needles again and again. Especially popular in the knitting of scarves and jumpers, but also of many other projects, is the so-called false patent.
For a long time, knit sweaters were considered old-fashioned and boring. Meanwhile, however, more and more DIY fans are aware that there are numerous patterns with which you can make various types of knitting projects interesting, varied and, above all, very modern. For the production of scarves and pullovers it is often resorted to the wrong patent. It looks elaborate, but is easy and quick to make. Which steps you have to master and how to proceed exactly in knitting, we answer below. Have fun learning the wrong patent!

material
 You need:
- two knitting needles (about 8 Euro)
- knitting wool
- scissors
- embroidery needle
Make sure the two knitting needles are the same size and width. The haberdashery trade offers them in a double pack. For some projects, you can also use a circular needle. Make sure that the needles are suitable for the wool you want to use. If in doubt, ask in the shop.
The cost of the wool depends on the quality, the manufacturer and the dealer. For larger projects with high quality wool is worth a price comparison.
preparation
1. Suggest the desired mesh size. For the knitting pattern to work, you should start with a number that is divisible by 4. No matter how high this number is, add five more stitches at the end.
2. Thread the thread around the left hand. Take it between your ring and the little finger. Then pass it over the back of the hand past the index finger clockwise from the front around the thumb. From there, lay the thread between your index and middle fingers. Make sure that the end of the thread is long enough to complete the stitching.

3. Hold the two needles with your right hand. Between thumb and forefinger, the thread has formed a cross. Lead the needles through the loop from the bottom right to the side of the thumb. Then, with the needles above the point where the thread intersects, grab the thread to the left of your forefinger and pull it through the loop. Below the resulting mesh, a knot has formed. Tighten it and repeat this process until the desired number of stitches are on the needles.

4. Carefully pull one of the needles out of the stitch chain.
Instructions for the stitches
To knit the bottle patent, use the following steps:
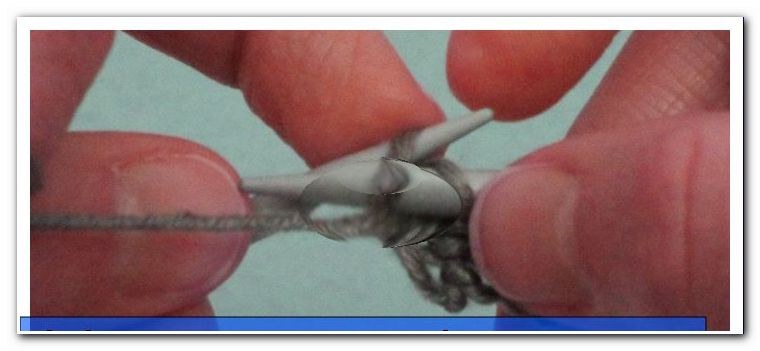
Knit right edge stitch

1. Pass the right needle on the back of the left needle through the first stitch
2. Grasp the thread with the needle
3. Pass the thread with the needle through the loop to the front
Attach left edge stitch
1. Lay the thread forward with the index finger in front of the last stitch
2. Put the last stitch behind the thread on the right needle
Knit right-hand stitch

1. Place the right needle under the loop and feed it from left to right through the loop
2. Pass the thread around the right needle with your left index finger
3. Pass the thread with the right needle through the loop to the front
Knit left stitch

1. Lay the thread forward with your index finger in front of the stitch
2. Pass the needle through the loop to the left front
3. Grasp the thread with the needle
4. Pass the thread with the needle through the loop
Instructions for the knitting pattern
First row
1. Knit right edge stitch
2. Knit three stitches to the right
3. Knit one stitch left
4. Repeat steps 2 and 3 up to the fourth last stitch
5. Knit three stitches to the right
6. Attach left edge stitch
Second row
1. Knit right edge stitch
2. knit one stitch to the right
3. Knit one stitch left
4. Knit three stitches to the right
5. Knit one stitch left
6. Repeat steps 4 and 5 to the penultimate stitch
7. Knit last but last stitch on the right
8. Attach the left edge stitch
Repeat both steps A and B alternately. Use scissors and needle to cut the wool or to sew the remains.