Sewing wall silo - instructions for hanging silo / wall bag

- Preparation and cut
- Finish wall silo
- variations
- Quick guide
I have been friends for some time with the idea to sew a clear system for my favorite sewing ingredients and today it's finally time! Soon, everything has its place and is ordered. Of course I'm talking about a wall silo in which the most important sewing aids can be stowed.
In my two instructions on the advent calendar and the toilet bag for hanging, I have already presented a few variations that you can install as desired in utensils. Today, I also want to add some extras to accommodate my safety pins and wonderclips.
Difficulty level 1/5
(this manual for a trailer silo is suitable for beginners)
Material costs 1/5
(depending on choice of fabric and size of the desired wall bag between 0-20 euros - great remainder use)
Time expenditure 1/5
(depending on experience, accuracy and decoration per wallet about 60 to 90 minutes)
Preparation and cut
I have created my pattern according to need, so it is exactly adapted to my needs. You can implement the individual elements and arrangements at any time to your own taste.
For my wall-hung silo I need two pieces of fabric with a width of 50 cm and a height of 47 cm, both including seam allowances. In addition, comes for the fan bag again an equally large piece of cloth, which, however, centered left to left (ie with the "not so nice sides to each other") is merged. I have planned a subdivision into four fan pockets. For the pincushion two pieces of fabric with about 10 x 10 centimeters are sufficient. I also use for my extras a wider rubber band, a cord and colorful ribbons and a woven band in the fabric width.

For hanging silos, I prefer to use high quality woven fabric, which I like to reinforce with a thin ironing fleece. After all, these wall decors must be robust. Stretchable fabrics are also possible in principle, but these must be strengthened in any case and can be ugly forgiven. I opted for a stretch denim with a low elastane .
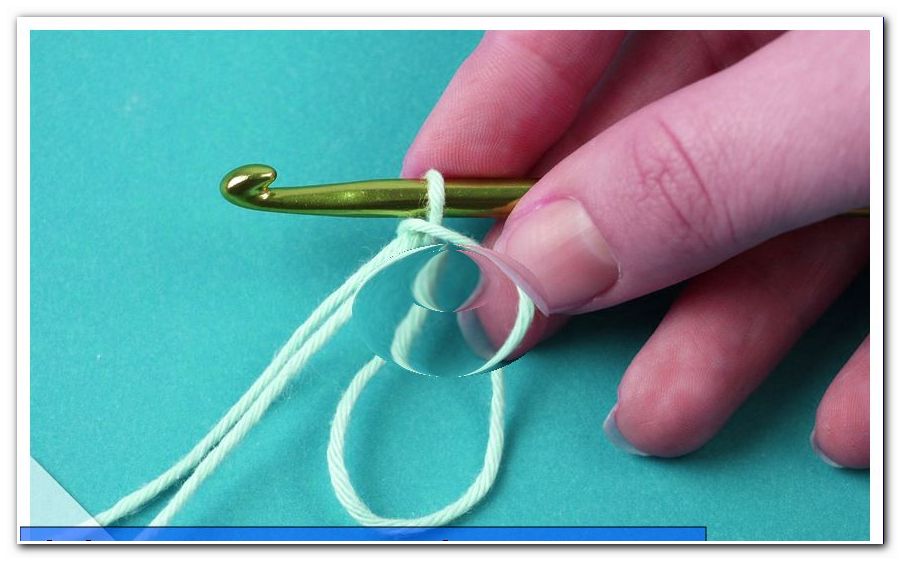
For my needle pad, I need two circles with about 10 cm in diameter, which I sew right to right (ie with the "nice" sides to each other) at the outlet of the turn around. Afterwards, I cut the circles within the seam allowance every few millimeters, so that everything turns nicely round after turning. Then it is already turned.

For stuffing I usually use stuffed cotton for such things. Since I still had some residue from the volume fleece, I picked them apart and filled them. I close the turning opening from the outside.

Tip: Since the pincushion is sewn around the wall pocket anyway, you can also close the turning opening on the wall storage silo directly with the machine. Remember: Narrow-edged with a simple straight stitch.
For the fan bag, I put the other fabric part in the middle left to left. Then I put a webbing on the edge. Then I put it on the front of my utensil and put the three outer edges firmly. Then I also mark the pocket distances with the aid of a ruler and a trick marker. I want four pockets of the same size, so I always mark after 12 centimeters. These lines are also sewn through all three layers.

I would like to attach my safety pins to a carabiner so that I can remove them easily and always have them at hand. For this I put a loop from the woven ribbon to the top edge of my bottom silo. For the Wonderclips, I only need a little colorful band, which I approach in zig-zag at only five places. Finally, across the corner, I attach a nice rubber band and make a short but sure seam after two stars (about every 2 cm). Here are my pins to be stowed.
Tip: Not only for beginners: If you sew all the deco elements and the loops for hanging on the wall silo in advance within the seam allowance on the utensil front, nothing can slip later!
Finally, I attach small loops of purple cords, so I can hang my utensil then synonymous.

Finish wall silo
On the front of my utensil I put right side on the right side (so the "nice" pages together) the back and then follows the ironing fleece. So that nothing slips I put everything around on the edge with Wonderclip together and sew under recess of a turning opening in the lower area once around everything together.
Place the fabric layers in the sewing machine so that the volume fleece is at the bottom, as otherwise either the sewing feet or even the needle could be impounded.
I cut all corners diagonally and turn everything. At the end, I'll step on a tight-edged turn around - including the turn-around opening. Optional: iron everything again and then fill and hang up.

I also filled my wall silo full of enthusiasm, but now I have to find the perfect place to hang it!
And your wall-hung silo is ready.

Have fun sewing!
variations
There are innumerable variations. Alone by the arrangement of different bags is for the individual Hängeutensilo a completely different look possible. You can design everything according to your own needs. Just look in my two contributions to the advent calendar and the culture bag to hang. Especially with different types of bags you can miss the utensil an individual look.
You can also create a completely different flair when you sew your felt up utensil. No seam allowances and twists have to be considered here, so everything looks a bit more delicate. Special accents then set with decorative stitching, for example, multicolour yarn.
Quick guide
1. Design / plan cutting pattern for the wall silo or take over mine
2. Find additional materials
3. Sew two circles together right to right and turn, fill, close
4. Fold and iron compartment pocket fabric longitudinally left to left
5. Sew on the woven ribbon (looks nice and stabilizes)
6. Pin off the edges and sew together within the seam allowances
7. Record and stitch compartments for compartments
8. Attach decorative materials
9. Place back side right to right, on top of that the volume fleece
10. Stick all layers well and sew them all the way around (turning opening!).
11. Cut off the corners at an angle, turn, shape
12. Stitch again all around with short edges
The twisted pirate