Fold origami cubes - simple instructions for crafting

- material
- Instructions for a simple origami cube
- Instructional Video
Origami relaxes and improves dexterity. However, the artfully folded results can also be the basis for individual decorations or complex works of art - this applies especially to the origami cube. Although it looks complicated, it can be folded in five minutes without any practice or much material. All you need is the right manual and a piece of paper.
Origami cubes, inflatable cubes or paper water bombs - as the folded cube is also called, it makes an impression but not much work. He can be used as a great home decoration or as an unusual building block for further craft work.
For this, however, it is necessary to fold the origami cube stably. The following step-by-step guide tells you how to do it.
material
You can make the origami cubes versatile. Use patterned, colorful or wrapping paper, written notes, design origami paper or sheets of different colors on front and back. As long as the paper is square cut and has at least a side length of seven centimeters, it can be folded into an origami cube. With shorter side lengths, folding becomes too difficult or even impossible. Further preparation is not necessary.
You need this:
- Square paper
- A flat, hard surface
- Five minutes
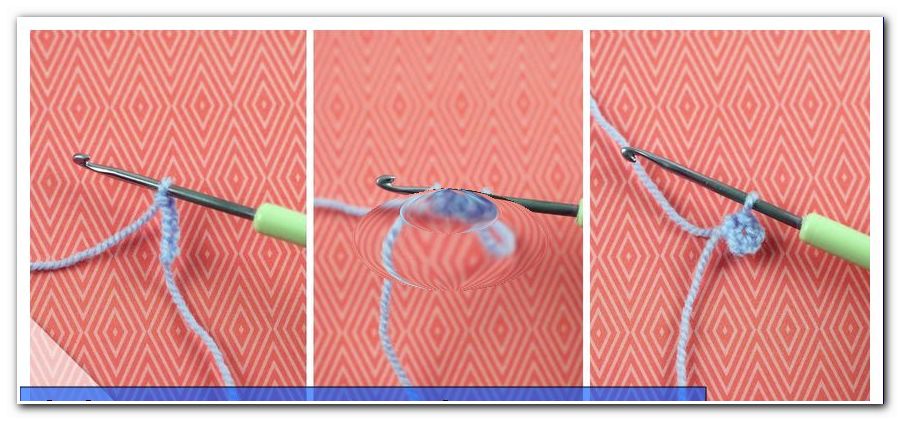
Instructions for a simple origami cube
The simple origami cube requires only a sheet of square paper. If no origami paper is currently available, you can also use a sticky note or a square cut sheet of writing paper.
1. The top edge is folded to the bottom edge so that it is centered in a line. The paper will be opened again.
2. The sheet of paper is now turned once to the back. The upper left corner is folded to the lower right. The upper right corner is folded on the lower left. The paper will be reopened afterwards.

3. The horizontal line is pressed in from right and left until the edges touch in the middle. The two smooth triangles come to lie on each other. The tip of the resulting triangle points upwards or forwards, ie away from the moth.
4. The bottom two corners are folded to the top corner.

5. The two newly created outer corners are folded to the center so that their tips touch. The paper openings point forward, forming two flat tabs.
6. The top corners are folded down so that they also touch the tips of the fold from step 5.

Tip: The next step is the most difficult of the whole origami cube. In the beginning, therefore, special care and patience should be maintained here.
7. Carefully grasp the downward-pointing left-hand tip and insert it into the left-hand tab. It is inserted into the tab until it completely closes with the edge and then folded with light pressure. Afterwards the same procedure is repeated with the right corner and the right tab. In the view from above, the upper corners are now "gone".

8. The paper is reversed and steps 3 through 7 are repeated on this page. This creates a flat, hexagonal shape.

9. The top and bottom tips are folded to the center of the shape and back. This creates auxiliary lines.
10. The outer edges are now slightly pushed apart, so that all four edges each have an approximately 90 ° angle to each other.

11. This will reveal a small opening at the front. Into these is purged until the shape enlarges into a body. Depending on the size of the cube and the thickness of the paper, a comparatively high pressure may be required.

Although the folding of the origami cube is now over, the body reminds after inflating but usually little on a real cube. To do this, it is necessary to press the cube into shape a little and straighten it out.
Instructional Video
Tips for quick readers:
- Use square and well foldable paper
- When folding, proceed exactly and conclusively
- Use leaf side length of at least 7 cm
- Consider the exact insertion in the tabs
- When inflating carefully increase the pressure
- Pull into shape after folding
- If necessary, use the ruler as a folding aid