Knitting finger gloves - free instructions for finger cots

- Material and preparation
- swatch
- template
- Size of the finger glove
- Knit finger gloves
- cuffs
- Back of the hand and palms
- thumb bridge
- The individual fingers
- Pinkie finger
- ring finger
- Middle finger and index finger
- thumb
In winter there is nothing better than warm wrapped fingers - finger cots and finger gloves are the best option. In this guide we show you how to knit finger gloves.
Material and preparation
Finger gloves are knitted in rounds. For these you need a needlelock with five individual knitting needles. If you choose a needle size of less than half the needle size specified by the wool, you can make the knit looser.
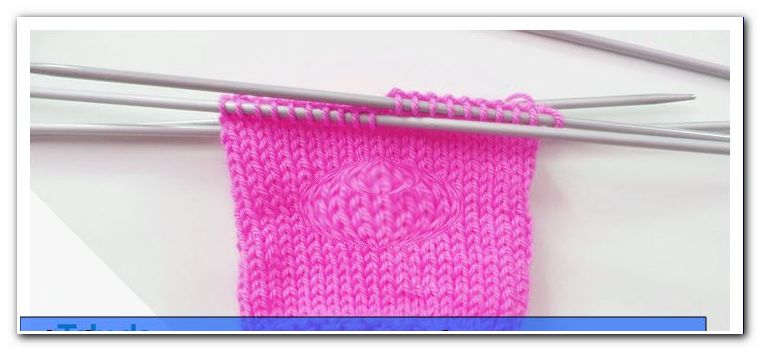
swatch
In order to knit the right glove size, we recommend a stitch test at the beginning. For this knit about 30 stitches in width and then a few rows. Now you can count how many stitches you need in width and how many rows you need in height for a piece of 10 cm x 10 cm.
template
Example of the width: knit 16 stitches in width on 7 cm. That makes about 22 stitches on a width of 10 cm.
Example of height: With a height of 2 cm 6 rows were knitted. This corresponds to about 30 rows for a height of 10 cm.

Size of the finger glove
Now measure your hand to determine the size of the gloves. Measure the circumference of the hand above the thumb. The length of the hand corresponds to the distance from the end of the middle finger to the wrist.

Knit finger gloves
Finger gloves are knitted from the cuffs to the fingertips.
cuffs
Start with the cuff by evenly slinging the necessary number of stitches on 4 needles of needlestick. You can also pin all stitches on a needle and then distribute them on all four needles.
These tables show sample sizes for stitch sample and stitch count for the cuff:
swatch
| Thin knitting yarn | Medium knitting yarn | Thick knitting yarn |
| Stitch sample: 30 stitches = 42 rows = 10 cm x 10 cm | Mesh sample: 22 stitches = 30 rows = 10 cm x 10 cm | Mesh sample: 30 stitches = 28 rows = 10 cm x 10 cm |
Cast on stitches
| Thin wool | Medium wool | Thick wool | |
| Circumference 18, 5 cm (S) | 56 stitches | 44 stitches | 36 stitches |
| Circumference 20 cm (M) | 60 stitches | 44 stitches | 40 stitches |
| Circumference 22 cm (L) | 68 stitches | 48 stitches | 44 stitches |
| Circumference 23.5 cm (XL) | 72 stitches | 52 stitches | 48 stitches |
Note: This number of stitches is determined by the amount of stitches and the amount of hands you measured previously.
Then the knitting work is closed for the round. For this the first open stitch must be knitted on the first needle.

Now knit the cuff in rounds and ribbed pattern until you reach the desired height. We recommend a height of at least 6 cm.
rib
knit one stitch on the left, knit one stitch on the left / knit two stitches on the left, knit two stitches on the right / knit on the right (one round on the right, one round on the left)
Back of the hand and palms
After knitting the cuff, knit smooth right in rounds. For all glove sizes knit 2 rounds. From the third round, the increases for the thumb wedge occur.

Right finger glove
The increases take place immediately on the first needle:
- knit 2 stitches to the right
- in front of the 3rd stitch you pick up the cross thread on the needle and knit it on the right crossed (ie from the back)
- the 3rd stitch is knitted on the right
- after the third stitch, pick up the cross thread again, knit off to the right and add a second stitch
- knit all remaining stitches on this needle = 3 wedge stitches
The other three needles are knitted normally without increasing.

* Knit 2 rows without increasing, join in the third row again 2 wedge stitches (before and after the increase each take a stitch from the cross thread) * = 5 wedge stitches
Continue this sequence ** until the thumb wedge has the desired number of stitches:
| Thin wool | Medium wool | Thick wool | |
| Glove size S | 17 stitches | 13 stitches | 13 stitches |
| Glove size M | 17 stitches | 15 stitches | 15 stitches |
| Glove size L | 19 stitches | 17 stitches | 17 stitches |
| Glove size XL | 21 stitches | 17 stitches | 17 stitches |
Then knit two rows without increments for each size.

Left finger glove
The increases in the left glove knit on the fourth needle of the needle game. The very first increase occurs before and after the third last stitch.
- Start the Daumkeil with the third last stitch on the fourth needle. Add stitches on both sides of it. Then the first three needles are knitted.
- pick up the cross thread on the 4th needle in front of the third last stitch on the needle and knit it off to the right
- The next stitch is knitted on the right
- then pick up the thread again, knit off to the right and add another stitch
- simply knit the remaining two stitches of the needle = 3 wedge stitches
For the left glove stitches are added in every 3rd row until the wedge is finished.
thumb bridge
Put on the bridge for the thumb in the next round. Knitt the original stitches of the inside and back as normal. The stitches of the wedge are shut down. Thereafter, web stitches are re-posted according to this table. The remaining original stitches of the cuff will knit normally.
| Thin wool | Medium wool | Thick wool | |
| Size S | 3 stitches | 3 stitches | 1 stitch |
| Size M | 5 stitches | 3 stitches | 1 stitch |
| Size L | 5 stitches | 3 stitches | 1 stitch |
| Size XL | 5 stitches | 3 stitches | 1 stitch |
Now knit a row with right stitches.
In the following rows, the web stitches are reduced.
A bridge mesh:
Knitt 3 stitches on the right (over): take off one stitch, knit the next two stitches and knit the previous stitch
Three web stitches:
1st row - remove the first two stitches in a covered manner (finish the first stitch, knit the second stitch on the right and pull over the previous stitch), knit the third stitch with the following stitch
Five web stitches:
1st row - remove the first two stitches in a covered pattern, knit 2 sts to the right and knit the fifth sts with the following stitches
2nd row - remove the first two stitches in a covered pattern and knit the last stitch with the following stitch
So again is the original number of stitches on the needles.
Continue knitting in a tight circle around the thumb bridge until the desired total height of the glove is achieved.

| Size S | 10 centimeters |
| Size M | 10.5 cm |
| Size L | 11.5 cm |
| Size XL | 12 cm |
The individual fingers
Now the individual fingers of the glove are knitted. As in the case of the thumb bridge, additional web meshes are created. In the following tables you can see how the stitches are divided on the fingers, and how the web stitches are re-struck.
Thin wool
| Size S | Size M | Size L | Size XL | |
| Pinkie finger | ||||
| Mesh back of hand / Stegmaschen / palm | 7/3/7 | 7/3/7 | 8/3/8 | 9/3/8 |
| ring finger | ||||
| Mesh bridge / Back of hand / Steg mesh / palm | 3/6/3/7 | 3/7/3/7 | 3/8/3/8 | 3/8/3/9 |
| middle finger | ||||
| Mesh bridge / Back of hand / Steg mesh / palm | 3/7/3/6 | 3/7/3/7 | 3/8/3/8 | 3/9/3/8 |
| index finger | ||||
| Mesh bridge / Back of hand / Steg mesh / palm | 3.8 / - / 8 | 3.9 / - / 9 | 10.03 / - / 10 | 10.03 / - / 11 |
Medium wool
| Size S | Size M | Size L | Size XL | |
| Pinkie finger | ||||
| Mesh back of hand / Stegmaschen / palm | 4/2/5 | 5/3/5 | 6/3/5 | 6/3/6 |
| ring finger | ||||
| Mesh bridge / Back of hand / Steg mesh / palm | 2/5/2/6 | 3/5/3/5 | 3/5/3/6 | 3/6/3/6 |
| middle finger | ||||
| Mesh bridge / Back of hand / Steg mesh / palm | 2/5/2/6 | 3/5/3/5 | 3/6/3/5 | 3/6/3/6 |
| index finger | ||||
| Mesh bridge / Back of hand / Steg mesh / palm | 2.7 / - / 6 | 3.7 / - / 7 | 3.7 / - / 8 | 3.8 / - / 8 |
right glove: take over the stitches for the top of the glove from the first and the second needle respectively - for the inside take over the stitches from the third and fourth needle.
Left glove: working in the same direction
Pinkie finger
(right finger glove)
Knitting now to the stitches of the little finger. For our example, the size S with the middle wool, you need for this 5 stitches on the 2nd needle. Then put the mesh of the back wall on a separate needle. Hang the work thread and take up the web stitches with a thread.

On three needles now lie the stitches for the little finger. Knit this up with the new, worn thread until it reaches the desired length. For the fingertip, knit as follows: knit the last two stitches of each needle together until 4 - 6 stitches remain - these are then pulled together.

Then knit with the remaining stitches of the back of the hand and the inner surface, as well as the web stitches three rows of right stitches. In this case, stitches are taken up with the working thread and that from the web of the little finger (this number corresponds to the number of new stitches of the web).
ring finger
This consists of the 3 to be struck stitches, 5 backs of the hand, the 3 Stegmaschen to the little finger and 5 stitches from the palm. These stitches are evenly distributed on three needles and knitted up. The lace knit as already described.
Middle finger and index finger
These fingers are also knitted in the same way as ring fingers and little fingers. All necessary stitches are distributed on three needles, the corresponding number of web stitches integrated and knitted up.

The length of each finger up to the peak decrease
| Pinkie finger | ring finger | middle finger | index finger | |
| Size S | 5.5 cm | 5.5 cm | 6 cm | 6.5cm |
| Size M | 6 cm | 6 cm | 6.5 cm | 7 cm |
| Size L | 6.5 cm | 6.5 cm | 7 cm | 7.5 cm |
| Size XL | 7 cm | 7 cm | 7.5 cm | 8 cm |
thumb
Around the thumb hole, pick up these stitches:
a stitch in front of the bridge from the cross thread, the thumb bridge stitches (1/3/5), a stitch after the bridge from the cross thread and the disused stitches. These are now distributed on three needles.
The disused stitches are now knitted. The last of these stitches is not - this is knitted together with the newly added stitch from the bridge (first lift the stitch, then the bridge mesh is absgetrickt and the stitch over pulled).
Combine the scoop you have made to the bridge with the first stitch on the right side (knit both stitches).
Now you have the thumb mesh. This is now knitted up until it has reached the desired height:
| Size S | 5 cm |
| Size M | 5.5 cm |
| Size L | 6 cm |
| Size XL | 6 cm |
The thumb tip knit as the other fingertips.