Sew on fabric school bag / with fabric cover yourself

- material
- Draw the cut
- Instructions: Sew the school bag
- Quick Start Guide - Sew the school bag
You want to give your child a very individual pleasure at the beginning of school ">
Quick and easy guide to sewing a school bag
The first day of school is a milestone in your child's life. Sweeten this day with a lovingly designed school bag even more! Do not worry, it's easy! Here's a step-by-step guide.
In each family album they are immortalized - the photos from the first day of school with the newly-baked schoolchild, who proudly and full of anticipation with the school bag in his hand smiles into the camera. With an individually stitched fabric cover, you can add something to this moment. Filled this can then - in addition to the sweets, which must not be missing in any case - also with homemade surprises. Just browse a bit here at Talu.de, there you will find something suitable!
Difficulty level 2/5
(suitable for beginners)
Material costs 2/5
(depending on the fabric selection between EUR 0, - from the remainder utilization and EUR 30, -)
Time expenditure 2/5
(including pattern about 1h, with applications corresponding to more)
material

For the basic form you need sufficient substances. Depending on whether you make the bag yourself from cardboard or buy a finished blank, size and thus material requirements may vary. In addition, you can choose from many decorative materials (often referred to as "Tüddelkram"). I used two different fabrics for my school bag. A small patterned for the lower part of the bag and a monochrome for the upper part. It always makes sense to use the "calmer" fabric for the upper part, as there is more room for further embellishment. In addition, I used Webband and created a print with my vinyl cutter, which I then ironed.
However, applications can be applied just as well - but this also takes a lot of time, which you should already plan in advance. Various borders such as zig-zag and bobble ribbons also give a beautiful picture. Last but not least, the tulle for the closure should not be missing. For this I used about 40 cm coarse tulle full width (150 cm) double-layered.
Tip: If you want to keep the school bag longer, you can also attach a nice cotton fabric instead of the tulle, fill it later with cotton and seal. You have created a wonderful souvenir cuddly pillow.
Draw the cut
Drawing a pattern for a school bag is easy. To do this, I glued together the boxes of two wrapping paper rolls, marked the center with a small arrow at the back and then measured straight upwards from the arrowhead and then laterally to the edge, creating a bow.

From the arrowhead to the side points I then pulled a straight line and cut out my finished pattern. After that, I rolled up the sheet on a trial basis to see if I was satisfied with the size. My school bag is material dependent (the box is only 68 cm long) 65 cm high. Purchased blanks usually have a height of 70 cm.

Tip: If you buy a ready-made blank or a finished printed school bag from the discount store to beautify it, place it on a box or paper, mark one point on the top and the top. Hold the bag at the point at the point and roll the top of the bag over the paper until the mark reaches the other side. So you can quickly create a suitable pattern.
Since I want to use two different fabrics, I have decided to split in two, 40 cm above the top. You can share your pattern as often as you like. Keep in mind, however, that this division must always be in an arc so that the line later looks like a straight line on the bag. Simply measure several times away from the tip in multiple directions and then connect the points or you pull the rounding with a compass.

Tip: When cutting, please think of an appropriate seam allowance! I have expected an inch here everywhere. If the school bag is only used as such, it does not need to be reinforced or finished. If you later want to make a pillow out of it, however, I would at least recommend ending to your heart.
If you want to apply a name or ornaments, you can do that now.
Instructions: Sew the school bag
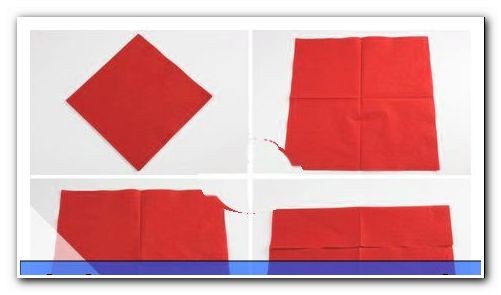
Place the subdivided fabrics with the right (ie the "nice") side up in front of them, as they are supposed to lie in the end. Now fold down the upper fabric and pin the edges. This can be a bit tricky due to the rounding.

Fold both fabrics in advance in the middle and mark these points with a pin. So you can ensure that the fabrics lie exactly in the middle of each other.

Now stitch both fabrics together along this edge with a simple straight stitch at the distance of your seam allowance (1 cm).

Lock start and end of the seam. Fold this seam apart and pin the tulle double-layered at the top right to the right. Start about 1 cm from the edge and let the other edge protrude a few inches. You can cut off the rest of the tulle strip.

Iron the seam allowances of the lower seam apart. The seam allowances on the top seam iron both down (toward the top).

Tip: tulle is quite sensitive to heat depending on the base material. Therefore, iron rather on level two and ideally with steam.
Now put on all borders, ribbons and embellishments. I lay my woven tape exactly over the seam between the two fabrics and pin it down. At the top, I make sure that my weave does not extend beyond the edge of the yellow fabric. Now I steppe each upper and below tight-edged on the woven band, where I lock beginning and end. For zig-zags and pompoms, a simple seam in the middle usually suffices.

Finally, I iron on my prepared, plotted lettering. This could be, for example, the name of the schoolchild.
When all ornaments are in place, fold the bag lengthwise to the right and pin the lengthwise edge. Make sure that all seams are exactly on top of each other, so that the bag looks nice from the back when it's done. To do this, first pin down the critical points and only then the longer material fields in between. After sewing, apply the bag. Gently shape the tip with a chopstick or a pair of scissors.
Finally, bring the upper, exposed tulle end to the edge and also stitch it with the machine. Since tulle likes to slip, you should also stick this piece in advance with pins.

And your schoolbag is ready!

To close the filled bag you can either hit a simple button in the tulle, use a gift ribbon or sew a ribbon to tie.
Quick Start Guide - Sew the school bag
1. Create a pattern and cut with seam allowance (about 1 cm)
2. Eventually strengthen and / or finish
3. Attach applications as desired
4. Sew pieces of fabric and tulle together and iron on seam allowances (down at tulle)
5. Decorate and decorate, sew longitudinal edge together, turn over
6. Fill, close and ready!
The twisted pirate