Crafting with wool - 5 great ideas with instructions

- Make pompoms
- Pompon Sheep
- Bottles of wool
- Pompon flowers
- Heart of wool
- Weaving with paper plate
With wool you can make a lot of things. The low-cost material offers the opportunity to create animals, figures, natural elements and other decorative items. In this DIY guide we present you six great ideas with detailed instructions that you can implement with your children in a short time!
Hardly any material has as many advantages as wool. It is not only absolutely affordable, but also versatile. Would you like to make beautiful animals, flowers and hearts "> 
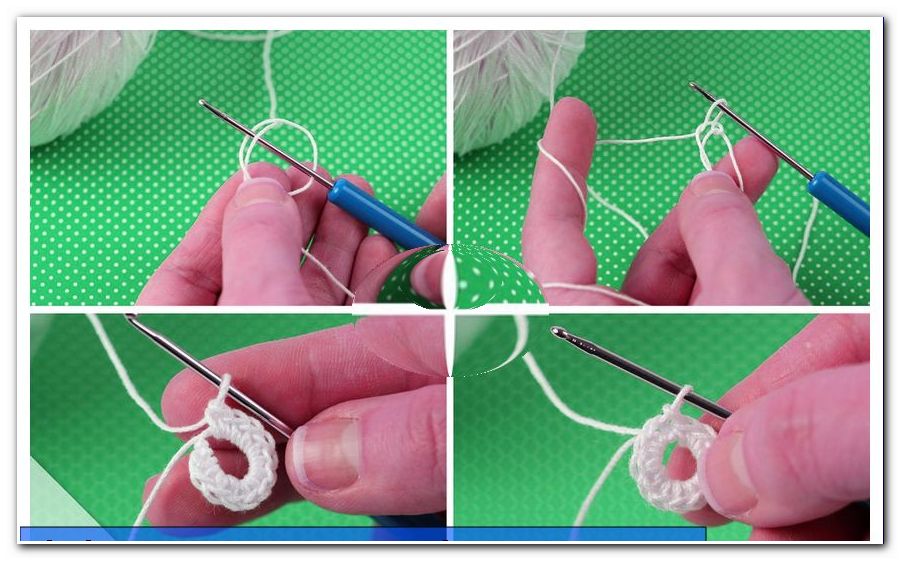
Make pompoms
The first two instructions (sheep and cat) require you to make pompoms. You will need wool, thin cardboard, scissors and a compass. For each pompom, use the compass to draw two equal circles on the cardboard (each with inner circle and outer circle). Then cut them out to make two rings, each with a hole in the middle. Then place the two rings over each other and wrap them with wool until the center hole is only tiny. In the next step, cut the threads along the outer ring. With a new - relatively long - wool thread bind the wound wool mass between the cardboard rings with a double knot. All you have to do is cut through the cardboard and remove it, as well as styling the pompon a bit. Do not cut the connecting thread - you'll need it for the upcoming tinkering.
For the detailed instructions for crafting a pompom, click here: Make pompoms yourself
Pompon Sheep
You need this:
- white wool
- black and pink felt
- white pipe cleaner
- thin cardboard
- paper
- pencil
- scissors
- compasses
- punch
Manual:
Step 1: Using thin cardboard, circles, scissors and white wool, make two pompoms with the following dimensions:
Pompon 1 (head): outer circle 2 cm diameter, inner circle 1 cm diameter
Pompon 2 (body): outer circle 3 cm diameter, inner circle 1.5 cm diameter

Step 2: Tie the two pompoms together at their connecting threads.

Step 3: Cut the white pipe cleaner into two equal halves. It forms the front legs of the sheep. Bend the wire right in the middle.
Step 4: Insert the bent wire between the head and the body of the sheep and then turn half a turn to fix it.

Step 5: Halve the second half. They form the hind legs of the sheep. Insert the hind legs deep into the body of the sheep.

Step 6: Now the wobbly eyes are attached.
Step 7: Then cut out two cute ears from pink craft felt. These are then glued to the head with hot glue.
8th step: Cut off a black wool thread a few centimeters short and make a knot exactly in the middle.
9th step: Cut the wool thread on both sides to the same length. The entire element acts as a whiskers.
Step 10: Stick on the whiskers as well. Finished!

Bottles of wool
You need this:
- Wool
- hot glue
- old glass bottles
Manual:
Step 1: At the beginning, the glass bottles are thoroughly cleaned and all labels are removed.
Tip: Soak the bottles in hot water for a quarter of an hour to easily remove the glue and labels.
Step 2: After the bottles have dried well, start at the bottleneck to wind up the wool. Attach the thread beginning with a small blob of hot glue.

Step 3: Wrap the wool around the bottle until it is either completely wrapped or a nice pattern is created.
Tip: In between, you should always fix the wool with a dab of glue.

Pompon flowers
You need this:
- Wool
- craft wire
- hot glue
- scissors
- pompons
Manual:
Step 1: Make any size of pompoms as described above - multicolored wool is especially suitable for a colorful bouquet of flowers.

Step 2: First cut a piece off the craft wire. This should be the length of the future flower stem.
3rd step: Then cut two wool threads, which are both about 1/3 longer than the piece of craft wire.
Step 4: Fix the thread ends and the wire end with hot glue inside the pompom.

5th step: Then wrap the two wool ends around the wire until the end. With hot glue, the ends are firmly closed and the protruding thread is simply cut off.

Repeat the same steps for all other pompoms and the pompon flower bouquet is complete.

Heart of wool
You need this:
- Cork or wood plate
- nails
- Wool
- paper
- pen
- scissors
- hammer

Manual:
Step 1: Pick up a piece of paper and paint a big heart on it, which you cut out in the sequence.
Step 2: Place the heart-shaped paper template on the cork or wooden board.

Tip: A small piece of tape on the back fixes the paper.
Step 3: Hit the nails along the template edge into the plate. The nails should be arranged as close together as possible. Then remove the paper.

Step 4: Grab the wool and attach the starting thread to the first nail by wrapping around the latter. Fix the thread with a knot.
5th step: Now wind the wool around all the nails - until a creative, beautiful tangle has formed.

Step 6: Tie the thread end. Finished!

Weaving with paper plate
You need this:
- two paper plates
- glue
- Wool
- wool needle
- scissors
Step 1: At the beginning glue the two paper plates exactly on top of each other to make the weave frame more stable.
Step 2: Then cut a small notch into each of the grooves on the edge.

3rd step: Now the frame is covered. Wrap it in any notch (the thread end is on the back), always start the wool thread around the opposite notch and back into the adjacent notch. When you have reached the end, the thread is cut off and firmly knotted on the back with the beginning.

4th step: Now the weaving can begin. Cut a long piece off the wool. One end is pulled through the needle and the other end knotted at one of the tensioned threads in the middle. Weave now with the needle alternately over and under the next threads along. In the beginning this can be a bit confusing, but round by round the pattern becomes more and more obvious.

Tip: If you use thick wool for weaving you will finish pretty quickly and the pattern will be very nice to see.
Step 5: Weave that way for as long as you like. In between, you can also change the color. For this, the thread is simply knotted on the tensioning thread and started in the same place with a new color.

Step 6: Complete the course as follows. Knot the thread end and cut off the rest of the rest. Thereafter, the tensioning threads are cut off and always knotted a pair lying next to each other. Only cut the next pair after knotting the previous one.

Done is the sweet little woven carpet, which you can now use as a coaster. In this way, you can weave all sorts of creative rugs, whether as potholders, doilies or dream catcher.