Silhouettes - free templates for printing

- material
- Paper cut - instructions
- The classic silhouette
- template
- To cut
- Use stencil
- Stick on paper cut
- Silhouettes templates
- fold and
- fold paper
- Paint a paper cut
- Cut out the motif
- Faltvorlagen
- The classic silhouette
Papercuts are precious and very decorative paper elements that are cut by hand. Of course you can come up with templates you have created yourself for this technique. We'll make it easy for you and provide you with free templates to print in this guide. Have fun trying!
The Scherenschnitt, also called Psaligraphie, is an old art craft, which was very popular in Germany, especially in the 19th century - the Goethe era. Black or white silhouette portraits are typical for this time. The origin of paper art lies, as with many other arts and crafts, in ancient China. Even today, there are still many lovers who appreciate this art and even reach for the scissors.
Especially at Christmas the silhouettes are popular decoration elements for window decorations or greeting cards. The nativity scene is a popular motif and you have certainly often come under the eyes.
material
Of course, the most important elements in paper cutting are paper and scissors.
In the specialized trade you can buy special paper cutting paper. This is offered gummed and ungummed. Rubberized paper is the most suitable - this is characterized by a black and white side of the sheet. The white side is provided with a kind of glue, which is activated by the application of water. So you can stick the paper cut immediately to the desired place.
You can also get a silhouette scissors for the silhouette. This is very sharp and fine compared to conventional scissors. It simplifies the cutting of filigree cuts, corners and holes.
Of course, you do not necessarily have to buy paper cutters and silhouette scissors to create a successful and elegant silhouette. With a sharp nail scissors, you can already do a lot. The type of paper actually does not matter as long as it is not too thick.
Paper cut - instructions
A distinction is made between two techniques in paper cutting, which we will introduce to you below.
The classic silhouette
As is customary in the Goethe era, the classic silhouette cut is characterized by the fact that the outlines of a picture are cut out and then applied to a light or dark background. If the silhouette is white, it is applied on a black background, it is black, then on a white. This is how the contours stand out especially strongly.
You need:
- scissors
- Scissors cut paper
- template
- possibly glue and brush
template
At the beginning you need a motive, which should be converted into a paper cut. We offer you a nice template for printing (see below). Print the picture you want.
But if you would like to design a motif yourself, simply draw it on a piece of white paper with a pencil.
To cut
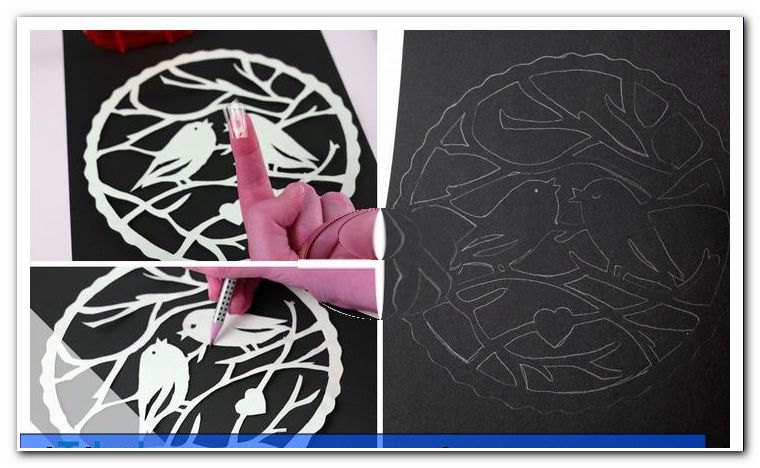
Then roughly cut out the image with the scissors. Cut out all inland pieces first. In the picture we marked all surfaces to be cut out with a cross. Only then are the outlines filigree and clean cut out.

When cutting, hold the paper firmly in one hand and use it to rotate. The other hand is cut.
Now our template or your own motif has been cut out. Now you can glue these directly on a black background and the paper cut is already finished. Then the motif must be glued mirror-inverted, otherwise the outlines of the template can be seen.
Use stencil
It's better to use the newly cut motif as a template. Decide on an alignment of the picture and then place it accordingly on the actual paper cut paper. Use the pencil to transfer the outlines of the motif onto the paper.
Tip: Attach the template to the paper with a small piece of tape. So nothing can slip when edging.
Stick on paper cut
Now take a sheet of paper in the contrasting color to your paper cut to hand. Then you can use the glue, which is already applied on the rubberized paper cut paper, or glue the motif with Bastelleim.
With the variant with rubberized paper you only need a brush and some water. Carefully apply water to the white, rubberized side using the brush. Then the paper cut can be glued on.

Caution: Take a little less water first.
Without gummed paper, you also stick the paper cut with glue and brush on the desired surface.
Silhouettes templates

- Cats: Click here to download the template
- Owl: Click here: To download the template
- Weihnachtsengel: Click here: To download the template
- Birds: Click here: to download the template
fold and
The folding cut technique is a bit simpler in contrast to the previous version. By folding the paper several times, you can cut several pages of your motif at once. Only downside of this technique - the subject must be symmetrical. The two birds in the previous guide are not. Nevertheless, paper cutting also makes fun with this variant. For example, you can design decorative snowflakes or butterflies in this way.
You need:
- Construction paper or paper cut paper
- compasses
- pencil
- Template or self-designed motif
- scissors
fold paper
At the beginning, use the compass to draw a circle on the sheet of paper or paper cut paper.

Then this is cut out clean
Now it is folded. Now fold the cut paper circle together as follows. First, the circle is halved once in the middle. Then this semicircle is gedriddelt. Fold one end of the semicircle in front of the middle and the other end back to the middle.

Paint a paper cut
On the small piece of cake you can now let your creativity run wild. Either you think up your own motive or you simply paint the forms of our templates. Because this technique is intended for abstract and simple motives, painting is not about details.
Cut out the motif
Now cut the surfaces painted by you clean. If your theme contains closed surfaces and holes, you should cut them first.

Attention: When drawing and cutting you must be aware that you do not cut individual elements apart. The outer edges should not be completely cut off, as your motif must always have connection points. Otherwise, the silhouette would fall apart.
Finally, the paper cutting only has to be unfolded carefully.
Faltvorlagen

Note - For the butterflies and other subjects with just one symmetry axis in the middle, fold a sheet of paper once in the middle. Then the subject is recorded on the front side. The symmetry axis runs at the closed folding edge. Now cut out the motif in two layers with scissors. Subsequently, the silhouette is only unfolded.
- Snowflakes: Click here: to download the template
- Butterfly: Click here: To download the template