Lay wooden tiles on balcony and terrace

- Material and preparation
- Costs and prices for wooden tiles
- Instructions - Lay wooden tiles
- 1. measure
- 2. Prepare underground
- 3. Loosely lay out wooden tiles
- 4. Cutting
- 5. Oil wood tiles
- 6. Laying the tiles
- Tips for quick readers
Wooden tiles are currently not only very modern on the terrace and balcony, the small wooden floorboards on the plastic grid are also very practical. Since the wood tiles can be laid flexibly and can also be picked up several times, they can always be used at a different location if handled correctly. How this works, we show you in our guide.
The biggest advantage of modern wooden tiles is the practical installation. If you lay the wood tiles with care and caution, you can take the small wooden boards again and again, if you move once. However, you must pay attention to a few points and always maintain and protect the tiles or the wood well. How the wood tiles are laid on the balcony and terrace and possibly also cut, we show you here in the instructions. In addition, you will also find some important care instructions for the beautiful wood tiles, because they are not very cheap and therefore should last as long as possible.
Material and preparation
You need this:
- rubber hammer
- Brush soft
- cotton cloths
- shovel
- Japanese saw
- jigsaw
- ruler
- pencil
- bar
- spirit level
- wood tiles
- wood oil
- gravel
- floor mat
Costs and prices for wooden tiles
Wood tiles are not very cheap. But you have to keep in mind that you do not make any demands on the ground, which in the end means a saving. However, you should still pay attention to the quality of the tiles. You also want to use them and not just maintain them all the time. You have to reckon with costs around 20.00 Euros per square meter. Especially fine woods may also be significantly higher.

- Acacia oiled - 4 fields with 6 small planks - 30 x 30 cm - each from € 1.90
- Acacia oiled - 6 planks per wood tile - 3 m² / 33 pieces - about 70.00 euros
- Wood tile pine pressure impregnated - 8 planks per wood tile - 50 x 50 cm - pieces from 5, 00 Euro
- Acacia floor grates - 4 fields each with 3 small planks - 30 x 30 cm - 1 m² from 17, 00 Euro
Tip: Look for wooden hardwood tiles, such as acacia, which are very commonly used for this floor covering. The tiles made of pine wood are usually pressure-impregnated. However, even with the best care, they will never last as long as the hardwood tiles. In addition, they should remember that pine is one of the softwoods and can be so quickly damaged by a chair leg made of metal, for example, if the cap is lost below.
Instructions - Lay wooden tiles
As is often the case, the actual laying of the wooden tiles is the smallest part of the work. The preparations are as well as the care of the larger share. Nevertheless, you should take the time, because you have much longer of the wood tiles.
1. measure
The measuring of the surface should be carried out very precisely. But if it's not a very limited area like a balcony, you can better fit the surface exactly to the entire tile than cutting it. Of course, this is not possible in a small, limited space.
Tip: Even when measuring, you can get advantages in the laying. If you have an area with lots of nooks and crannies, you can foresee that you have to cut many wooden tiles. Then you should choose a wood tile that is particularly small-sized.

But always buy a little more of the wood tiles so that you have a suitable tile in stock even after damage. Above all, if you know that you are moving in the near future, you should buy some additional wooden tiles right now. The next balcony is guaranteed to have a different dimension.
2. Prepare underground
The floor on the balcony should be clean and dry if you want to lay wood tiles. Make sure you check once again whether the drainage of the balcony works well.
Tip: You may also want to lay loose the wood tile directly above the drain. For this purpose, the plastic bottles must be cut off at this and the surrounding tiles. This allows you to quickly clean the drain on the balcony after a heavy rain or snowfall. In addition, this tile is then not in the wet and rot.
On a terrace, the ground must also be level and dry. There is no foundation required for laying the wooden tiles. If there is an old concrete surface, you can lay the wood tiles directly here. Otherwise you will need a porous gravel substructure to lay the wooden tiles for the terrace. The gravel layer does not have to be overly thick, which you need for the wood tiles. But you should infer a root fleece, so that no herb can grow through the wood tiles.
3. Loosely lay out wooden tiles
On a balcony or in narrow areas, you should start laying out the wooden tiles at the front of the parapet. So, wherever you see it best, you always have a complete tile that has not been cut. If you lay out the tiles loosely in advance, it is best to see which wooden tile has to be cut.
So you can later lay the entire surface in one go and do not have to cut every single tile in between. This is important because the wood tiles should be oiled again before laying. Especially the cutting edges in the wood have to be protected from the weather.
4. Cutting
One of the many advantages of wood tiles is the ease of cutting. Draw the cutouts on the back as much as possible. If you have selected small-scale wood tiles, you will often succeed in cutting only the plastic grid and not the wood. You can cut the plastic mesh as well as the wood with a simple Japanese saw. For the plastic use a fine sheet. Depending on the wood thickness you can choose between the fine and coarse leaves of your Japanese saw when cutting the wooden parts.

Tip: Usually you get the Japanese saw directly in the set with two differently serrated saw blades, which can be exchanged quickly. These sets are also available from discounters from time to time in very good quality at a good price.
5. Oil wood tiles
You should oil the tiles again before the first installation. On most packages read the note "pre-oiled". Often there are indications that the wood tiles should be oiled regularly. If you oil the tiles before laying, you will have a little more rest.
Tip: It is ideal if you pick up the wood tiles in winter and store them. Then the wood tiles should be cleaned as thoroughly as possible and oiled again before they are stored. Ideally, place the tiles upright on two strips so that they do not stand on the damp floor. The cellar or a covered area on the terrace is sufficient as a storage place completely.
The oiling is done with a very soft brush. You should use a special oil for outdoor or decking. Always swipe from one end of the small wooden plank to the other end. If you lay the patio tiles in a particularly wet, stressed area, try to dab some oil between the plastic grid from the bottom to protect it as well.
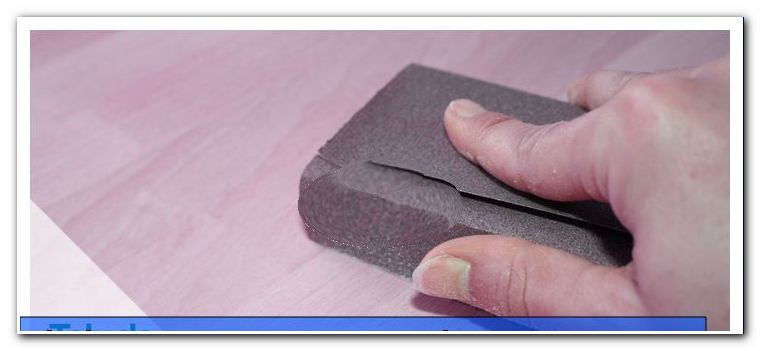
Tip: If you do not want to store the tiles in winter, you should nevertheless thoroughly clean them and possibly sand off the first damage with fine sandpaper. Then the wood tiles are then re-oiled thoroughly.
6. Laying the tiles
Take a smooth piece of wood, which you may wrap around with an old soft cloth. If you want to cover the drain with a loose tile as described above, you should have prepared that as well. Normally the tiles are laid from left to right. For wooden tiles, however, you have the choice and can also start in the middle, if you feel like it. This only makes it more difficult to pick up the tiles when cleaning or changing.
If you want to resume the tiles, you should remember which was the last tile laid. There you start in reverse order to picking up the wooden tiles. You can mark the last tile or even easier to photograph. If you have many differently cut wood tiles, you should number them from the bottom, so that you can always put the right tile back into its own place during the autumn cleaning and after storage. For particularly problematic floor plans, paint your installation plan with the numbers on a sheet of paper. So later you have less problems with the repeated laying out of the tiles.
Most tiles can be easily connected to the plastic bottles. If a tile does not feel like it, you can put the piece of wood on it and lightly tap it with a rubber mallet. Much violence is rarely needed in this work. If the surface is a bit uneven after laying, for example because some tabs are not yet properly connected, you can put a long lath or a board over it and adjust the uneven areas with the rubber mallet. In some cases, it is even sufficient to just run with soft sneakers over the floor.
Tips for quick readers
- Measure area - plan laying
- Select type and pattern
- Calculate amount of tiles
- Prepare the surface clean and dry
- Lay the wooden tiles loosely first
- possibly cut / saw
- always cut from the back
- Protect cut edges in the wood
- Oil tiles before laying
- Lay tiles on the surface
- pick up and re-oil wooden tiles before winter
- If possible, store wooden tiles in the basement / under the roof