Knit skirt with circular needle - instructions for beginners

- Preparation & Material
- Knit skirt
- The cuff
- The increase dogs
- Length and braid
- cord
A skirt is an incredibly versatile garment. From elegant to casual and summery light to cuddly for winter, it comes in all variants. Some are more unusual and are worn only by supporters of certain fashion trends. Others are quite conventional as part of uniforms for women. Even every knit option of skirt is open to you.
In this guide, we give you a basic introduction to knitting skirts. Beginners can easily get their first home-made skirt with this simple approach using the circular needle. The pattern is not in the foreground here. It is important to measure correctly to knit with the correct number of stitches. In addition, you'll find a step-by-step guide to a universal cuff that makes minor inaccuracies invisible and ensures a perfectly fitting skirt. Thanks to the circular needle, you can try on the skirt while knitting and adjust it if necessary. In addition, awkward seams fall away.
Preparation & Material
Prior knowledge:
- right stitches
- left stitches
- Increase mesh
There really are no skills needed that newcomers in knitting do not master. If you already knit one or the other scarf, maybe even a hat, this procedure with the circular knitting needle will hardly cause you any problems.
Material:
- approx. 300 g wool, running length from 125 m to 50 g, of which 200 g yellow and 100 g red
- Circular knitting needle size 5, 100 cm
- wool needle
- maybe crochet hook size 5

For our summer skirt we have selected a light ribbon yarn with just under 90% cotton. Cotton and silk are very pleasant, cool materials for the warm season. Knitted skirts made of new wool are more for autumn or winter. Certainly, this guide also allows for a warmer model if you opt for the appropriate wool.
The circular knitting needle with 100 cm is absolutely sufficient for the average figure of size 40. Should your skirt fit on fuller hips, you should reach for a circular needle with 120 cm length.
The dimensions
Make both a stitch pattern for smooth right and a rib pattern with 2 left, 2 right. In our case, 26 stitches in the ribbed pattern gave a width of 10 cm. Knitted smooth right were 22 stitches exactly 10 cm wide. For a height of 10 cm 38 rows had to be knitted.
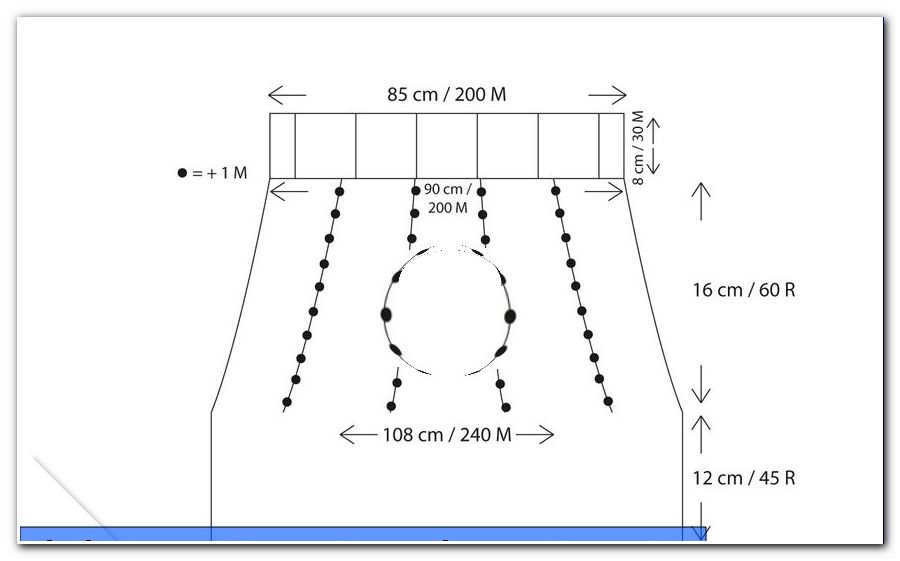
They knit down from the cuff. To calculate the number of stitches for the attack, you must measure the waist circumference below the belly button. Depending on whether you prefer to wear the skirt higher or on the hip, measure the circumference higher or lower. At a circumference of 85 cm we come in the ribbed pattern on 26 x 8.5 = 221 stitches . Since the cuff is stretchy and wool widens with time, we generously round off to 200 stitches. So many stitches are struck on the circular needle.
Another measuring point lies lower on the hip. Take the measuring tape to a closed circle and pull it down from the navel over the hips. Make a note of the maximum size. For most women, this is approximately at the transition between buttocks and thighs. Be generous in this measure, if the skirt should not be skin-tight. We are going from 108 cm . The important thing now is the distance between the upper circumference on the belly button and the maximum circumference further down. In our case, this was 16 cm .
It is now obvious that you need to increase after the cuff stitch to accommodate the width of the hips. The necessary increases are calculated as follows: After the cuff we will continue to knit with 200 stitches on the right side. This corresponds according to mesh sample about 90 cm. So it lacks 18 cm circumference to the hip. 18 cm corresponds to almost 40 stitches. These 40 stitches we have to increase over 16 cm height. That's 38 x 1.6 = 61 rows . We round off on 60 rows, which makes it easier to calculate.
The point now is to distribute the 40 increases evenly over 60 laps. Ideally, you will gain between 4 and 8 stitches in an increase. This gives a nice even picture. We opt for 4 increases in an increase round. That's 40: 4 = 10 increase rounds . We distribute these laps evenly on our 60 laps. So we come to the conclusion that we have to increase every 60:10 = 6th round 4 stitches . You can comprehend these calculations and measurements clearly in the sketch.
Knit skirt
The cuff
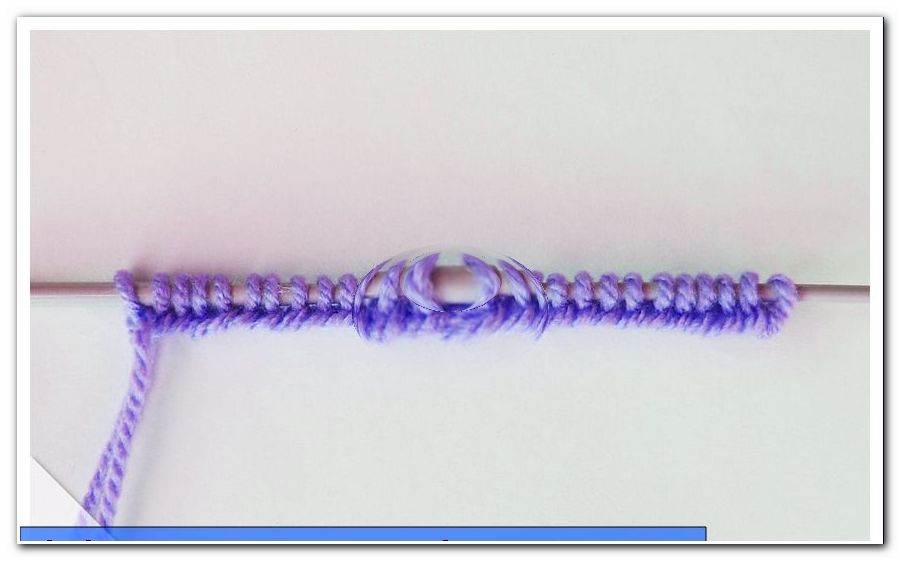
Hit the calculated number of stitches. Close the stitches to a round.
Note: Make a mark at the latest every 20 stitches. So you do not have to count all 200 stitches at the end to check, but only 20 pieces at a time.
Now knit over 8 cm in rib pattern 2 left, 2 right. That corresponds to 30 rounds. They knit a relatively high cuff, which is later folded in half. The two-ply cuff has a higher stability and it can be wonderful to draw an elastic or a drawstring. In our model we decided on a cord. With this, the skirt can be laced closer anytime later and slips guaranteed not.

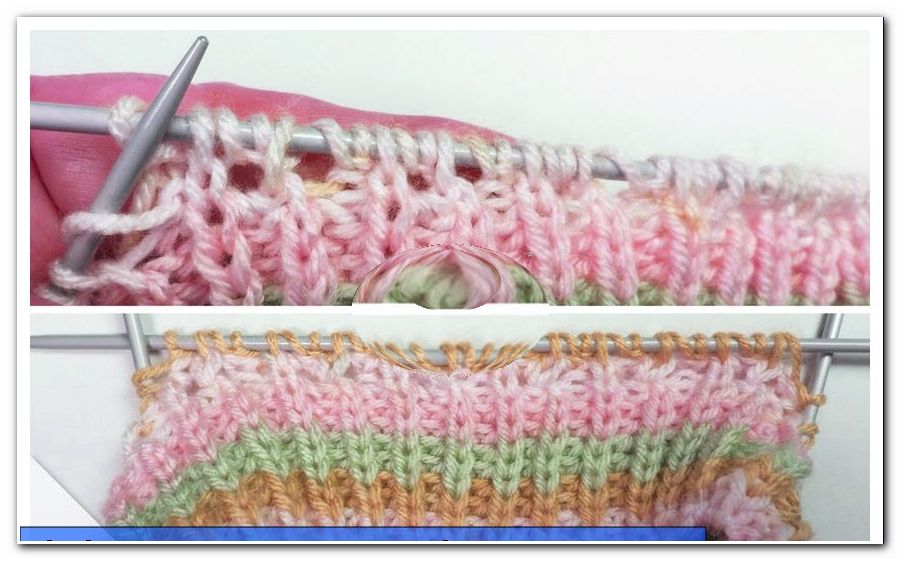
The cord will therefore run in the cuff and protrude only in 2 places to knot them outside. For the exit points you need 2 small holes. These knit after just 6 cm or 23 laps. At one point knit a right and a left stitch together. Make 2 envelopes. Then knit the following left and right stitch together. Repeat the procedure. 3 Continue ribbing again. If you find this spot in the next round, knit the envelopes as normal.

The increase dogs
After the 8 cm rib pattern knit smooth right on. Now it is necessary to increase the calculated number of stitches. So we take 4 stitches every 6th round. To facilitate the work, we distribute in the 5th round evenly spaced 4 marks. These are initially 50 mesh apart. In the 6th round knit two stitches out of the stitch after the mark. The markers stay in the same spot until you have completed all the increase dogs.

Tip: Keep a tally on your rounds. Use a different colored marker for the end of the round, which reminds you to set the stroke.
Instead of a complicated pattern, you can make the skirt more vivid with different colors. Our model got a few rounds of red after 15 laps in yellow. The first red stripe is 3 rounds high, the second 5 rounds, the third 7 rounds and so on. Despite the change in color, the increasing numbers continue in the usual rhythm.

For the first two strips, leave the yellow wool from the end of the yellow to the next beginning on the left side of the skirt. For wider stripes, you should cut off the yellow wool and start again. Tie the two colors tight at each transition and sew the ends together.

After the third red streak, the increases are finally done.
Length and braid
Now it's up to you how much you want to show off your skirt. The necessary increases for the fit are now done. This means you can easily knit stitch by stitch with the circular needle for the next few rounds. For a breezy summer skirt you can also continue with the increase in the usual rhythm. So it's going to be quite far below.
We continued to knit without any increases after round 61. Since the legs are usually narrower towards the knees, it still has not become a tight mini skirt. A total of 45 laps were knitted to the lower edge. That's about 12 cm. So the skirt is a good 28 cm long from the cuff. Of course, you can easily vary in length by knitting a few rounds more or less. For a longer skirt, only pay attention to the higher material consumption.

The last two laps are back in red. After that, it is chained off as usual by the circular knitting needle. For a playful conclusion we have still crocheted a simple border at the rock edge. This was made with a 5 crochet hook with the red wool. It's a nice finish and also helps keep the edge from rolling in so easily.

cord
Now you are almost done. Only the cuff has yet to be brought to its final form. To do this, you'll need a drawstring or other ribbon to tie the cuff. We have made a thick ribbon out of red wool.
Flip the top half of the cuff inward. Sew it along the edge and the transition to the smooth right knitted part together. It is easier after just a few centimeters of seam to put the cord in the cuff. Also, pull the ends through the two holes on the outside of the skirt. Later, the threading would be very tedious.

Once you have finished sewing, sew and knot the remaining thread.
Her summer skirt is now ready to be worn!