Crochet Children's Hat - Free Instructions & Size Chart

- material
- preparation
- Crochet Pattern - Children's Hat
- cap plate
- Size Chart
- Crochet cap height
- flowers
Children's hats are not only a useful accessory in winter. Nor does a cap always have to be knitted. There are various crochet techniques that can be used to create sophisticated hats for every season. For example, it is important for children to protect them from direct sunlight in the summer with their airy headgear.
In this manual, we give you a technique by the hand, with which you can vary completely individually: From the super-warm winter hat on a medium-thick transitional cap to a breezy kids cap for the summer, everything is possible with just a guide. In addition, in order to be able to charm every person of your choice, from baby to teenager, without specific measurements, you will find in this guide a size chart with measurements for different age groups. So the cap succeeds with security.
material
For a small kids cap, as you can see on the photos in this guide, you will need the following material:

- Cotton in 3 different colors, not mercerized with 50 g / 115 m
- Crochet hook 5 mm
The slightly thicker cotton used here is perfect for a comfortable transitional cap. If you would rather crochet a light summer model, use a thinner cotton or cotton blend. Cotton blended yarn consists mainly of cotton, but in addition has a further natural fiber , such as bamboo or kapok. This ensures a special lightness of the cap.
For a children's cap, which should keep your little head warm in icy winter temperatures, opt for a mixture of new wool and synthetic fiber. A ratio of 25% virgin wool to 75% synthetic fiber is an ideal compromise between comfort and warmth. It is also worthwhile experimenting with materials other than those mentioned in this manual. So there is very pleasant merino wool, which scratched much less than sheep's wool. Made of linen you crochet a velvety-soft, cuddly kids cap.
Tip: When crocheting a children's cap, always opt for the larger crochet hook when in doubt. Also, crochet nicely. Otherwise, the cap will be stiff and does not nestle so nicely against the head.
It is also not necessary to use three different colors for the children's cap. If you prefer the hat less colorful, choose only two colors and switch between these two. The beauty of the pattern in this tutorial is that there are no color transitions. The cap consists at the end of different colored rings, each of which is self-contained.
preparation
Prior knowledge:
- thread ring
- Half chopsticks
- chain stitches
- stitches
- Fixed stitches
In this guide, we work with a double thread. This makes the structure of the cap thicker and thus warmer. Since commercial yarn is usually wound up as a single thread, you need to make yourself a two-ply ball. Wrap off the purchased ball in about halfway. Take the thread twice and wind it up again in a ball. One thread comes from the unwound part of the yarn, the second thread from the rest of the thread.
In the photo you can see that the green ball already consists of a double thread. The small green ball still hanging from it is left over from the single-thread ball, since not exactly the middle was hit during unwinding. That is not a problem.
Crochet Pattern - Children's Hat
cap plate
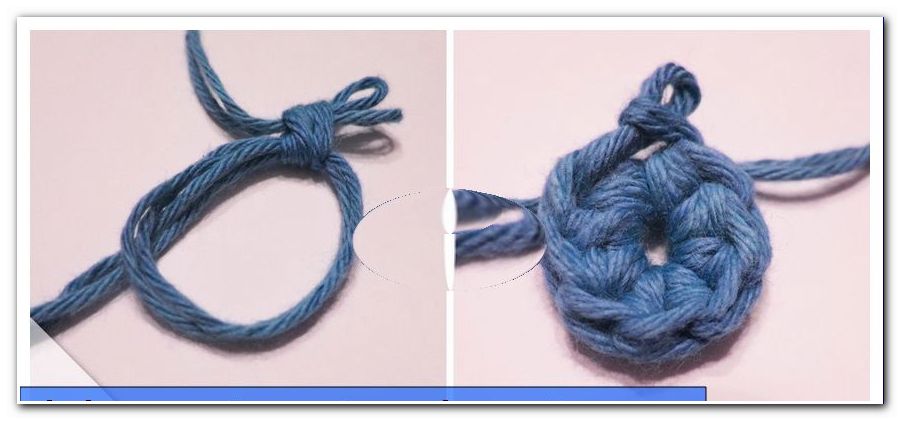
You start with a thread ring in the color of your choice. Pay attention to the double work thread. Just pretend it's a thread. The relatively large crochet hook will make crocheting with the double thread easier. Work 8 half rods into the string and pull together. Close the round with a slit stitch in the first stitch.
Note: You can certainly also crochet the children's hat with whole sticks. This is especially suitable for more airy models. Try in a swatch before, if you like half or whole sticks better.
Now pick up the next color. Hold the loose end to the back of the newly crocheted ring. Crochet two meshes in the new color in the warp stitch. Tighten the warp neatly and let the thread of the first color hang down on the back.
Crochet half a stick into the first half of the preliminary round. Then work two half sticks into each half stick of the first round. To double the number of stitches. The two air stitches from the beginning of the round replace the first half stick in the first stitch. After the 15th half stick, close the round with a chain stitch in the second loop from the beginning of the round.

For the third round, pick up the third color. We start the round again with two air meshes representing the first half stick. This is followed by two half-sticks in the second stitch of the preliminary round. Now crochet alternately half a stick and two half sticks. So you double every other stitch, which leads at the end of the round to a total of 24 stitches, respectively half sticks. Close the round again with a chain stitch.

Now, so to speak, all three colors are involved. It may seem a bit confusing, but the three balls are quite easy to handle in practice. Be sure to pull the thread of the preliminary round taut at the beginning of each round. To avoid holes at the color transitions.

Tip: Put the three balls in a basket or bowl. There they can unwind gradually, without rolling away.
In the fourth round you resume the thread of the first round. Pull it tight, but not so much that the cap contracts. The thread should only rest smoothly on the underside.
The procedure is always the same until you have reached the desired plate diameter according to the size chart. In each additional round, the distance of the stitches, which are provided with two half-rods, increases by one. In the fourth round, crochet two half sticks in every third stitch. For each round, pick up the working thread in the color corresponding to the pattern. Measure regularly, how big the diameter of your miter plate is now.

Size Chart
In this size chart you will find the average head circumference for different age groups. Head shapes are individually very different and the information in this size chart are indicative. At the elementary school age, the head is already almost fully grown and you can look at the adult beanie sizes from S to XL.
A perfectly fitting cap can be reached with greater certainty if you measure the circumference of the head itself. Place a measuring tape horizontally around the thickest part of the head just above the ears. What you can read on the measuring tape is the head circumference.
It is plate diameter = (head circumference: 3.14) - 2 cm.
Behind 3.14 hides the circle number pi. We subtract another 2 cm from the calculated diameter of the plate, since the diameter of the cap does not continue until one or two laps after the last increases. In addition, the cap is stretchy and adapts to the head circumference. Instead of calculating yourself, of course, you can read the appropriate head diameter for the plate diameter in the size chart. We will come straight to the column "Hatsheight".
| Older | Head circumference (cm) | Plate diameter (cm) | Cap height (cm) |
| 1 month | 35 - 38 | 9 - 10 | 12.5 |
| 1 - 3 months | 38 - 41 | 10 - 11 | 13.5 |
| 3 - 5 months | 41 - 43 | 11 - 12 | 14.5 |
| 5 - 11 months | 43 - 47 | 12 - 13 | 15.5 |
| 1 - 2 years | 47 - 51 | 13 - 14 | 16.5 |
| 2 - 6 years | 51 - 53 | 14 - 15 | 17.5 |
| 6 - 9 years | 53 - 56 | 15 - 16 | 18.5 |
| size | |||
| S | 54 - 55 | 15 | 18.5 |
| M | 56 - 57 | 16 | 19.5 |
| L | 58 - 59 | 17 | 20.5 |
| XL | 60 - 61 | 18 | 21.5 |
Crochet cap height
It's going to be really easy now. Once you have reached the desired diameter, stop increasing. Now crochet half a stick per round of round of the preliminary round. Continue to complete each round with a warp stitch and start the next round in the next color with two air stitches. This gives you self-contained color rounds.

From time to time, keep measuring how tall your hat is already. Lay the hat flat on the table. Now place the ruler or tape measure at the top and measure to the bottom edge. When the cap height is reached according to the size chart, stop with the half-length rounds. As a conclusion, crochet one last round with tight stitches. In the example, we did not change the color for this round.
If you look at the cap height in our size chart, you will get a children's cap that reaches over your ears. The underlying rule of thumb is:
Cap height = head circumference: 3
If you have a summer hat for children, you may not want to cover your ears at all. Then skip the last rounds and crochet the hat between 2 cm (babies) and 5 cm (schoolchildren) less high.
Finally, sew the threads on the inside of the hat. The least conspicuous thing to do is to sew each thread in a row of the same color. The cap is ready now!

flowers
For decoration, we have provided the cap with three flowers. These are done quickly. At the beginning, crochet a thread ring with five stitches. Close the thread ring with a chain stitch. It follows an air mesh. Now crochet one by one into the first stitch, half a stick, two whole sticks and half a stick.
In the next stitch, crochet a slit stitch and an airlock again. Continue to crochet in the same stitch half a stick, two whole sticks and half a stick. Repeat this procedure for all three remaining stitches. Now you have a flower with five petals.
Finish the flower with a slit stitch in the first round of air in the round. Cut the thread generously and pull it through the loop. Use the protruding thread to sew the flower to the hat.

With the appropriate color combination fits a children's cap according to this guide to each child. But even adult hats can be made according to this scheme. Just try changing the color every third turn, or keep the entire hat down to two or three separate rows in one color. There are no limits to creativity here.