Crochet Amigurumi for Beginners - Free Guide

- The right accessory
- Colorfull yarn
- crochet hook
- Stitch marker or marking thread
- filling material
- For the right facial expression
- For the beginning
- material
- Häkelanleitung
- body
- legs
- head
- Ears (work twice)
- tail
- completion
- Own Amigurumi creations
Instead of buying anonymous stuffed animals, more and more grandmothers, moms and even dads or uncle to crochet hook and make using the Amigurumi technique very darling figures themselves. Amigurumi, that is a composition of two Japanese words with the German meaning "knit" and "envelop "Or" packaging "and has now been well established for crocheting animals, figures or objects in the German language.
Beautiful, you look, the crocheted little works of art and often you can not imagine to be able to produce something like this yourself. With the right instructions, the entry is not so difficult and the rest is the practice. Because "the exercise is known to make the master". Here is an Amigurumi introduction and basic instructions. The cute Amigurumi cat "Kevin" helps me to explain and implement the basic steps of the Amigurumi.
The right accessory
Colorfull yarn
When working according to a manual, it is usually also indicated which yarn should be used. Otherwise, it is quite good to first have a few thoughts on the yarn or wool texture. How should the Amigurumi figure be used ">
crochet hook
With crochet hooks everyone has their own preferences. From the simple plastic needle to the ergonomically shaped high-tech needle, there is the right tool for every hand. The banderole of the wool used provides information about the thickness of the crochet hook. For the Amigurumi crochet, it is recommended to work with the smallest possible needle size, so that a close-knit crochet structure is formed and later the filling material does not push through the loops so easily.

Stitch marker or marking thread
Especially when amigurumi crochet you can hardly get around this useful utensil. It is usually crocheted in spiral circles and there it can happen that the beginning of the round is overlooked. For the correct crochet form, however, it is enormously important to be always in the process of counting. Personally, I do not like working with stitch markers and therefore prefer to mark certain fixed points on a marking thread: just a piece of thread that moves from round to round with the crochet work.
filling material
Only through the filling material gets the Amigurumi figure also its plastic form. In the specialized trade or craft supplies there are packaged bags with suitable material. It is financially affordable, gives a good shape without dents or bumps to produce and can even be washed. So if our cat "Kevin" has dirty paws, she walks into the laundry without any problem. If an amigurumi is to be able to stand upright later, it is best to use fill granules to fill in the feet. If the small beads do not want to stay in shape and slip through the stitches you can z. B. in old silk stockings fill before you put them in the Amigurumi.
For the right facial expression
What would an Amigurumi without a face ">
Otherwise, in the Amigurumi country decorating hardly a wish remains open. Buttons and bows complement - as in real life - the clothing of the figures. What can not be crocheted or embroidered, we just improvised. A pair of glasses is bent out of a piece of wire and the crochet pirate is of course given an earring. Shashlik sticks or toothpicks complete the hand tools of the crocheted fellows.
For the beginning
The single crochet steps in the Amigurumi are explained immediately afterwards with the instructions for our cat "Kevin". First of all a few hints that will facilitate the work afterwards:
Anyone who has been crocheting hats so far, is used to finish each round with a finishing stitch and start again with transition stitches. In Amigurumi figures is usually crocheted in spiral circles, which, as the name implies, turn like a spiral in shape. There are no transitions in the final product, which of course makes a visual impression. During the work it says: watch out! It is not really clear where a new round begins. And that's where the above-mentioned stitch marker or marking thread comes into play.
If a flat shape is needed, it will be crocheted in rows. At the beginning of each row, a spiral air mesh replaces the first fixed loop.
The thread ring, the air and kettmasche, the fixed mesh, decreases and increases - these are the most important techniques that should be mastered in the Amigurumi. Our DIY quick guides show how to do it. The simplest method, the decrease, is to mend two loops together and for the increase, two stitches are worked into the same puncture site.
And then it starts:
Amigurumi manual with the example of the cat "Kevin". (In fact, "Kevin" is definitely not a common cat's name, but we were accompanied by her long, happy mustache cat's life, but a tiger-tiger with the same name, which is why the Amigurumi cat crocheted here is called "Kevin")
material
- 1 skein of wool for needle size 6 in gray + black, a wool rest in pink
- Crochet hook No. 5
- A few security eyes
- fiberfill
- finished size: approx. 13 cm
Häkelanleitung
All body parts are crocheted in spiral rounds! For detailed descriptions of the individual crochet techniques, which are used in the following, we have put together an overview:
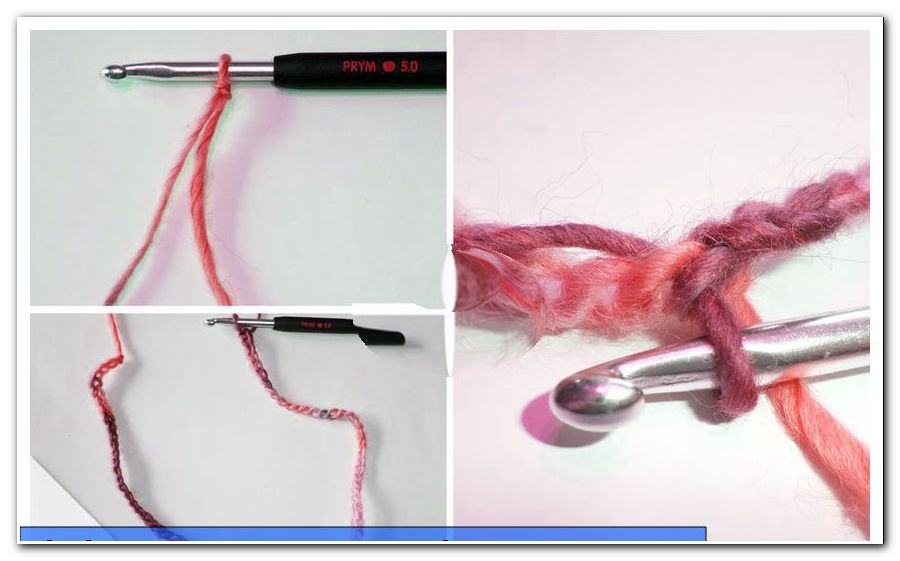
- Crochet the thread ring
- Crochet tight stitches
body
1st round: (use the gray wool) 6 solid stitches working in a string ring

2nd round: mark the initial stitch with stitch marker or auxiliary thread. In this round, all the stitches are doubled, so it is inserted twice in each of the 6 stitch heads of the initial round (= 12 stitches)

3rd round: Reposition stitch marker or auxiliary thread (in this and each subsequent round), doubling every other stitch, ie crocheting a single crochet, and crocheting 2 crochet stitches in the next stitching point, etc. (= 18 stitches)
4th round: double every 3rd stitch (= 24 stitches)
5th round: double every 4th stitch (= 30 stitches)
6th round: double every 5th stitch (= 36 stitches); By now you can see the bulge for the body quite well. At the top of the photo you can see the marking thread, which I already prepared for the next round.

7th - 11th round: crochet 36 sts each (doubling). At the mark you can see when the round is over. Now just pull out the thread and einwicken again at the spiral end.
Round 12: Combine every 5th and 6th stitch together (remaining: 30 stitches)
Round 13: Combine every 4th and 5th stitch together (= 24 stitches)
Round 14: Combine every 3rd and 4th stitch together (= 18 stitches)
15th round: cut off every 2nd and 3rd stitch together (= 12 stitches)

Tip: Do not cut the thread end too short after the completion of a part, that you may be able to use it for sewing together.
legs
1st round: (use the gray wool) 6 solid stitches working in a string ring
2nd round: double every 2nd stitch (= 9 stitches)
3rd - 6th round: each crochet without increases
head
1st round: (use the gray wool) 6 solid stitches working in a string ring
2nd round: double each stitch (= 12 stitches)
3rd round: Reposition stitch marker or auxiliary thread (in this and each other round) double every other stitch (= 18 stitches)
4th round: double every 3rd stitch (= 24 stitches)
5th round: double every 8th stitch (= 27 stitches)
6th - 9th round: Crochet without increasing - before the rounds become smaller again, the safety eyes should be placed between the 5th and 6th round (with 2 - 3 stitches).
Round 10: Combine every 8th and 9th stitch together (= 24 stitches)
Round 11: Combine every 3rd and 4th stitch together (= 18 stitches)
12th round every 2nd and 3rd stitch together (= 12 stitches)
Ears (work twice)
1st round: (using the black wool) Work 6 stitches in a string ring
2nd round: double every 2nd stitch (= 9 stitches)
3rd round: double every 3rd stitch (= 12 stitches)
tail
1st round: (using the black wool) work 4 stitches in a string
2nd round: double every 2nd stitch (= 6 stitches)
3rd + 4th round: Crochet without increases
4th - 15th round: continue to crochet without increasing (change to gray wool)
Tip: The piece of thread of the initial thread ring disappears best when crocheting in tail inside. Oh, the knotted color ends of the color change run inside the narrow crochet tube.
Tip: Color change - to get the most invisible color change is recommended in the Amigurumi the following technique: The last stitch before the color change still start with the first color, but not pull the last envelope through the loop. Instead, the new thread is already taken, placed around the needle and pulled through the loops on the needle. The first stitch after the color change may possibly be crocheted as a single crochet rather than as a single crochet stitch (make a loose knit stitch). The thread ends are firmly knotted and can be sewn on the inside of the crochet piece. However, as the ends of the Amigurumi disappear inside the body anyway, sewing is for once not absolutely necessary.
completion
- Body, legs and head are stuffed with stuffing
- Ears and tail stay without filling
- press the ears and sew them to the head
- Sew head and body together
- the legs are sewn on the bottom of the body
- the tail comes to the back of the body
- embroider a nose with the pink wool remnant
- either cut off whiskers from the black wool and tie them under the nose on the left and right or embroider whiskers

Tip: Sewing together the individual parts of the body - before you reach for the needle and thread, the individual parts should first be positioned with pins. So it is still possible to work on the final form. For sewing together you can then, if they are long enough, die the end threads of the individual crochet parts. Otherwise use wool that is best suited to the seam.
Finally, the stitching is still a little patience with the Amigurumi. However, exact work is rewarded and it is great fun to see how piece by piece life comes into the individual crochet pieces.

Own Amigurumi creations
Our "Kevin" consists of two fairly round body parts, elongated legs and a long, narrow tail. If these forms are changed only slightly, you can crochet any Amigurumi figures.
For a longer upper body in the middle part simply crochet several rounds without increases. If you want to run slightly pointed, like in a long nose, start with the thread circle and keep increasing until the thickest point is reached.
For bean shapes or indentations, increases and decreases are not evenly distributed on the round but only on one side.
Amigurumi Tips and Quick Start Guide:
- Use the smallest possible crochet hook
- Individual body parts start with a thread ring (6 stitches)
- Crochet tight stitches in spiral rounds
- crochet flat body parts in rows
- Increases: Crochet two stitches in a stitch of the preliminary round
- Decreases: cut off two stitches of the preliminary round together
- mark the beginning of a new round with a stitch marker or marking thread
- fix body parts with pins before sewing