Knitting herringbone pattern - monochrome and bicolor

- Material and preparation
- Knitting monochrome herringbone pattern
- Bicolor herringbone pattern
- Problems and solutions
- Possible variations
The herringbone pattern captivates in addition to the interesting look through its robust structure. In this manual, you will learn step by step, with which small tricks this extraordinary knitting pattern succeeds.
You have heard that it is difficult to knit the herringbone pattern "> Material and preparation
With the herringbone pattern you knit pieces that are characterized by a dense and resistant structure. That's why it's a great choice for protective potholders and coasters. It is also suitable for carpet runners, blankets and pillow cases or warm winter scarves.
The herringbone pattern comes into its own with thick wool of strength 7 and up. The characteristic structure is also created with thinner yarn. It is important that you use in any case needles that are at least two millimeters thicker than suggested by the manufacturer of the yarn on the band. Otherwise, the stitches will become so tight that you will not be able to pierce them. How much thicker the needle must be depends firstly on how tight you put the threads in knitting. Second, the nature of your project determines how dense the finished fabric should be. For example, a potholder must have a very strong structure so that it reliably holds off the heat. A scarf, on the other hand, should be soft and loose so that it nestles pleasantly against the neck.
When knitting a herringbone pattern for the first time, choose a medium thread count, for example four. For a thicker wool you would need to use very strong needles. These feel strange to inexperienced knitters and would make it unnecessarily difficult for you to focus on the pattern.
You need:
- Wool in medium thickness in one or two colors
- Pair of knitting needles, at least two thicknesses thicker than stated

Knitting monochrome herringbone pattern
To knit the herringbone pattern, first strike any number of stitches. Then work a preparation series in which you knit all the stitches left.
Step 1: Insert the right needle into two stitches at the same time.

Step 2: Knit both stitches together so that only one new stitch is created on the right needle. Leave the two knitted stitches still on the left needle.
Step 3: Drop one of the knitted stitches from the left needle. Take those who are closer to the top. The second stitch remains. Now you go into this and the next stitch and the next round begins.

To knit the herringbone pattern:
For the actual pattern repeat the two rows below. The single stitches in front of and behind the asterisks (*) indicate the first and last stitch of the row. The stitches in between are the herringbone stitches just declared. These knit several times, namely until only one stitch is left on the left needle.
1st row: 1 stitch on the right, * knit 2 stitches on the right side, drop off only 1 stitch *, 1 stitch on the right

Tip: To knit right crossed, pick up the front loop, not the back one as you would with normal right stitches.
2nd row: 1 stitch on the left, * knit 2 stitches on the left, drop only 1 stitch *, 1 stitch on the left

Tip: If you want to knit the herringbone pattern in rounds, work as described for row one. In the second round, knit right, unblended stitches instead of left. The single stitches before and after the asterisks do not need you.

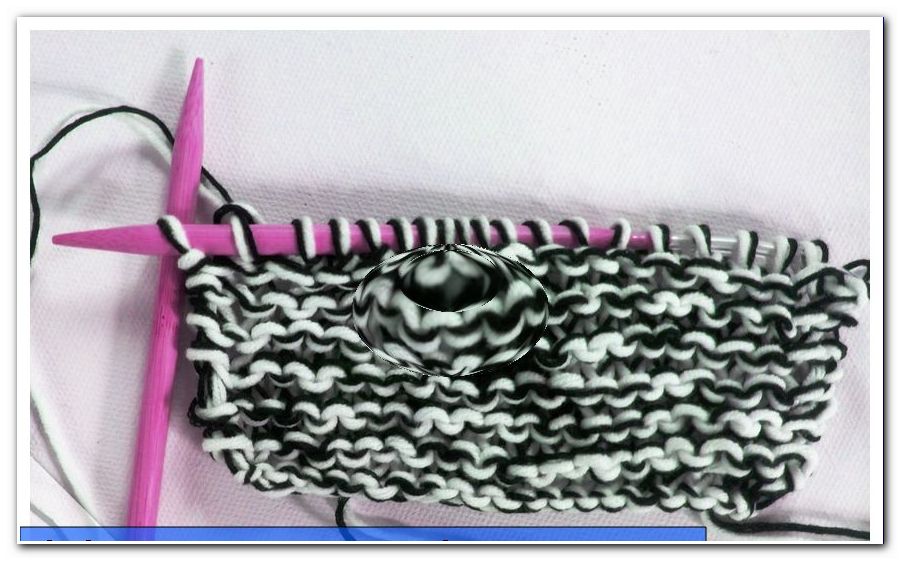
Bicolor herringbone pattern
The two-tone herringbone pattern knit with two threads at the same time, which makes the individual bones very clearly visible. The pattern becomes firmer and thicker than the monochrome variant. Be sure to use an even larger needle size. How much thicker the needles need to be for the stitches to slip well depends on how tight you are knitting. We used strength ten for a wool that is normally suitable for 3.5 to 4.5.
Hit the stitches in any number as usual with a thread. Now knot the second yarn and work a preparation series and the pattern rows as described in the monochrome version. Grasp both threads so that each stitch consists of two loops in different colors.
Tip: Make sure you always pick up both parts of a stitch and pull both threads through.

Before decoiling knot the threads, cut one off and finish the knit with the other as usual.

Problems and solutions
Problem 1: The stitches are too tight, so they can not be knit anymore. > Grab even thicker needles and be careful not to let the thread loose.
2nd Problem: All stitches are in the same direction and the pattern does not look like herringbone. > You knitted the stitches in row one, not folded. Remember to stab in the front of the mesh, not in the back.
3rd problem: The mesh size is no longer correct. > If it's just a scam too much or too little, you probably made a small mistake. If this does not continue in the pattern, it is no problem. If your number of stitches continuously decreases or increases, you have not understood the herringbone stitches yet. Take a look at the corresponding part of the manual and the pictures again. It is important that you knit a new one out of two stitches and only drop one of the knitted stitches. The already knitted stitch, which is still on the left needle, forms the next pair together with the following stitch, which you knit together to start the process from the beginning.
Possible variations
Variant 1: Knit a striped herringbone pattern by changing the color after every other row. Hang the thread you do not need on the side until it's your turn again.
2nd variant: If you find the bicolor herringbone pattern difficult, you can use a yarn that is multicolored from the outset. Wool also looks beautiful with a gradient.