Masking and painting roughcasting - 10-step instructions
- 1. Measuring and planning
- 2. Obtain materials and tools
- 3. Mending old woodchip
- 4. Note drying time
- 5. Covering and masking
- 6. Paint the ceiling
- 7. Paint corners and edges
- 8. Paint walls
- 9. Remove masking tape
- 10. Let the paint dry
Does your woodchip need a new (or first) painting ">
1. Measuring and planning
Before purchasing, the area to be painted must be determined.
Do you really know exactly how many square meters the room to be painted has? And how tall are the walls? Rather measure accurately before painting.
sample calculation
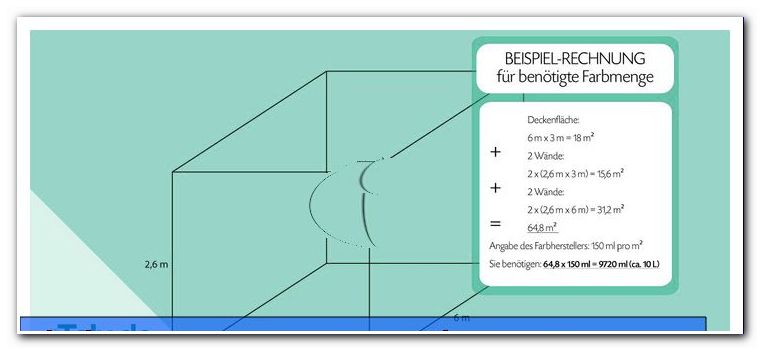 Depending on the wall color, a difference in double-digit or three-digit euro amounts.
The m² information on the paint buckets apply to normal soiled white walls. If you want to paint a dark wall white, you should get a small amount of the future wall paint and determine by trial (possibly with special separating primer), how many layers you need for a covering coat. If you want to paint a newly wallpapered wall, you should also plan something more color, so that the painting later even appears.
This color quantity calculator definitely makes planning easier: //www.toom-baumarkt.de/service-beratung/planungshilfen/farbrechner/
2. Obtain materials and tools
Think carefully if you need anything else - nothing is more annoying than having to rush back into the hardware store during the renovation. Usually you need:
- Wall paint
- Bucket and mixing tool (some natural wall paints are sold as powders)
- possibly to the wall color matching tinting color
- Abstreichgitter
- Brush, small to medium in size for painting corners and edges; Do not save on quality here, cheap brush fibers and leave hair on the paint
- at least one large paint roller for the free areas and a small space for hard-to-reach areas behind radiators, etc.
- Of course, depending on the number of co-workers you need more paint rollers, and one in reserve is not bad either
- possibly a telescopic pole for painting the ceiling
- Cover foil or newspaper
- Masking tape, "painter's crepe"
- Variant: a combination of foil and masking tape is called masker (adhesive tape with integrated cover foil)
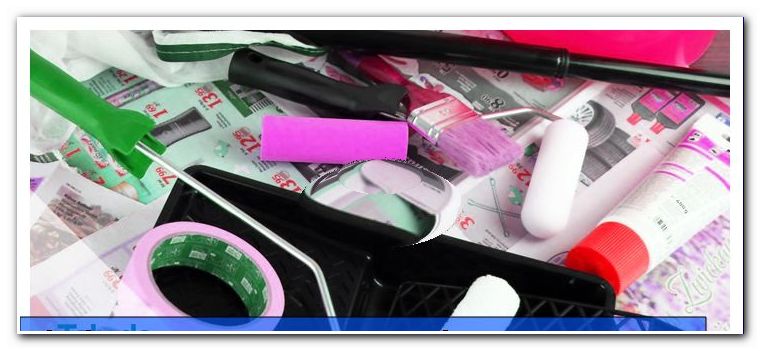
Not listed individually here is the material you need to pre-treat the wall. This can go from roughwall pieces + glue or liquid woodchip from the tube for repairing the old wallpaper, to the putty when holes must be closed.
3. Mending old woodchip
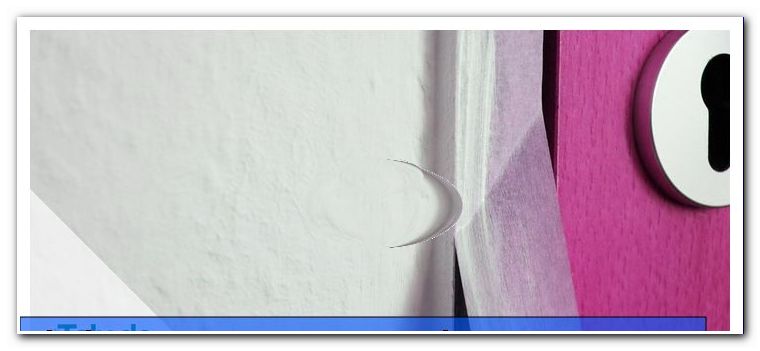
If a woodchip is to be overcoated, now is the best time to mend. Look around all the small cracks, bumps or other damage.
These are carefully scratched and brushed and then filled with putty. For small damage that is quite comfortable from the tube and you may more or less artistically reproduce the Rauhfaserstruktur (fingers and fingernails are excellent modeling tools).
Sounds exaggeratedly fussy to some people, but if you paint the wall in color, such unrepaired places can magically attract years later. Afterwards you can do little there. However, if the wall is painted white, you can repair it to a certain extent later.

Finally, you should still test whether the walls need cleaning before painting: Stick masking tape on the wallpaper at various points and then remove it again. If you can see dirt or dust, the wall should better get a little laundry, for example, with a large, soft, slightly damp sponge. If you omit this wash, these particles could later be spread with the paint on the wall and become visible.
4. Note drying time
If the painting follows directly on the wallpapering, you must not be too fast, because the fresh Raspasertape must necessarily have enough time to dry out. At normal humidity in the environment, it takes at least 12 hours. If it rains outside for days at a time, it can take longer.
If you want to paint as quickly as possible, you should in any case carefully examine / scan the wall beforehand to see if there are still any damp spots. If you are not sure, wait another day. If you have the wallpaper on the roll at some point, this is not really fun.
5. Covering and masking
Everything that should not get any color, is now covered. All furniture that is too heavy to carry out will move you to the middle of the room. These can be covered with a large foil. In an emergency, most natural and also emulsion paints can be removed with a brush of upholstery and fabrics.
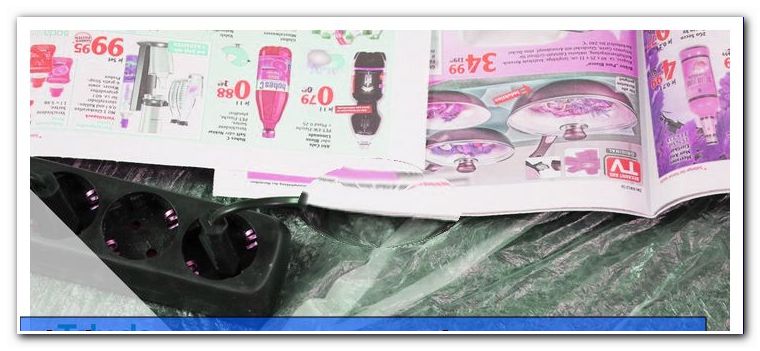
The windows and window frames are of course covered / taped. The entire floor, if the carpet is still to be used, should possibly be covered twice with foil or newspaper - by running and crafting foil and newspaper are very strained.
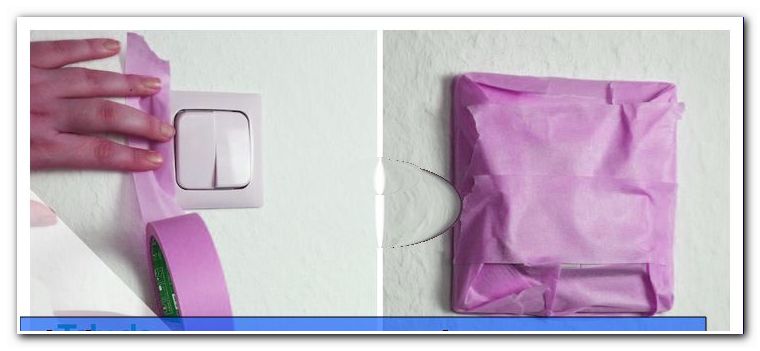
Small parts, which should not get any color, are covered with masking tape (if necessary a strip of foil). This means windowsills, light switches, not easily removable lamps, baseboards and sockets.
6. Paint the ceiling
The ceiling is first painted because it inevitably lands splashes of paint on the walls. If you paint in a warm room with thick paint, you should even plan the treatment of these splashes of paint before; if they stick to the wall until the ceiling is finished, you'll have a really humpbacked wall later in the worst case.
The easiest way to do this is when the walls are heavily grained or painted in color:
Tip: As you stroke the ceiling - starting at the narrow side of the room - a fellow helper touches thin primer paint and follows you with some distance. He can immediately pass the splashes of paint from the ceiling painting.
Strong helpers paint the ceiling with the telescopic pole, while others, not so strong, can work with the ladder.
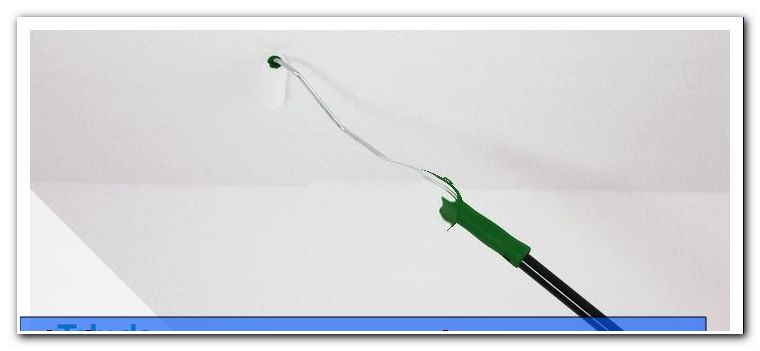
7. Paint corners and edges
Before the final coat is applied to the wall surfaces, the corners and edges are brushed off. Also paint all other hard-to-reach areas around the windows, around the radiators and over the skirting boards.
After this little work, there are only wall surfaces left that you can paint with the big paint roller. Thus, the large-scale finish can be performed evenly and time-saving.
8. Paint walls
The final coat should be done fairly quickly after brushing. If you paint already quite dried on corners and edges, you may see it later.
Choose the paint roller that will keep you fatigue-free for a long time. The better you pass the color, the better the result.
Uniform and free of color shades is, if you do not work straight lines, but square by the letter "M" or "W" s delete. After immersing in the paint, always paint the paint roller well on the wiping grid - you will see thick drops of paint later.
9. Remove masking tape
After painting, you should remove the masking tape fairly quickly because it may partially soften and then cause frayed edges.
10. Let the paint dry
When done, the paint is allowed to dry. Ventilate frequently (the paint loses moisture that the air in the room can not absorb at some point) and wait at least 24 hours.
If you want to confess quickly, the adhesive clover test will help again: if a piece of painter's crepe does not remove any traces of paint from the wall after a short time, it is sufficiently dry and the room is ready for use.
Tips for quick readers:
- Measure the room and plan the amount of paint
- Get materials and tools
- If necessary, patch wallpaper
- Note drying time after wallpapering
- Cover furniture and mask windows etc.
- Paint ceiling
- Paint corners and edges
- paint walls
- Remove the painter's crepe early
- Let the paint dry