Knit leg cuffs - free pattern guide

- material
- Knit leg cuffs
- preparation round
- 1 round
- 2nd round
- 3rd round
- Decreasing
Leg warmers are not only a warming accessory, they look really chic and fast on the legs. You wear them over your pants, under your boots, over your boots, just the way you love them. The main thing is, they stand out. In this manual we have described step by step how to knit leg warmers yourself. The simple patent pattern is most suitable for beginners. Have fun while knitting!
You only need wool and a free afternoon for this top fashion accessory on the feet. Even knit beginners can be a great success with our proposal for leg warmers. Choose the right wool for your outfit - and you're ready to go.
material
We have decided on a robust new wool blend in anthracite. Choose an effective yarn that is easy to knit and gives a clean mesh look. With such yarns even beginners are fast becoming the pros.
Our pattern is also easy to knit, you no longer need to knit as right and left stitches.
You need this:
- 150 g new wool superwash / run about 100 meters
- 50 grams of wool
- Strength 5-6 knitting needle game
- darning needle

Tip: Put great emphasis on high quality when buying the wool. Only then will you be guaranteed a long pleasure with your knitting. When buying your yarn, do not forget that the patent pattern uses more wool than a normal knit pattern.
Knit leg cuffs
The patent pattern is often knitted with scarves or jackets. It is very voluminous and warms really well. An additional hallmark of this pattern is its stability, as well as the patent pattern can stretch wonderful leg warmers - the perfect knitting pattern.
The patent pattern is usually knitted only in rows. That is, there is a back row and a back row. However, we will show you how to knit this ideal pattern with its distinctive ribs in rounds.
Tip: We knitted the gauntlets for a calf circumference of 36 cm. The finished leg cuff measures 34 cm in circumference. It rests very lightly and can easily be thrown when worn. This emphasizes the loose style something.
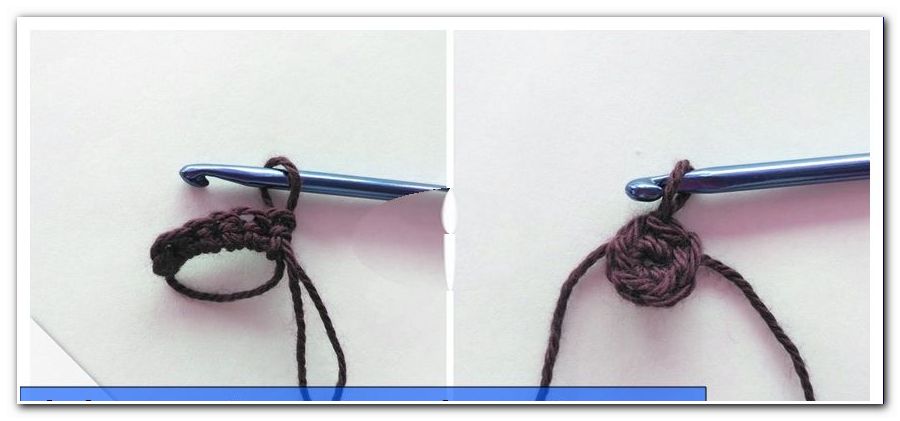
The patent sample is now knitted in rounds. Use a needle on your needles to loosen 42 stitches loosely. When splitting these stitches on four needles, you simultaneously knit the pattern for the patent design, one stitch on the right, and one stitch on the left.

Now close the stitches of the double-needle play by knitting two stitches on the fourth needle from the first needle. These two stitches will bring you back to the first pin after three or four rounds. Thus, there is no large mesh gap between the first and fourth needle, which looks ugly in the first rounds.

Tip: Remember that your starting thread is always the beginning of the first needle at the same time. Here also starts the pattern set, which goes over two rounds.
After the stitching on the needle game you knit a preparation round. Only after this round begins the pattern set, which goes over two rounds.
preparation round
At the beginning, knit one stitch on the right and one stitch on the left. Subsequently, the pattern set of the patent pattern begins in rounds. Knitting these as follows:
1 round
- Knit a stitch right.
- After that, lift off a loop with the envelope on the left.
- Now knit a stitch right again.
- Likewise, you also repeat the lifting of the stitch with the envelope on the left.
This first round you knit consecutively in this order. The round ends then with the last stitch before the stop thread.

2nd round
- A stitch (it's the first stitch on the right) is now lifted off with an envelope.
- The stitch, which was lifted in the preliminary round with an envelope on the left, is now knitted together on the left. You then have three threads at once, which are knitted together on the left.
- Then you lift the next stitch on the right with the envelope and the next left stitch with the envelope is knitted on the left again.
To continue with the entire lap.

3rd round
- The right-hand stitch, which lies on the needle with an envelope, is now knitted with the envelope on the right.
- Then lift off the following left stitch with an envelope on the left.
- The next right stitch with the envelope is knitted again on the right side.
- Then lift the left stitch with an envelope again.
In this episode you will continue until you have returned to the starting thread, and thus at the beginning of the next round.

The 2nd and 3rd round are now repeated continuously.

The entire leg cuff is now knitted up by changing the pattern set. How long your cuff should be, decide you alone. Our sample model is 30 cm long. Since our knitting suggestion is not very close to the leg, but light and loose is worn, this leg cuff is very casual. But you can also knit a tighter cuff, which ultimately sits a little tighter.
When you have reached the desired length of your leg cuff, knit the last round and chain the stitches.

To decline, knit the stitches the way they appear, without having to worry about another envelope.
Decreasing
When the needle starts with a right stitch, knit it to the right and knit the next stitch on the left. Now pull the first knit stitch over the second stitch and just let the cover slide off the needle.
You have only one stitch on the right needle again.
Knit the next stitch according to the pattern and pull the one stitch of the right needle over this new stitch.
During the entire decapping, you will only have one stitch on the right needle.
After the last chipped stitch, the cut knitting thread is simply pulled through the loop of this last stitch. Her first leg cuff is ready.
Tip: When decending, make sure that you loosely bind off the stitches. That is, do not pull too tight on the knitting thread, rather leave everything nice and easy.

Repeat the described steps for the second leg cuff. Once you have done that, you can call your own pair of knitted cuffs your own. Especially in autumn and winter, these leg warmers are welcome accessories.