Sew cuffs - instructions for beginners: leg and arm warmers

- material selection
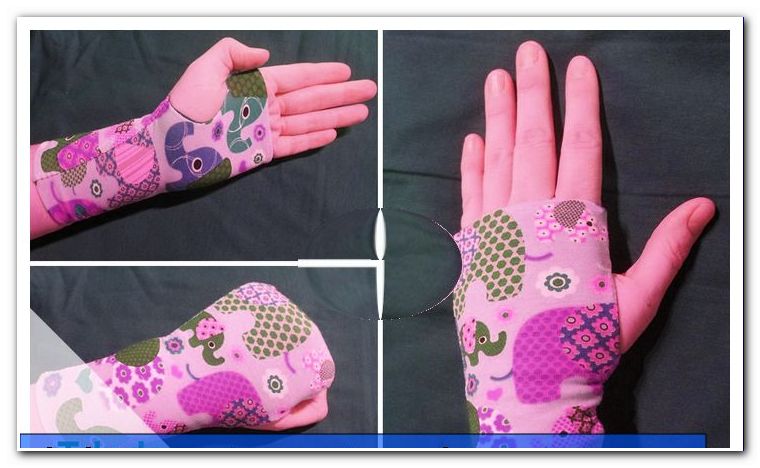
- Sewing arm warmers - instructions
- Sew cuffs
- Sewing Leg Warmers - Instructions
- Sew cuffs
- For decoration
- variations
- Quick guide: Sew on arm warmers
- Quick guide: Sew leg cuffs
Autumn and winter bring cold winds with them, wrapped arms and legs are a must. Gauntlets keep wrists and calves warm. They always wanted to know how to sew cuffs ">
Cuffs sew for arms and legs - reversible tulips
Not only in winter, it pays to pack his forearms especially. Especially in summer, when you sit in the warm office with your short-sleeved arms and your forearms are always on the cold table, arm warmers are invaluable. Of course, the legs will be nicely decorated to match the arms, so today in our tutorial I will show you a simple guide for arm and leg warmers that even beginners can playfully implement.
Arm warmers were originally part of armor. Who would have thought that they would turn into fashionable accessories? Of course, I give here only the basic form, which you can modify as desired. You will find more about this in the tips and in the "Variations" section at the end of the tutorial. Sewing arm and leg warmers is really not difficult, so fresh to the factory and a lot of joy sewing cuffs and decorating!
Difficulty 1.5 / 5
(suitable for beginners)
Material costs 1/5
(depending on the choice of fabric between EUR 0, - from the remaining utilization and EUR 15, -)
Time required 1.5 / 5
(incl. pattern variable depending on cut)
material selection

Basically, you can use for stitching to sew any type of fabric. However, if you're working with non-stretch fabrics, remember that top and / or bottom will require cuffs or elastic banding, otherwise they will not stay in place. I would like to sew arm warmers for me and leg warmers for my toddler out of the same fabrics. The respective sewing pattern for cuff sewing can be adjusted as desired.
amount of material
The amount of material depends, as always, on the pattern. In the arm warmers, I would definitely sew with two layers of fabric, as it looks better and also scores for comfort. The leg gauntlets can also be single-layered, unless you want to turn them up or use them as reversible gauntlets.
Sewing arm warmers - instructions
Pattern for arm warmers with thumb holes
Place your hand on a piece of paper and trace the contours. Make a note of how long the gauntlets on the finger side should be approx. Now straighten the cut by bridging the narrower areas a bit and draw in the thumb hole. This should be about 3.5 cm for adults. For children also 2 - 2.5 cm are enough. Now cut your pattern along the straightened lines and draw a semicircle for the thumb hole.

Tip: Always use a stretchy stitch for stretch fabrics. For example, a stretch stitch or a flat zig-zag stitch, otherwise the seams will tear when donning and they will not enjoy your work for long.
Sew cuffs
Fold each desired inner and outer fabric in the threadline and record your pattern. Ideally, secure both layers with pins, so that nothing can slip. Now cut the fabric without cutting out the thumb hole. Now you peg the outer sides (the fabrics lie right to right, ie with the "nice" sides to each other) and sew them together. Open both pieces of fabric and put them back to right, put them on and sew everything well.
 Fix the two layers of fabric (one inside and one outside) on the side where you want to open the thumb hole. Quilt the thumb opening with a single or multiple straight stitch and cut out the semicircle with a short edge. Now apply the fabrics and shape the semicircle nicely. Place the open edges above and below, left to right, together and pin them down. Now put one side of the inner fabric on this edge as well, then fold the other part around so that it also comes edge to edge on the opposite side.
 Pin together the edges of the four layers of fabric and also sew this length. Apply the arm cuff. To finish, you can either close the turnaround with a ladder seam, miss it, or put on a cuff. I opted for hemming. How to attach cuffs can be found in my tutorial of the same name.

Tip: You can use the same pattern for the second arm cuff on the other arm, but you must work exactly the wrong way around the thumb opening!
 Sewing Leg Warmers - Instructions
 Sewing Leg Warmers - Instructions
 Sewing pattern for turn leg warmers
For the leg gauntlets, measure once under the knee around your leg and add about 1 cm of seam allowance. The length is a matter of taste. If you attach cuffs, then add a few inches later. They always start with one (simple gauntlets) or two (reversible gauntlets, padded gauntlets) rectangles.

Tip: The described cuffs are tight. If you like it further or you want to wear your cuffs over the pants or the boots, they have to be cut widthwise by a few centimeters.
If you like it quick and easy, sew on one-legged leg warmers with cuffs at the top and bottom. I would like to sew short reversible tulips or those that can be turned up. I would like to sew these without cuffs, so I add about 5cm to the calf length. In addition, I do not want to sew any 08/15-cuffs, so I fold my rectangles lengthwise in the middle and cut them diagonally to the bow (about 3 cm at the edge to the middle).

Sew cuffs
Now I put my two pieces of fabric right to right (ie the beautiful sides to each other) on each other and put the top edge (in my case, the "top" or the "roof") firmly and seize. Then I open the fabric layers, turn them around and work the "lace" out nicely (here you can also iron!).

In the next step, I fold both fabrics together lengthwise, so that the edges come to lie on each other (each inner fabric on inner fabric and outer fabric on outer fabric) .This I stick to me and mark on the inner fabric a turning opening with two small needles and sew accordingly.

Now it will be a bit tricky for the beginners, but do not worry - you can do it! I lay the tunnel in a circle and start at the two seams, and I put these right to right on each other and stick the beginning firmly. Shortly after, I begin to sew the two fabric layers and sew around once, finally over the two seams. A circle has been created.

Now turn through the turning opening so that the inner fabric comes to rest on the outside and close the turning opening. If you want to use the gauntlets as reversible gauntlets, close them with a ladder seam. Otherwise you can simply stitch with the machine with a straight cut short edged. Make sure that you sew together only the inner fabric and sew the beginning and end! Remember that they also need a second leg cuff.

For decoration
Decorations - affectionately also referred to as "Tüddelkram" - are currently almost indispensable to the sewing world. Now you can decorate, sew, hang and equip your cuffs with whatever you like. For girls especially sweet, for example, with a self-sewn button flower. You will find a suitable instruction in my contribution "Application".
variations
As already mentioned, you can easily change leg gauntlets. The simplest version is a fabric rectangle according to pattern, which they fold and sew together. Then you only need to attach cuffs (circumference x 0.7 plus 1 cm seam allowance) at the top and bottom and they are already finished.
A simple twist on arm cuffs would also be to simply omit the thumb holes and keep them shorter at the top so that your forearms are protected even when your sleeves are slipping up, like stretching your arm out, for example.
Not more complicated, but to sew a little differently are cuffs, where even on the thumb along a piece of fabric is attached or even sewn together between all fingers.
Quick guide: Sew on arm warmers
1. Create and cut patterns
2. Sew inner parts and outer parts separately
3. Sew finger edge of inner and outer part together
4. Stitch thumb opening and cut out with edged edges
5. Turning and forming, put edges together, wrap inner fabrics and pin
6. Sew over all four fabric layers (thumb opening inside)
7. Turning and closing (cuffs, hem or ladder seam)
8. And done!
Quick guide: Sew leg cuffs
1. Create cutting pattern and cut, chamfer as desired
2. Place the inner and outer fabric right to the right and sew the upper edge together
3. Sew finger edge of inner and outer part together
4. Turn and possibly shape the tip
5. Fold longitudinally, stake out and sew together (turning opening!)
6. Form the ring and sew the ends together right to right
7. Close the turning and turning opening (ladder seam or straight stitch with the machine)
8. Turning - and you're done!
The twisted pirate