Make paper angels - instructions for an angel made of paper

- Make paper angels
- Paper Gel - Variant 1
- Paper gel - variant 2
The Christmas season is approaching and you like to make small gifts for your loved ones. Or do you still need a Christmas decoration for your cozy home to beautify window sills, shelves or even the table for the coming holidays ">
We have created for you and your little ones a free guide for a angel made of paper, after which you, in just a few tinkering steps, make a paper angel. At the same time, our small crafted heavenly messengers are also suitable as an extension for your Christmas tree or as a gift tag for the colorfully packed small and large Christmas packages. As a window decoration, for example, for the nursery, find the magic paper angels also use and decorate the entire living environment. We explain in our step-by-step instructions how to make the paper angels very easily.
Make paper angels
Paper Gel - Variant 1
With this crafting idea you fold in just a few steps an angel made of paper. You only need a few craft materials for that.
required materials:
- a colored sheet of paper in A4 format, 80g / m 2 or even Christmas pattern paper
- a few wooden beads in different sizes, possibly also colored
- ruler
- scissors
- Bastelleim or hot glue
- some yarn or a wool thread
- Needle for threading the wooden beads
- bonefolder
Step 1: First, grab a sheet of A4 paper and divide it into two parts. You can use the scissors or fold the sheet several times from one side to the other and then tear the two sheets apart.

Tip: For even faster parting of an A4 sheet into two pieces, you can also use a paper cutter, if available.
Step 2: Lay a piece of red paper upright and start folding it fan-shaped from below. For the first fold place the ruler and measure 1 cm for the first fold. Fold the entire paper. You can also use the folder or a similar object to fold your fanfolds once more.
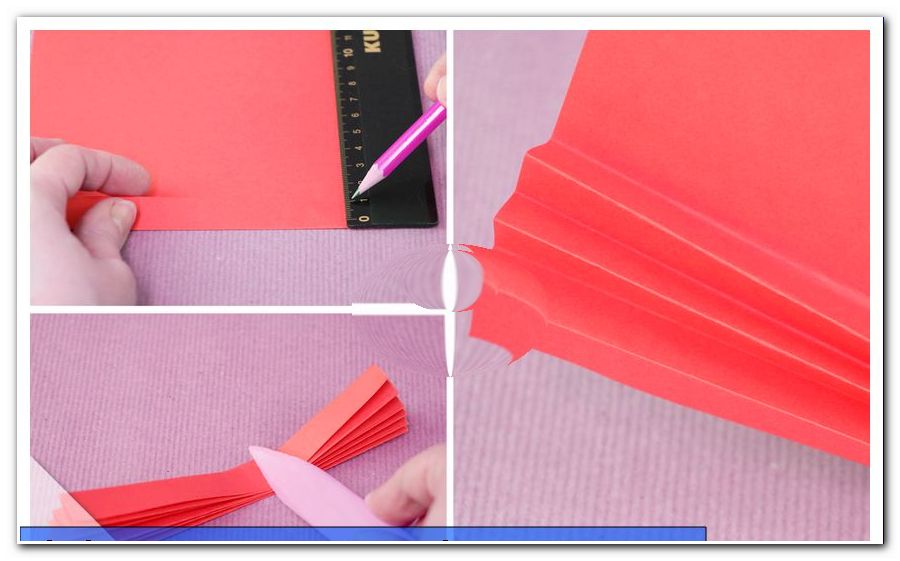
Tip: Of course, you can also individually set the size of the fold and choose it to be larger or smaller. Thus, the appearance of your paper angel changes again.
Step 3: Repeat the second step from the same time with the second piece of red paper.

Step 4: Now measure from a folded fan piece 6 cm from the outside to the middle. Now fold the measured piece to the middle of the fan piece. That's how the first wing of your paper angel was created. Fold here also your folding with the Falzbein.

Step 5: Repeat step four on the other fan piece. Now also the second wing of the paper angel is finished.

Step 6: Now glue the wings from steps four and five to the body with some hot glue.

Step 7: On the long side of a fan piece, apply a little bit of hot glue in this step, carefully put a piece of wool thread or other yarn on it, and then glue the second fan part to it. Please glue the individual components together quite quickly, because the hot glue cures quickly and quickly.

Tip: When using hot glue please attach to the thread pay attention to your fingers and do not get to the hot glue, there is a risk of burns. And if you work with children, you better use craft glue or craft glue.
Step 8: Now thread a needle on the wool thread and put the wooden beads on it, first a smaller, colored and then the larger, which forms the head and as a third ball then again a small, colored wooden bead.

Tip: If you are working with smaller children please supervise here or take this step itself, as pointed objects such as needles again risk of injury and small parts, such as pearls and the like, could be swallowed.
Step 9: Finally knot the wool thread into a suspension loop and "hide" the knot, if possible, in the third threaded wooden bead.

And Schwupps is your first angel made of paper finished and can be used as a decoration or gift tag.
Paper gel - variant 2
This crafting idea is a small modification to variant 1, but is identical to the previous crafting idea of the folding technique.
required materials:
- two sheets in A4 format, 80g / m 2, once in white and once in color, we have used yellow or Christmas pattern paper is usable
- a medium sized wooden bead and small white seed beads (glass beads) or plastic beads
- ruler
- scissors
- Bastelleim or hot glue
- some yarn or a wool thread
- Needle for threading the wooden beads
- bonefolder
Step 1: Divide the two A4 sheets back into two halves. Use the scissors or, after folding the paper several times, tear the two sheets apart.

Tip: Use a paper-cutting machine to split the blades, if you have such a machine on hand.
Step 2: Refold a colored sheet of paper as a fan. The size of the fold can be set individually or chosen as in the first variant. We re-sized the size of the number two paper gel by one centimeter.

Step 3: Fold the resulting yellow fan halfway together. Fold something here with the shinbone again. If you now cut off the lateral ends at an angle with the scissors, the fan ends are pointed and tapered.

Tip: When cutting the outer edges obliquely, cut off a bevel on the unfolded folded fan at an angle with the pair of scissors and then use this bevel as a measure of the second cut by bending it down onto the not-yet-sloping fan side. Cutting the folded fan at one go is sometimes difficult, so split it into two cuts.
Step 4: Fold the white, half piece of paper again as in step two of the second paper gel variant and then cut the outer sides diagonally with the scissors again.

Step 5: Now glue the yellow fan in the middle together with some hot glue.

Step 6: Using a needle, pierce a hole in the middle of the yellow fan where you just glued it together. Likewise proceed with the white fan. Then thread both compartments with needle and thread and provide the thread end with a double knot.

Step 7: Now glue part of the white fan to the yellow fan piece. Then fan the folds of the white fan slightly upwards.

Step 8: Now thread a small white pearl onto the needle and thread, then the medium-sized wooden bead and finally a small white pearl again.

Step 9: Now make the remaining wool thread into a loop and knot the thread at the head of the paper gel.

And in no time this little paper gel is ready and waiting to be given away or decorated by you!

We wish you and your little ones a lot of fun crafting and giving away a variety of heavenly paper angels.