Knotenkunde: Seemannsknoten lernen - 15 DIY-tutorials

- Basics and important concepts
- Sailor's knot - instructions and use
- Achterknoten
- Simple roringstek
- Kreuzknoten
- bowline
- Palstek around bar
- Round trip with two half blows
- Simple Schotstek
- Double Schotstek
- overhand knot with draw-loop
- rolling hitch
- sheepshank
- clove hitch
- secured
- put on panties
- placed in the hand
Whether as a lifeguard at the Wasserwacht, as a hobby sailor or angler - seaman's knots are part of the basic training of every sailor. We show you in this knot-knot which knots are among the most important ones and how you can bind and use them.
Basics and important concepts
If you want to deal with seaman's knots, you should know a few basic concepts at the beginning. These are needed in the following instructions.
Eye - here the rope is put once to the loop. The end, with which is worked, lies above.
Bay - form with the rope a "U".
End - this is how we call the ends of the rope. The end used for the node is called the end of work.
Half blow - this is the conventional knot you know from everyday life.
Rundtörn - wrap the rope 360 ° around an object.


Sailor's knot - instructions and use
Achterknoten
manual
Step 1: Place an eye at the beginning.
Step 2: Afterwards, guide the short end around the long end, which should not exhale.
Step 3: Then insert the short end from the top through the eye.
4th step: Finally, the figure of eight is only tightened.

use
If you want to connect two ropes, the figure eight is a good option. It offers particularly high strength with smooth ropes and is easy to loosen. The figure eight is usually used when sailing to prevent the pods from hissing or falling out of the eyes.
Connecting two ropes works this way. You bind the knot with a rope end as described above, but do not tighten it yet, let it loose. A second rope is now passed through the knot so that ropes run parallel. Follow the knot course with the second rope. Then the Acherknoten can be tightened.

Simple roringstek

manual
Step 1: At the beginning, place two round trips around the object (bar, ring) to which the roring stick is to be attached.
Step 2: After that, simply pass the short end through the two turns and tighten the knot.

use
This knot is used for mooring on a ring or for attaching ends to round objects, such as an anchor ring. The advantage of the knot, it is one of the strongest Steke and can not be solved so easily. It is also advantageous that this clamps on the ring and in this way can not be worn through so quickly.
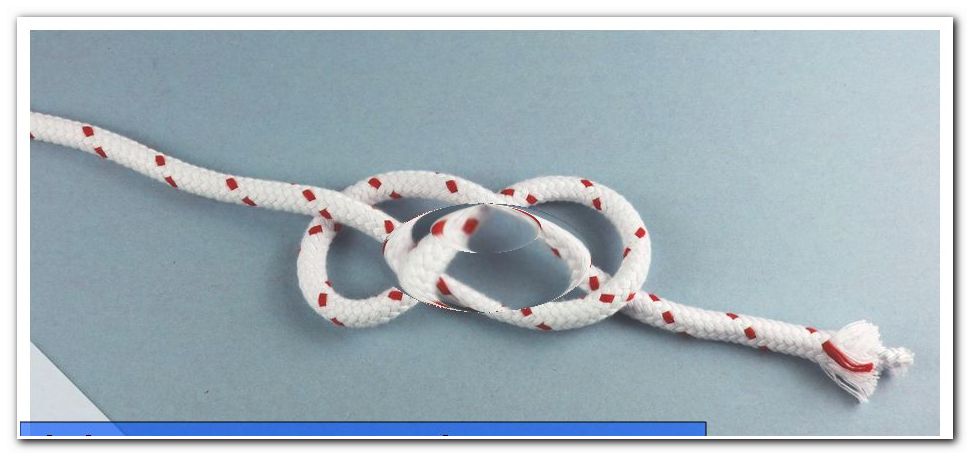
Kreuzknoten

manual
Step 1: First cross the two ropes one above the other - remember which rope is below (blue).
Step 2: Then twist the two ends on the left and then on the right to swap places.
3rd step: Now twist the two upper ends as in the previous step. The rope, which was down, now comes up.
Step 4: Afterwards, guide the end of the rope (red) through the loop, around the other rope.
5th step: The knot can now be tightened.

use
The cross knot, also called double knot, weaver knot or Samaritan knot, is often used to connect two equally strong ends of a rope, such as socking. Since the knot is very thin and simple, it is very popular. However, should you renounce this knot, life and health depend on it. It can be quickly tied wrong or not hold properly if the two ropes are not the same thickness.
bowline


manual
Step 1: First, place an eye with the shorter working end resting on top.
Step 2: Afterwards, guide the short end through the eye from bottom to top.
Step 3: Afterwards, bring this under the not yet used end of the rope.
Step 4: Now, once again, bring the end of the work through the eye from Step 1 and tighten the knot. If you have done everything right, a loop has formed on one side.

use
The eye at the Palstek has the advantage that it does not contract. Usually, the Palstek is used for mooring on posts, poles and rings. It is also used in the rescue of persons. Furthermore, it can also be used well to connect two equal or ungelichtwirke ropes with each other. The Palstek is a universal node and definitely belongs to the basic knowledge of the sailor.
Palstek around bar
Here we show you how to bind the above-described Palstek around a pole or a ring.

manual
Step 1: Put an eye back on.
Step 2: The short working end is then placed from back to front around the bar or ring.
Step 3: Pass the end through the eye afterwards.
4th step: Then the rope end is again behind the other, still unused end out.
Step 5: To finish the knot, retrace the end of the work and tighten the knot.

Round trip with two half blows

manual
Step 1: Lay the rope around the pole or ring from front to back with two round trips.
Step 2: Then, run the shorter end of work from front to back around the second end of the rope.
Step 3: Then pull the rope through the resulting loop.
Step 4: Repeat steps 2 and 3 below in the same way.
5th step: Now the knot can be tightened.

use
The round trip is used for permanent mooring on posts, poles and rings.
Simple Schotstek

manual
Step 1: Lay a bay with the thicker rope.
Step 2: Pass the end of the thinner rope from bottom to top through this bay.
Step 3: Then, thread the end of the rope behind the two ends of the other, wrap it around the bay.
Step 4: Then the working end is pulled forward and pulled through under the corresponding rope piece.

use
With a simple sheet pile, two unequal ropes can be firmly connected. The name comes from the fact that former sailors used the knot to tie the sheet together. It can be put on panties and is therefore to be solved even under heavy load. He can solve at low to no load very quickly and should therefore always be under train.
Double Schotstek

manual
Step 1: Lay a bay with the thicker rope.
Step 2: Pass the end of the thinner rope from bottom to top through this bay.
Step 3: Then, thread the end of the rope behind the two ends of the other, wind it twice around the bay.
Step 4: Then the working end is pulled forward and pulled through under the corresponding rope piece.

use
The double Schostek is used to connect a thick, stiff rope or a hawser with a thinner rope. The strength of the knot strongly depends on the different rope strengths. If you tie three instead of two, you will receive the Zeisingstek.
overhand knot with draw-loop

manual
Step 1: First put a round trip from front to back around the bar or ring.
Step 2: Form a cove with the short end of the rope.
Step 3: This bay is now pushed through the round trip lying on the pole.
Step 4: Hold this bay until you have tightened the knot on the long end of the rope.

use
The Slipstek is a short-term knot for covering and quickly releasing a leash on poles, rings or posts. Under changing loads, this node holds only limited.
rolling hitch

manual
Step 1: Place the end of the rope over the pole from the front to the back in a round trip.
Important: The rope end must be laid from right to left, otherwise the knot will not have a stopper function.
2nd step: Then you put a second round trip from front to back, which crosses the first one.
Step 3: Repeat step 2 and place the rope exactly parallel to the previous course.
Step 3: Pass the working end back around the bar and back again.
Step 4: Now tighten the knot by pulling the working end between rounds 2 and 3 upwards.

use
The Stopperstek you need for it, as the name suggests, to prevent slipping of the leash on a towing haul. With the clamping knot you can knot an auxiliary rope to a rope, which is under tension to relieve this with a pulley or a winch. The stopper effect depends on the rope diameter, as well as the material and the surface of the ropes.
sheepshank

manual
Step 1: Put three eyes on each other.
Step 2: The middle eye is now drawn out through the other two.

use
The trumpet knot is a shortening knot that can be leashed without using the ends. This allows a subsequent shortening of the already fixed line. The two eyes created serve well as a suspension for a double hook.
clove hitch

manual
Step 1: Guide the end of the rope around the pole from the front to the back with a round trip.
Step 2: Then the end of work is placed in front of and with a second round trip crosswise backwards.
Step 3: Afterwards, you only pull the rope through the round trip just laid. The knot can be tightened.

use
Use the weaving tackle for piling and piling or securing the fenders to the railing. Partly he is also called Achterschlinge. He is one of the few nodes that are suitable for the middle of the line, if the ends are not free. The advantage of the Webeleinstek: he hardly gets stuck at higher load. The disadvantage: it can relax or unroll when loaded on one side.
In the following we show you the secured Webeleinstek, as well as the Webeleinstek on slip and put on the hand.
secured

manual
Step 1: Bind a weaving tackle as described above.
Step 2: The rope end, which is now upwards, is then pulled down and secured with a half blow around the other end of the rope. Pass the working end around the other and tighten the fuse through the resulting eye.

put on panties

manual
Step 1: Tie a weaving tackle as described.
Step 2: The rest of the outstanding top is now put into a bay by pushing the end through the second round trip again.

placed in the hand

manual
Step 1: At the beginning, lay two eyes that run the same way, with the end of the rope always resting on top.
Step 2: Lift the first eye and put it over the second one so that they overlap.
Step 3: Then pass both eyes over the pole, stake or bollard. The knot only needs to be tightened.