Insulate and insulate the attic with little effort

- floor insulation
- roof insulation
- Insulation between the rafters
- Install under rafter insulation
In order to save costs when buying a home or building a house, many home builders wait until the attic has been removed and can save this work for later periods when it is needed for children or other purposes. It is precisely these plans of use that determine how the soil must be insulated and insulated.
It makes a difference whether the room is fully used or whether it is needed only sporadically, mostly as a storage area. With little effort to work is desirable, but you must not forget that you have to work carefully and carefully, otherwise there are thermal bridges and the heat disappears through the roof or the floor. That's certainly not worth striving for.
floor insulation
The floor slab must be insulated so that the heat does not escape through the top floor. An insulating layer can be applied on its own without any great effort and ultimately helps to save on heating costs.
The easiest way is to design roll felt, but it is only suitable if the floor is only done sporadically. That will rarely be the case. However, if the floor space is used, pressure-resistant insulation boards are the better choice. They are ideal as underlay for walking surfaces, ie gypsum fiber boards. Ceiling insulation panels made of mineral wool or hard foam ensure good accessibility and the best thermal insulation, which is also important.

Tip: Two-layer laying reduces possible thermal bridges and that significantly.
It is important to ensure a sufficient diffusion resistance of the ceiling construction, so that mold formation by condensation water is avoided. For wooden beam ceilings, it is therefore useful to install a vapor barrier film . Solid concrete floors, on the other hand, usually do without an additional vapor-retarding layer.
Suitable for floor insulation
- Mineral wool, for example ISOVER Topdec Loft
- Two-layered rock wool plates
- High thermal insulation, especially good for old building ceilings
- Energy saving
- Ideal under walking coverings made of gypsum fiberboard or chipboard
- Good for fire safety - non-combustibility, melting point ≥ 1, 000 ° C
- rigid foam
- Isover Exporit EPS 100/035, 100/040 and 150/035
- Multipurpose insulation panels made of expanded polystyrene foam
- Low weight
- Easy and fast to lay
- For increased pressure EPS 150/035
- Styodur® 3035 CS
- Environmentally friendly foam boards
- Especially pressure resistant
- High thermal insulation
- All-round stepped rebate - for good joint coverage
- No heat loss
- Isover Exporit EPS 100/035, 100/040 and 150/035
roof insulation
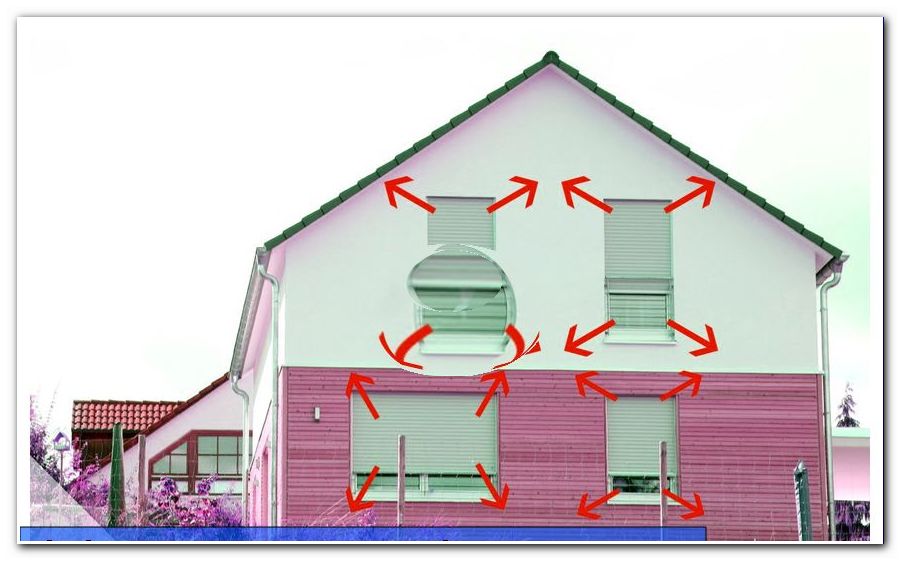
For the roof insulation is irrelevant how the rooms are used. The point here is that no heat is lost through the roof surface. About a poorly insulated roof can escape up to 30 percent of the heat of the house. Roof insulation is therefore important to keep you comfortably warm and to save energy and thus money. In addition, proper roof insulation is also an aspect of the German Energy Saving Ordinance EnEV. There are three types of insulation:

- Rafter insulation - the most expensive version, since the entire roofing has to be renewed
- Under rafter insulation - easier to do on your own
- Interim savings - also easier
The insulating layer is usually about 20 cm thick, but depends on the heat transfer coefficient. The U value indicates how fast heat flows through a material. According to the energy saving regulations, this value should be at most 0.24 W per square meter Kelvin for pitched roofs. For mineral wool this requires an insulation thickness of at least 160 mm. More is better.
Insulation between the rafters
Most often, the intermediate rafter insulation itself is made, because the associated work, so the doubling of the rafters, the pulling of the underlayer and the actual insulation can be done by yourself. It is important to work carefully to prevent later building damage.
Schematic structure of the intermediate rafter insulation


- Outside is logically the roofing
- The second layer consists of the battens and counter battens
- Then comes the vapor-permeable membrane, but this is usually missing in subsequent insulation
- Fourth, the insulating materials follow
- The fifth is the rafters and, depending on the doubled squared timbers
- This is followed by the vapor-permeable vapor barrier film
- The seventh layer is the installation level. If an insulation combination is desired, here comes the Untersparrendämmung
- The last layer is the interior lining, so for example plasterboard
Doubling of the rafters (layer 2)
Many insulation materials are too thick to be used with normal rafters. That comes from the required insulation effect. The depth can be achieved by doubling the rafters. It is important to note that insulating materials are classified in different groups, depending on their thermal conductivity and their heat transfer coefficient. The lower the value, the better the thermal effect. The thickness of the insulation should, if possible, be as thick as possible. Alternatively, however, better heat conductivity groups (WLS) and higher heat conductivity levels (WLS) can also be used.

There are two possible approaches:
- Screw a square timber (6x8cm) directly onto the rafter. This simple solution achieves the necessary rafter depth.
- Attach one board each to the right and left of the rafters and align it carefully. The version is more elaborate.
It is favorable to pre-drill and use wood screws that penetrate just as far into the rafters as the doubling squared lumbers are thick, ie 120 mm wood screws with 6 cm strong squared timbers.
Install underlay film (layer 3)
Roofing, roof battens and counter battens are usually available. In contrast, the underlayment is often missing. It is not 100 percent necessary, but already cheap. A vapor - permeable underlay foil prevents moisture from penetrating from the outside and then dampens the insulation. At the same time, it is also there to transport moist air from inside and out of the insulation to the outside. The foil must lie over the rafters, but under the bricks. Where it is missing, it can be retrofitted. It makes sense, albeit a bit elaborate. You have to proceed as follows.
- Cut the film to size
- Plan a supernatant of about 10 cm
- Use narrow strips to attach the supernatant to the rafter.
Anyone who does without the film must leave two to three centimeters of air between the insulation material and the roof so that the air can circulate and the roof is ventilated.
Installing insulation materials (layer 4)
When rafters have been doubled up and the underlay film laid, it is time to trim the insulation mats or wedges. They have to be made to fit perfectly, just to make sure the insulation sits firmly between the rafters. This is easy to achieve by cutting the material two to three centimeters larger than the gap. It is important to work exactly and cleanly. There must be no gaps or slits, even in the corners. It is beneficial to work in two layers with offset joints. This makes it easy to compensate for irregularities, eg by uneven rafters.

Anyone who has omitted the underlay film must leave about three centimeters of air between the insulation and the roof.
- Fit insulating mats precisely behind the rafters.
- Then apply a sealing tape directly to the rafters and under the vapor barrier film. The purpose of the tape is to prevent the film from being damaged during screwing.
Apply vapor barrier film (layer 6)
The sixth step is to apply the vapor-permeable film, which is simply stapled to the rafters. Alternatively, Velcro can be used. It is important that the lower lane overlaps the upper, about 10 cm. On the wall and floor, these 10 cm must also survive. All edges, connections and overlaps must be glued airtight with special adhesive. On plaster or concrete, a special sealing adhesive is used.

Attention: make sure that the film is not under tension, it could tear. It has to be worked very carefully. If this vapor barrier is leaking somewhere, it can lead to mold and structural damage.
Mount under-floor insulation or installation level and install inner lining (layer 7 and 8)
Layer 7 is the one in which corresponding lines laid or added an additional insulation. For this purpose, crossbars are screwed onto the rafters. It is important to always screw on the rafters. Between the slats then the cables or lines can be laid. On the crossbars are fixed as the last step, the plasterboard. Alternatively to use are OSB boards. It is important to make sure that the vapor barrier film is not damaged. Before the panels are fitted, some must be cut to size. Cut-outs for pipes and sockets must be precisely cut. As a last step, the plasterboard is glued or grouted.
Useful measure - combine intermediate and sub-rafter insulation
The best insulation is the rafter insulation applied by the roofer. It holds the heat best in the house. As a do-it-yourselfer, you can achieve similarly good values, and the inter-rafter insulation is combined with under-rafter insulation. The big advantage of the connection is that it does not injure the vapor barrier. In addition, all electrical wiring can be installed within the sub-rafter insulation. You save the cable outlets in the film. It is also important that the mounting material of the inner lining has no direct contact with the vapor barrier.
Install under rafter insulation
A sub-rafter insulation is mainly installed if a direct intermediate rafter insulation is not possible or if the insulation layer is insufficient. As the name implies, this layer of insulation is applied under the rafters, which reduces the thermal bridges created by the rafters and thus provides better thermal protection.
This insulation is usually used when the existing thermal insulation is no longer sufficient, the Zwischensparensentämmung too little power. As a modernization measure, a sub-rafter insulation is installed. Not everywhere works the installation but so easily. The roofing, ie the lining of bricks or the like, must be completely intact. In addition, the rooms must be high enough so that after installation still sufficient freedom of movement is guaranteed. The insulating layer between the rafters must not show any damage. Finally, the planking, usually consisting of plasterboard without complications must be removed. You have to be extremely careful that the previous vapor barrier is not damaged. If that happens, it's not drama either, because it has to be a new one anyway.

Needed slats, mineral wool, vapor barrier film and panels for disguise . The slats must be as high as the intended insulation layer.
Step 1:
Pin or screw on the lowest lath, ie the baseboard, parallel to the floor. It is thus across the rafter. It is important that the distance to the ceiling on the entire length is the same. If that is not the case, you have to compensate. The individual rows of slats are mounted strictly dimensionally stable. The compensation is made only with the last bar, otherwise it can happen that the entire construction of the insulation gets out of measure.
Step 2:
After the first all other rows install battens parallel to each other, up to the ceiling. Since mineral wool slabs are 62.5 cm wide, but rolls only 60 cm, results in a distance of 61.5 cm or 59 cm for all subsequent battens. One chooses a 1 cm smaller distance, so that the insulating materials can be clamped between the slats. Elastic enough for that. Without trapping them, they can easily fall out due to the sloping roof. Finish both roof sides!

Step 3:
Is not a must, but only helpful for laying carpet. As a rule, roof pitches collide at an acute angle with the floor. Since no carpet rails can be mounted. Alternatively, an approximately 10 cm wide strip is screwed onto the rafters, the wooden wedges are placed so that it is at right angles to the floor.
Step 4:
Regularly, it continues with the fact that the individual insulation boards made of glass or rock wool are pressed between the slats. It is important that no gaps occur at the collisions. Firmly push the plates together. The last one usually has to be cut to fit properly.
Important: Check everything once again that there are really no gaps and gaps, otherwise a thermal bridge can arise.
Step 5:
Apply vapor barrier film. The lightest work is with rolls of one meter width. The foil must protrude about 10 cm at the ridge walls, so that it finally closes with the wall at the end. Staple on one side of the slats. A helper should continue to hold the film taut while the film is attached over its entire length. Attach the next track 10 cm overlapping. She also has to survive on the ceiling.
If there is any penetration, for example from an exhaust pipe, this is a bit more difficult. In this case, a commercially available sleeve is used and the film is glued at this point airtight with adhesive tape. All other transitions must now be sealed. The foil overlaps are taped with a specially designed tape. Important are the transitions to the wall and to the ceiling. For them, a special adhesive from the cartridge or a good adhesive tape is needed for sealing. The film must be absolutely tight and, above all, completely adhered to the walls.
Step 6:
Plank roof, preferably with plasterboard, because they are easy to fill in the joints. The surface is absolutely smooth, which is why they can be painted well without transitions being visible. Prior to that, impregnate the plates with a deep base so that the wall paint does not dry up.
 Damming and insulating a roof can certainly be done by hobby craftsmen. It is important to proceed step by step and to work precisely. If you stick to the guidelines, nothing can go wrong. Conveniently, advice from a specialist. Do it yourself can save a few euros. In the case of under rafter insulation one has to reckon with costs between 30 and 70 € / m², in the case of intermediate savings with 50 to 80 € / m². The Aufsparrdämmung is significantly more expensive, here are 150 to 200 € / m².