Make 3D letters yourself - instructions and templates

- Material and preparation
- Make 3D letters
- Cut cardboard
- Assemble letters
- Cover with paper mache
- Decorate letters
- Related Links
Whether as a decoration for the shelf, the sideboard or as a gift - 3D letters and lettering are popular home accessories. You do not want to limit yourself to the offer of well-known furniture stores, but you can create your own lettering and make 3D letters yourself ">
Almost any lettering you can use this technique in a decorative 3D lettering transform. Your child's name, favorite word, "Love" or "Home" - anything is possible. Of course, they need more crafting time, the more letters they want to tinker. The pure working time can be, depending on the word length, 4 hours and there is not yet included the drying time.
Material and preparation
You need for the 3D letters:
- Our template
- Thick and thin cardboard
- pen
- scissors
- cutter
- ruler
- masking tape
- hot glue
- craft wire
- wallpaper paste
- brush
- newsprint
- Acrylic paint and brush
Make 3D letters
Cut cardboard
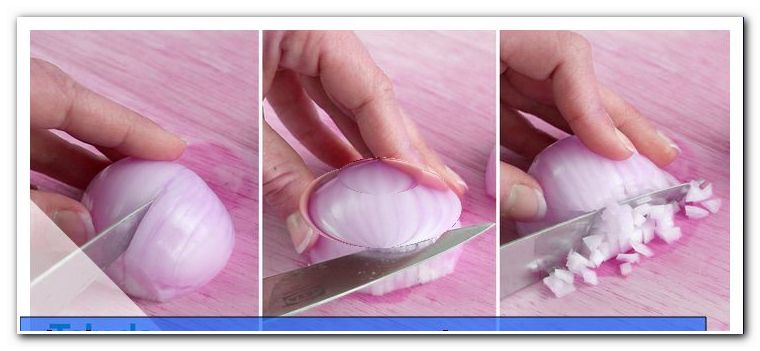
Step 1
To begin, print out the letters you need. Here you will find our template for download: Making letters
Of course you can also create your own templates, as you like. The most important thing is that the font must be wide in order to be able to cut it out stably. The size of the letters must also be considered. Thick cardboard does not really cut well into very small letters.

Now cut out the letters you need. On the template you will see the uppercase and lowercase letters (dashed).

Note: Make the lettering the way you want - just small letters or just big ones. That's up to you.
2nd step
After that, the letters are transferred to cardboard - twice. You need a front and a back. Lay the template on the cardboard and surround it with a pen.

3rd step
Then cut the letters first with a cutter and then with the pair of scissors.

Assemble letters
Step 1
Now you need small bars that are glued to one side of the letter. Cut small rectangular pieces of cardboard for it. The width of these strips determines the thickness of the letters. We cut the strips with a width of 4 cm. The length of the stripes is determined by the shape of the letter.
2nd step
Then attach the bars on the letter. Stick them with masking tape.

3rd step
Then place the front of the letter on top and attach it with tape. The letter does not have to hold together so very stable, therefore only tape.

Note: You can also glue the bars and the two sides of the letter together with hot glue.
4th step
Now measure with the ruler again the depth of the letter. In this width you now cut several strips of thin cardboard. For the thin cardboard is best the cardboard of cereal and cereal packaging.

The letter is closed with these stripes on the sides - tape is also the best method here.

Note: The scaffolding itself must only be held together in such a way that it holds with paper mache when sheathed. Small gaps can also be closed with tape. The paste and the newsprint will later turn the framework into a stable letter.
Cover with paper mache
Now stir up wallpaper paste with water. Similarly, small snippets of newspaper have to be plucked rightly. This should be a size of max. 6 cm x 6 cm.

Disguise the letters all around with a layer of paste and a layer of newspaper. To make the 3D letters really stable, repeat this one or two more times.

Let the letters dry overnight.

Decorate letters
After the glue has dried, the letters are decorated. You can use just about anything you can get your hands on. From acrylic paint, over spray paint, to glitter, buttons, knitwear or pompom - there are thousands of ideas and possibilities. Take a look at her crafting utensils. There you will definitely find something.

The i-point and j-point:
The small dots over the letters are of course a challenge. But there is a simple solution. Just cut a small piece of crafting wire and put one end in the letter and the other in the dot - with a dab of glue you can fix the wire a little bit more. In this way, the dot flies optically above the letter.
Done are the homemade 3D letters! You can attach the letters to the wall with poster strips, place them on the shelf or hang them up. There are many possibilities. Some letters, such as the "i" do not stand by themselves - no trick: you can place the letters at an angle.

Related Links
Now we show you some more creative ideas for crafting letters.
- Embroider letters
- Letter templates for coloring
- Crochet letters