Double Windsor: tie knot in 8 steps | manual

Probably the most popular tie knot, the double Windsor. It is simply called Windsor. In our tutorial we would like to show you how you can tie this tie knot quickly and easily. Our step-by-step instructions will get you to your destination safely and in just a few steps.
The double Windsor! You should definitely include the elegant, symmetrical, full and wide knot in your repertoire, because it will do you some good things. Due to its triangular shape with the blunted corner shapes, you have a more elaborate tie knot ready for so many festive and business occasions with which you will score all along the line. The double Windsor can be worn extremely well in combination with a shark collar.
Since tie tying is not always so easy, especially for the beginners among you, we would like to support you with our free instructions to include this tie knot in your inventory. So that you become a convinced tie holder!
content
- Double windsork knot
- Tie double Windsor knot manual
- Worth knowing about the Windsor knot
Double windsork knot
The large Windsor knot is suitable for experienced binders and those who want to become one! So do not hesitate, you too will face this challenge and master it brilliantly! In addition, the double Windsor is well suited for narrow, light and ties with a subtle pattern. In addition, small to medium-sized tie wearers are welcome to adorn themselves with this tie knot.
And furthermore, the Windsor knot flatters angular face shapes. Wear the Windsor tie knot on classic and elegant occasions and ideally in combination with a suit and shirt, which, as already mentioned, has a Kent or shark collar.
Tie double Windsor knot manual
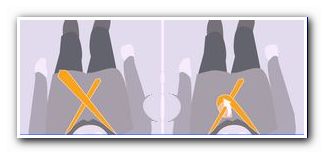
Step 1: As a starting point, put the tie around your neck and neck. The wider end of the tie is on your right and the narrower side of the tie is on your left half. Please leave the wider tie side a little longer, otherwise your tie will be too short as a result.
The double windsork knot is a double knot, which consumes a large part of the fabric of the wider tie end. So you need a considerable part of the broad side of the tie and you should let it hang down very far on the right side of your body at the beginning of tie-tying.

Step 2: Pass the wider side of the tie from right to left over the narrower end of the tie. Then guide the wider end of the tie around under the narrower area of the tie and up through the loop on the neck.
Step 3: Then flip the wider end to the left over the half knot and then pull the wider end of the tie down with your left hand to the left. The wider tie end is now on the left side of your body and the narrow tie side is on the right side of your body.

Step 4: Under the narrower end of the tie, pass the wider end of the tie to the right side of your body. The seams on the wide side of the tie face up and are therefore visible. Another tie half-knot is formed in this way. After this step, the wider side of the panties is on the right side of your body and the narrower end of the tie is on the left side of your body.

Step 5: Now pull the wider part of the tie from right to left over the middle half of the tie. The wide end of the tie now points to the left again and the narrower one is in the middle or slightly to the right.

Step 6: As one of the last steps, fold the wide end of the tie in the middle over the half-knot and further through the loop on your neck and then up through it.

Step 7: Insert the wider end of the tie in the middle through the loop opening created in the previous step and pass it through it, from top to bottom.

Step 8: Now tighten the tie knot and shape it and adjust it in the middle. The double windsork knot should lie as exactly as possible in the middle of the collar and cover the top button of your shirt.

FINISHED! You have successfully completed your first double Windsor knot.
Worth knowing about the Windsor knot
Incidentally, the world-famous Windsor was named and popularized after Edward VIII, who after his abdication in 1936 was declared King of the United Kingdom as the Duke of Windsor and who wore the characteristic tie knot throughout his tenure.
Until 1960 he was prescribed the invention of the windsork knot, which the English always denied in a self-written book and always claimed never to have worn the knot. He referred to the fact that the tie fabric would only have been thicker at the time. Nevertheless, that Edward VIII has always been the namesake for this special tie knot, even though this tied tie knot actually comes from the USA.

The double Windsor is therefore not a standard knot and therefore ideal for shirts with widely spaced collar corners . The space in between can be filled very well with the double Windsor knot. Shirts with a Kent collar or shark collar are therefore extremely suitable for this tie knot. As a result, the large Windsor becomes fuller and larger than the simple Windsor knot and therefore a short or thick lined tie should not necessarily be used. The simple Windsor knot, also called Half-Windsor, is also more suitable for everyday use. Due to its much narrower appearance, this fits almost any shirt collar.
Even with this double Windsor knot, the wider end of the tie should end with the top at the height of the waistband. The narrower tie end should be shorter or the same length. With smaller men, this often doesn't work out perfectly. To ensure that the wider side of the tie ends at the correct height, the too long, narrow end of the tie can be tucked under the waistband or tied up with a tie pin and simply hidden behind the tie. Please also note that the double Windsor, even large Windsor knots, is often not very suitable for very tall men, because as a double knot it uses up so much tie length that the tie result is simply too short and not elegant.

At Talu.de we hope you enjoy trying out and binding, as well as wearing the double Windsork knot afterwards! If your first tie knot tying result has not yet been completely perfect, be sure that no master has fallen from the sky yet. With this in mind, we wish you happy tying of ties and have a look at all the ties your surroundings have in store for you!