Erect drywall with plasterboard

- Determine material requirements
- considerations
- Building a drywall
- Theses
Whether as a front wall in front of old walls, as a thermal insulation or as a room divider: plasterboard is currently the first choice when it comes to hanging a blanket or move a new wall. Drywall walls are cheap, lightweight, can be built anywhere and also easy to construct. And when the time comes that the formerly loved room divider made of plasterboard no longer pleases, a drywall can be quickly and easily removed without major construction work.
Drywall walls are also easy to create for inexperienced craftsmen. A few profiles on the wall, stand pulled in and already the first plasterboard can be screwed. Only a short time later, the mineral wool in the drywall and the other side is planked. What sounds pretty simple, however, has its little pitfalls and pitfalls. In this manual, you will learn everything you need to know about the construction of drywall and what mistakes are to be avoided, plus helpful tips and tricks that can simplify the work.
Determine material requirements
The material requirement for a drywall is quite easy to calculate. The basic construction is first and foremost the UW-profile, which is screwed to the ceiling as well as to the floor. The length of the UW profile is thus twice the width of the room for a simple wall.

In the next step, the CW profile is needed, this profile is also shown as a stand profile, which is vertically placed in a uniform distance in the UW profiles and connected to these, is also used as a wall profile. The distance between the CW profiles depends on the width of the plasterboard.
calculation
A wall which is 4.50 m wide and 2.60 m high is to be confiscated. There is a door in it.
UW profiles are required for the floor and the ceiling. For the ceiling so 2 1/4 profiles are needed and for the floor as well. So you have to buy 5 stand profiles. Since the profiles are available in a length of 2 m and I have decided for a profile thickness of 10 cm, the UW profiles cost: about 5.50 €.
Before you can estimate the necessary CW profiles, you should inform yourself about the offered widths and heights of the required plasterboard in the nearest hardware store. In our example, we have a ceiling height of 2.60 m. Plates with a width of 600 mm x 2600 mm are available. With a wall width of 4.50 m, I need 7.5 arithmetically. If you sketch it out you will realize that 7 plates á 4, 10 € are sufficient: 28, 70 €.
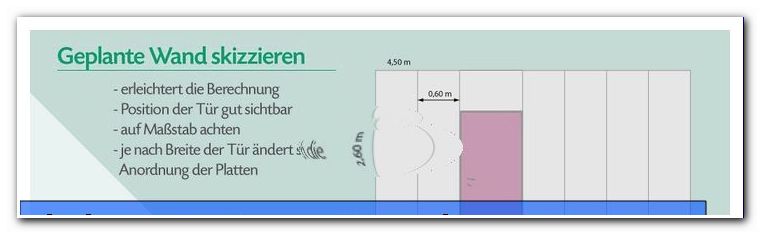
Since the panels are 600 mm wide, the spacing of the CW profiles for the vertical uprights is 550 mm, as 2 panels are screwed onto a profile, ie 2.5 cm per side = 55 cm. Since we already know in the upper section that we attach 7 gypsum boards, this results in 8 CW profile stands. Of these, 2 stiffening profiles (UA) are 6 CW profiles á 5.90 = € 35.40.
For the door complete door sets are offered with 2 UA profiles, a lintel, angle and screws for about 50, 00 €.
Overview:
- 5 UW profiles (100 x 2000 mm) = 5.50 €
- 7 gypsum plasterboards (12.5 x 600 x 2600 mm) = € 28.70
- 6 CW profiles (100 x 2600 mm) = € 35.40
- Door set = 50, 00 €
- Mineral wool = 45, 00 €
- Screws (1000 pieces) = 29, 00 €
- Sealing tape (25 m roll) = 22, 00 €
Total amount: 215.60 euros.
Attention: If the wall serves as a room divider, two surfaces are to be covered. In some cases it is also advisable to make a double planking, in which case the number of square meters has to be adjusted. For all surfaces, at least 10% more plasterboard should be purchased due to waste.
Depending on the application, the LW, UA and HUT profiles are calculated according to the same scheme as CW and UW profiles.
Screws are in the pack and will not be charged separately, because you can estimate the exact number previously difficult. As a guideline, the frame construction is fixed to the floor, ceiling and wall every 25 cm with a knock-in dowel. Plasterboard panels are attached to the stand construction approximately every 5 cm with a drywall screw.
Primer, putty and mineral wool are also calculated over the number of square meters.
The self-adhesive sealing tape is only needed on the back of the frame construction. The length corresponds to twice the width and twice the height of the room.

considerations
If a completely new wall is to be moved in, the door is an important part of the planning. You have to determine the width of these and the width of the frame when building the wall. Around the door you have to arrange aluminum profiles or slats. The Rigips has no bearing effect, because the door frame can not be attached. If a much-used passage in the wall is to emerge, it makes sense even to double the wooden slats around the frame, in order to achieve a higher stability.
Tip: Make an exact scale drawing of your wall with the entire interior. Then, later on, you will have the option to easily find the upright stands again, if you want to hang a wall cabinet or heavy pictures.
Building a drywall
As an example of a structure of a drywall wall is a partition wall with door.
- Ripping the new wall


First of all, you set the course of the wall at the bottom of the room. For this you use the longest possible spirit level. To build an intermediate wall, you should first mark the position of the wall on the floor. Take an angle iron and attach it with one leg to the wall from which the new partition should exit. Then pull a string along the angle to prevent the partition from going its way. Along this line you can draw in the position well. Alternatively, you can also set the position of the wall using a laser gauge or tape on the floor.
Tip: Make sure that the wall track marked on the floor is parallel to the opposite wall. If the wall is slanted in the room, this does not disturb the statics of the wall, but looks very unpleasant.
If the marker is placed on the floor, the line on the walls is extended with a spirit level. Finally, the connection of the line is made on the ceiling. A lot is used to check whether the ceiling and floor mark match exactly. If the lines do not match, there must be a measurement inaccuracy or it should be mis-drawn. A correction is absolutely necessary!
- Attaching the ceiling profile
At this point it should be mentioned that the drywall works easier and faster for two! With a folding rule, commonly called'chmiege', the width of the room is now measured. This measure is touched on a CW profile. The profile is cut to length using a hacksaw or better a metal shears. The easiest way to do this is to first cut in the upward-facing parts of the profile, then bend the profile slightly and then cut through the middle part. Subsequently, the sealing tape is glued to the back of the profile. With a cordless screwdriver, the holes are drilled in the profile for the knock-in dowels. One hole each in the rearmost section of the profile, then every 25 cm a hole is advised. Once this step has been taken, the profile is held to the ceiling as it is to be screwed down once. Through the holes of the profile, the markings for the holes in the ceiling are transferred to it with a pencil. If the drilled holes in the ceiling are attached to the drill, the profile can now be fixed to the ceiling with the help of the swivel dowels.
Important: If ceilings are suspended with plasterboard, only knock anchors are permitted, which have a metal dowel! Plastic dowels would melt in a fire melting and the plasterboard ceiling fall down!
- Attaching the soil profile
The same operations performed on the ceiling profile are now repeated on the floor. Not to forget here is the door area. No CW profile is applied in this area. So the floor consists of two CW profile parts. It is important to make sure that the shell dimensions are used for door cutouts!
Tip: If you use aluminum profiles, you should apply sealing tape to the profiles on the floor and ceiling. Alu transmits the sound very well, so it is important to break this sound bridge with sealing tape. Do not use thin styrofoam strips, because they would squeak later in every step in the room.
- Attaching the wall profile
The wall profile is not a CW profile, but a UW profile . Sealing tape is glued to the back of the UW profile. The procedure is then the same as for the floor and ceiling profiles: set the drill holes in the profile and wall, then fix with knock-in dowels. The profiles are always attached with the profile back to the wall.
- Connecting the profiles
The profiles must now be connected together in the corner points. There are two possibilities.
Option 1: Riveting
When riveting, a hole must first be made in the corner points through both profiles, then a rivet is placed in the hole. The corner is now riveted together with a rivet tongs. This option is extremely time consuming, by the rivets also more expensive, so you are now using option 2.
Option 2: Crimp
When crimping, the material is connected with a composite pliers. The pliers connect the profiles with each other by simultaneously perforating them. The sheet metal edges that are created hold the profile together.

- Setting the soffits for the door
When step 5 is done, the next two UW profiles are cropped. These serve as soffits for the door, are placed with the back to the door interior and riveted back up and down, alternatively connected with a compound pliers .
- Secure stiffening profile
The door jamb must now be fastened between the two UW profiles. A UA profile is used for this. Again, the shell dimensions are to be used. A UA profile is fastened again with rivets or composite pliers.
- Setting the stud walls
The stud walls will now be set. The distance of the UW-profiles depends, as already mentioned, on the width of the plasterboard. For example, if the panels are 1250 mm wide, the profile spacing is 625 mm. Starting from one side, a stand is drawn into the wall every 625 mm. The special feature is that this also happens at the door. If another stand has to be installed and the dimension is in the middle of the door, it is not left out, but the CW profile is inserted above the door cut-out.
Note: When screwing the construction, you should also create an angle more often. Even if you use the spirit level meticulous, but the stand can get something out of the corner. Before you screw on the plates on the first page, you should complete the complete stand.

- The first page plasterboard
The basic construction would be finished hereby. Afterwards, the first side of the wall is covered with plasterboard.
Before doing so, think about whether heavy furniture or objects should hang on the wall. If this is the case, the wall should be plastered twice, ie two plasterboard layers are screwed on each side. This is advisable in the bathroom as well as in the toilet and the kitchen.
If particularly heavy furniture is to be hung, such as a hanging shelf in the kitchen or the toilet in the bathroom, for safety reasons, 2 to 3 cm thick wooden boards should be pulled in between the CW profiles in the area where the furniture is located. These boards support the plasterboard wall, which mitigates the weight and pressure created, for example, by a seated person on a toilet. The wooden boards are not absolutely necessary, but it can lead to impressions and dents in the wall at excessive loads on the wall.
The gypsum plasterboard is fastened every 5 cm with a plasterboard screw . Since these have a self-tapping thread, pre-drilling is not necessary. The screws must be easily screwed into the plasterboard so that they can later be filled over. However, too deep screwing is not advisable, otherwise the plasterboard breaks.

Cut gypsum board
If a plasterboard has to be cut to size, it is placed on the floor and the dimension is marked. With a cutter, the torn line is subsequently cut. About half to two thirds of the plate is cut through. The plate is raised against the cutting direction and gets a small push by hand. The record works like a book. Now the plasterboard can be cut from the other side while the coating is not damaged.
The edges of the cut surface are traced with an edge planer, but only the side that later faces outward.
If the wall is double-planked, it is important that the edges of the two layers do not sit one above the other. So you have to work with offset.
- Lay the power cable
When a page is closed, it is now time to do intermediate work, such as setting the holes for sockets. Also, the electric cables are already drawn through the H openings in the profiles.

Tip: If you want to run power or telephone cables within the wall, you should plan these well in advance. Drill holes in the upright slats with the Forstner drill at the same height through which the cable can be passed. These small cable ducts should not bring you higher than about 80 centimeters from the ground, otherwise you could easily hit a cable when hanging the picture.
The position of power cables should be accurately recorded, as well as the position of the posts and cross braces. This way, you will always have a possibility to reliably hang small wall cabinets or heavy pictures.
When you close the wall, pay attention to the holes for your power cords that you will not otherwise find. You should also consider this with the other side. Do not cut the holes for the sockets as big as you want them to be later, just run the cables through them. Do not forget the light switch next to the door during this action.
- Introducing the insulation
In the next step, the mineral wool from the other, not yet closed side, is introduced into the wall. Mineral wool is best processed with a saw blade from the kitchen, cutters are unfavorable when processing mineral wool.
Important: wear gloves and mouthguards. Mineral wool is not particularly healthy in the lungs and it is very prone to itching on the skin.
The insulation should be cut very accurately. In this case you should not hit so hard, because Rigips is not concrete. If the wall is drawn between two heated living rooms, it is not so important that the fields are filled in one piece with insulation. Here you can patch a strip.

- The second side plasterboard
If the mineral wool is introduced into the wall, the second side is sealed with plasterboard, as it was already done with the first.
Theses
In order for the plasterboard to give a really smooth and level wall, the panels must finally be grouted and oversized. Detailed instructions can be found here: Fill gypsum plasterboard and sand .
Tips for quick readers:
- Ripping the new wall
- Install ceiling and floor profile (UW profiles)
- Attach wall profile
- Connect profiles
- rivet
- crimp
- Create door reveal
- Set sidewalls with UW profiles
- first side with plasterboard planking
- Pull the power cable
- Install insulation
- second side plank