Learning weaving with a weaving frame - instructions for children

- 1st part: stringing the woven frame
- 2nd part: weaving
- Tips for weaving
- Change color
- Part 3: clamping the workpiece
- Extra: Turn the workpiece into a bag
- Information about the cost issue
Do you want to learn something really traditional with your children ">
Weaving is one of the oldest techniques for the production of textile fabrics. When weaving, at least two thread systems - the warp and weft - are crossed at right angles. The warp threads form the carrier. In these, the weft threads are successively pulled in - from one selvedge to the other and through the entire weaving width. The resulting product is called "tissue". As far as the technical terms around weaving. Now let's start right away with our extensive DIY guide, which will lead you to great results with minimal resources. By the way: previous knowledge or special handicraft skills are not required. Everyone who wants can learn weaving!

Weaving with a simple school weaving frame consists of three major stages: stringing the frame, weaving it, and tentering the finished piece.
Note: Before we start with the three parts, we would like to say that there are different types of school and teaching web frames. Since our guide is aimed at beginners in general and children in particular, we have decided to use a very simple framework. This consists of a wooden framework and two metal bars.
1st part: stringing the woven frame
You need this:
- a simple school web frame
- Warp or wool
- a scissors

Tip: To string the schoolweb frame you should use warp yarn. Wool comes in and of itself in question, but has a rough surface. As a result, they can hang on the wood or slip in places where you do not want them.
How to proceed:
Step 1: First insert the two metal bars. These place you in the first gaps or notches of the frame. Tighten the rods with the small screws, but not too tight. Otherwise the wood could break.

Step 2: Pick up the warp yarn. You do not need to cut anything for now. Begin the step with the entire warp roll. First, knot the yarn beginning at one corner of the frame. It is best to take one of the poles as corner (see picture).
Step 3: Now start to string the loom. They start where you previously knotted the yarn. Pull the thread through the first notch to the opposite gap. Behind the frame, place the twine in the second notch and pull it back to the opposite side to place it again behind the frame in the next gap.

Step 4: Repeat the entire procedure until the weaving frame is completely covered.
Tip: Make sure you tighten the thread tight enough so that it does not slip out of the notches.
5th step: The schoolweb frame is completely covered ">

Congratulations, you have mastered the first stage successfully. Now it's time to weave!
2nd part: weaving
You need this:
- the covered web frame
- Wool in your desired color
- a boat
- a comb
- a scissors
- a thick needle
How to proceed:
Step 1: Grab the boat and the wool. The latter wind on the wooden tool. This has at both ends small, but clearly visible indentations. So the winding of the wool is quick and easy from the hand.

Tip: Hold the initial piece of wool about half of the boat with your free thumb until it holds itself in the following rounds of wrapping.
2nd step: After you have wound up a sufficiently large amount of wool, cut off the end of it with scissors.
Tip: The wound wool does not necessarily have to last for the entire frame. If necessary, simply wrap a piece again as soon as the predecessor is "all". Then all you have to do is knot the end of the predecessor with the beginning of the new piece and then you can weave it on normally.
Step 3: First, attach the wool to one of the four frame corners. Put the starting thread around the corner from the outside and make a double knot.

Step 4: Where you have just knotted the initial thread, start the weaving process. This is as follows:
a) Push the boat with the wool under the metal rod. In each row, the respective metal bar is woven in at the end.
b) Skip the following thread thread. That means you lead the boat over him.
c) Then push the boat under the next thread.
d) Skip the following thread again.
e) Push the shuttle again under the next thread.
f) Repeat this "up / down" move until you reach the other side where the same game starts again.

Tips for weaving
- It does not matter if you start with the boat at the very beginning of the frame or start in the middle. After each row, the just-woven is pushed down anyway.
- Whenever one of the two frame edges is reached, pull the shuttle briefly to the side to tension the thread. Then pick up the comb and use it to push the fabric down to make it straight.
- Never forget to include the metal bars as well. They serve to make the workpiece evenly from top to bottom. If you leave them out, the tissue threatens to become crooked and crooked.
- At the end, each row must have one loop at each end. These loops are always around the metal bars.
Change color
If you want to get creative, you can change the color of the yarn from time to time. This goes like this:
- Cut off the wool thread and knot the end with the outer thread and the metal bar.
- Now take the boat with the new wool, or you prepare two different boats, and knot the beginning of the thread right next to the knot just made.
- Just weave on now.

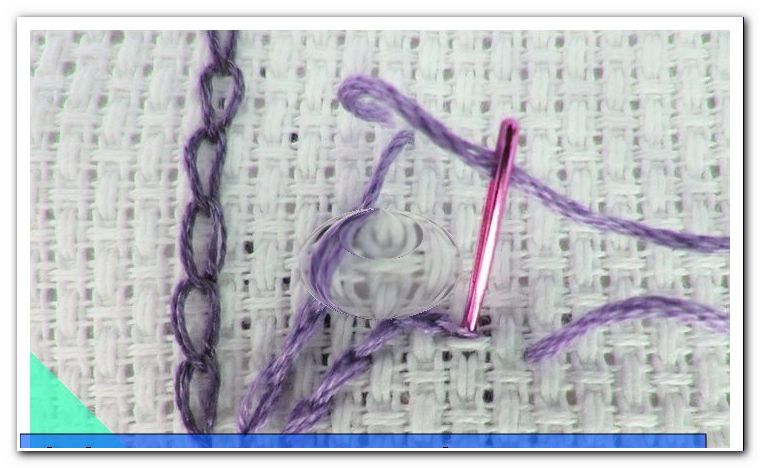
Step 5: At some point you will get to the point where there is not enough space between the last woven row and the top of the loom to use the shuttle. Instead, grab a thick needle and make the last two or three rows with their help. At the basic principle (up and down, back up, down again), of course, nothing changes. Do not forget combing.

Finished "> 3rd part: clamp workpiece
You need this:
- the woven school web frame
How to proceed:
Step 1: Loosen the screws of the metal bars.

Step 2: Slowly and carefully remove your workpiece from the loom. Do not tear too much, so as not to break anything.
Tip: It's best to start on one long side and then take care of the other end.
3rd step: Now, the metal bars probably "clamp" in your woven workpiece. Carefully pull the loops around the smaller ends of the rods, then carefully pull them out of the tissue.

Step 4: Knot the ends still open, so that the fabric can not open, so it remains stable.
Step 5: "Dress up" your workpiece where necessary. Have you in between new wool threads incorporated "> 
Basically, a finished object is now in front of you. For example, you can use the woven piece as a small rug, potholder, table mat or similar. Alternatively, you can also go one step further and sew a small bag out of the workpiece. We show you how to realize your self-woven and sewn woolen bag.
Extra: Turn the workpiece into a bag
You need this:
- the woven workpiece
- matching wool
- a darning needle
- a scissors
How to proceed:
Step 1: Place the workpiece lengthwise in front of you - in such a way that the side that is to be the inside of the bag at the end is at the bottom.
Step 2: Fold the lower side of the fabric upwards - approximately in such a way that about a fourth of the entire workpiece remains free. Then it is necessary to sew the two edge areas of the bag.
Step 3: Pick up a darning needle. The thread that you use to stitch the first edge area is knotted at the end. The other side of the thread stuck as usual in the darning needle.
Step 4: Push the needle into the workpiece and roughly sew the first edge area. Do not forget backstitch.
Step 5: Repeat steps 3 and 4 for the second edge of the bag.
Step 6: Shorten the two thread ends with scissors.
Step 7: Reposition the current exterior - the non-visible side - so that the seam comes in.
Step 8: Fold down the free quarter of the workpiece. It acts as an envelope of the fabric bag.
Tip: Experienced seamstresses (or those who want to become one) can now sew a sufficiently large button on the bag so they can close properly.
Done is the self-woven and sewn bag, which is happy about children as well as adults with a tendency to home-made!
Information about the cost issue
A small, simple weaving frame is already available for about two to five euros. Warp yarn costs about four euros. Add some wool for a little change. Needles and scissors are most likely in stock at home. Otherwise, these are also low investments. Simple weaving is therefore an extremely inexpensive pleasure that children can learn excellently under the guidance of their parents. All utensils are available in well-assorted craft shops - whether online or on site.
We wish you and your children a lot of fun with the first web experiments. Of course, once you and the little ones get along well with the simple school frame, you can of course change to a larger or more complex model!