Knit Cable Knit - Instructions for Beginners

- material
- Knit narrow cable knit
- Triple braid
- Knit plastic cable knit
- Zopfvariation
Cable knit patterns are among the patterns with crossed stitches. The simplest cable pattern consists of two stitches, which are knitted together. In narrow stripes they are used for visually striking cuff shapes or pattern stripes, knitted over a large area or with thick wool, lending winter fashion that certain something.
Cable knit patterns are classics in knitwear and are often used in cardigans, thick pullovers and knitwear. But also thin yarns such as mohair wool become the eye-catcher when they are knitted with thick needles to braid patterns. In addition to the crossed stitches, knitting of left rows of stitches next to the pigtail strips is typical. This is necessary to create the plastic effect of the cable pattern, which otherwise could not stand out from the smooth right-hand knit.
material
- Rundstricknadel
- Wool
- auxiliary needles
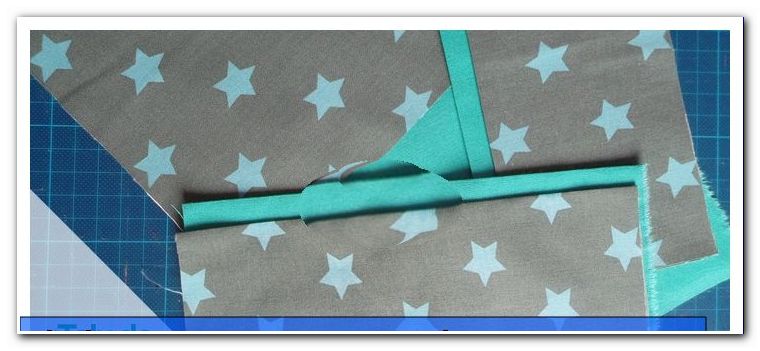
For the cable pattern knitting it needs a needle. Experienced knitters can also re-sort the stitches by pushing them off the needle and reseeding them in a crossed shape. For the first pieces of knitting, however, an auxiliary needle is recommended, as the stitches can easily be split into deeper rows. There is a so-called pigtail needle, which is worked like a small bow, can be shut down on the stitches of the braid. A second circular needle or needle from a needle-punching game serves the same purpose.
Braids can be made up of at least two stitches. The more stitches crossed, the more voluminous the knitted braid appears. It is important to pay attention to the right needle size, because cable patterns should be loosely knit. At the crossed places, it takes more thread to knit across the stitches. To tightly knit wool would contract the fabric too much here.
Knit narrow cable knit
The simplest braid is created by crossing two stitches (double braid). To do this, make a few stitches and knit across several rows of plain right (knit the stitches in the back rows as they appear).
Knit a few stitches in the next row on the right, work one stitch on the left and then intermesh two stitches. Take the first stitch of the left needle onto a second needle (auxiliary needle) and bring it behind the knitted part.
Now knit the next stitch of the left needle right.

Now take the needle in your left hand and knit the stitch on the right.
Now a stitch left, which forms the edge of the braid.

And knit to the end of the row - the first braid is ready.
Turn the work, knit all stitches in the back row as they appear.
This knitting style is called "crossed to the right" or "to the right". The above-lying stitch points to the right. Therefore "crossed to the right". If it says "cross to the left" in the knitting instructions, the upper stitch at the rotated position must point to the left. For this you would bring the first stitch of the left needle before the knitting work, then knit the next stitch of the left needle and then the stitch of the needle.

After this first spin, knit a few rows of plain right to create the cable pattern. The more rows you work until the next rotation, the longer the individual braid elements become.
The second rotation is like the first crossing of the stitches.
Done is the smallest cable pattern.

If the braid is worked with four stitches, two stitches are placed in front of or behind the work, two stitches are knitted by the left needle and then the two stitches of the auxiliary needle.

If the rotation of the stitches occurs regularly in every second row, the result is the following knitting pattern:

Normally Zopfreihen run in a vertical manner. If only plait turns are knitted in a row (so there are no simple right stitches between the plait strips), a skewed look can be achieved by offsetting the twists.
First row: Edge stitch, cross two stitches to the right and knit the entire row in this way.
Second row: knit all the stitches left
Third Stitches: After the edge stitch knit one stitch on the right, at the remaining sts always cross two sts with each other to the right.
Fourth row: knit all the stitches on the left
Always repeat these four rows. This gives you a slanted pattern that does not look like a classic cable pattern at first glance.

Triple braid
The triple cable pattern is reminiscent of a plaited braid, which consists of three strands. This requires a divisible by three mesh number to get three individual stripes. So knit some rows to the right, and start a new row with some stitches to the right. Then one or two stitches left. Now begins the pigtail strip, which consists of nine stitches. The first turn is done with the first six stitches. Put three stitches on the needle behind the work, knit the next three stitches of the left needle on the right. Then knit the three stitches of the needle to the right. The remaining three stitches of the braid are knit smooth right. One or two stitches left as before the braid and the remaining stitches right.
Knit all stitches in the back row on the left.

Knit all stitches in the next row on the right. Turn and knit all the stitches in the back row.
Now is turned on the second spot. Knitting up to and including the left stitches. Now the first three stitches of the braid pattern are knitted smooth right and the remaining six stitches are turned. This rotation must point in the opposite direction, ie to the left (to the left). To do this, place the first three stitches of the left needle with the auxiliary needle before the work, knit the next three stitches of the left needle and then knit the stitches of the needle as right stitches.
Work to the edge stitch, turn the work and knit the back row and two rows on the right side.

Now the first six stitches are turned to the right again, after the back row and two more rows then the last six stitches are plucked to the left again. In this way, the triple braid is created, which can be varied in many ways.

Knit plastic cable knit
Knitted braids optically gain in depth when the braid is knit in a different mesh than the basic knit.

In this cable pattern variant, the rotations are offset again, so that a plastic pattern can arise. In addition, two auxiliary needles are needed:
Make a straight stitch and knit two stitches on the right after the edge stitch and two stitches on the left alternating to the end of the row. Turn and knit all the stitches in the back row as they appear. One more back and one back row in smooth right work.
In the next row, after the edge stitch, take two stitches on a needle to do the work. The two following left stitches are also placed on another needle, which comes to lie behind the work. The next two stitches are knit to the right of the left needle. Then knit the stitches of the second needle on the left. Finally knit the stitches of the first needle on the right. The rotation is done.

Knit two stitches on the left and then the next turn in the same way.
Knit the entire row with the braid over six stitches and two adjoining left stitches.
Turn the work and knit a back row and two more rows as the stitches appear.

In the next row is turned again, but in a staggered position. It starts with two stitches on the right and two stitches on the left, then the rotation described above is done over six stitches. Then two stitches left and one turn again. In this way knit all over the row, knit, knit one back row and two more rows in the appearing pattern.
Always repeat in this way.
Zopfvariation
By zipping in different directions, many effects can be achieved. If the rotations occur at the edge of the braid, a flat structure is created in the middle, which can be "filled" with knobs, left-hand stitches or mini-heads made of two stitches.
The braid consists of eight stitches. You knit four stitches on the left, eight stitches on the right and four stitches on the left. In the back row knit all the stitches as they appear.
In the third row the left stitches are knitted on the left, then the plait stitches are divided into two strips of four stitches each. For the first turn to the right, put two stitches on the needle behind the work, knit the next two stitches on the right, then knit the stitches on the needle as well. The first turn is done. Turn the next four stitches to the left, add the first two stitches to the needle before doing the work, knit the following two stitches to the right, then knit the stitches on the needle to the right as well.
In the back row knit all the stitches as they appear. Six more rows of smooth right work. Then turn the plait again in the same way.
Tip: Cable patterns contract. Always make a swatch and wash it before taking it. The values for the number of rows and rows indicated on the wool banderoles apply only to straight-cut knitwear.