Make Cherry Stone Pillows by yourself - DIY guide

- amount of substance
- cut
- Now it is sewn
- filling
- close
- Warm cherry stone pillows
- Cherry stone pillow as a cold compress
- Cherry stone pillow for massage
- design options
What could be better than creating something with your own hands and marveling at the finished work! In the case of DIY cherry stone pillows, you can even warm or cool off with your results - just as you like. And as a fluffy cuddly partner is your cherry pillow: All these benefits make it a creative, not just warming the heart, gift.
Few materials, some time and lots of desire for creativity: In fact, the versatile cherry stone pillows can be produced in a few steps - even by beginners. Our clear instructions tell you what you will need and then guide you step by step to a classic cherry stone pillow. If you prefer other shapes, let your imagination run wild. Your cotton fabric should always be at least twice as big as your desired pillow. By the way, even minimal sewing skills are sufficient: Of course, the expert use of a sewing machine facilitates the process. However, anyone who is completely at war with a needle and a thread can seek help from lovingly acquaintances. In funny team work makes the making of Kirschkissen just the more fun!
You will need that:
Due to the close skin contact with the cherry stone pillow, you should pay particular attention to the choice of material:
- 100% cotton fabric with Oeko-Tex® standard and, at best, GOTS certificate, depending on size
- sewing machine
- Kirschkerne

Links to: Oeko-Tex® and GOTS certificate
amount of substance
How much fabric you need for your own cherry stone pillow depends on several factors. If you are plaguing neck pain, an oblong pillow is very good. Abdominal pain can be well relieved with square, large pillows. Depending on your needs, you need a seam allowance of 1 cm to 1.5 cm in addition to the desired pillow format.
Tip: Make sure that the size of the cherry stone cushion does not make it too big - after all, it has to fit into the microwave or into the oven or the freezer.
cut
This sewing guide shows you how to sew a simple rectangular cherry stone pillow yourself. A perfect size for such a pillow is 25 cm x 20 cm. This fits perfectly in the microwave later. A seam allowance of three centimeters is sufficient. In addition, 4 cm should be calculated on each side for the substance thumb. So you need for this pillow two pieces of fabric (front and back) with a size of 32 cm x 27 cm .
Tip: For rounded corners, which can be turned around well, you should sew the fabric at an angle of about 1 mm in front of the corner at the seam allowance. Such curves look better in the end and are easy to turn around.
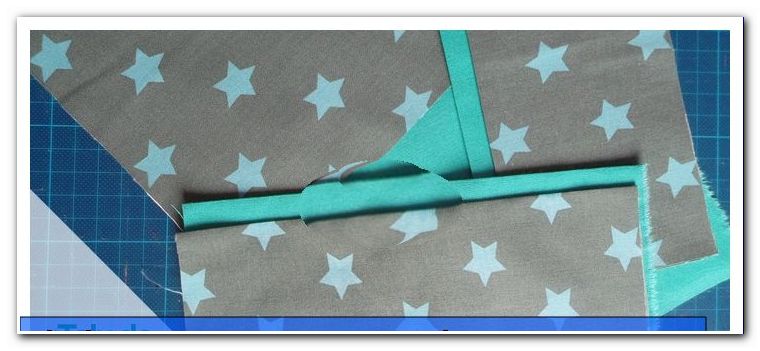
Now it is sewn
With cotton fabrics, the end of the fabric edges always offers. So they can not fray.
For beginners of sewing: "to fill" is the seaming of a fabric. The edge of the fabric is wrapped and sewn at least once. Flip the edge once 2 cm wide and sew it tight. This gives a smooth fabric edge and prevents the fraying of the fabric.
Then both parts, front and back, are sewn together with their "nice" outsides. Pins on the corners fix the parts, so that nothing slips when sewing. Start at about the last quarter of one of the four sides with a straight stitch. This is sewn to the first corner. All other three sides are completely sewn, as is the other quarter of the first page, creating an opening on that side. The cushion opening then has a length of about half a page.
If you use an overlock sewing machine, you can cheat now. After sewing the 3.5 pages, you could sew along with a straight stitch (light green) just next to the first seam. The turn takes place at the pre-marked corners.

The end and the beginning are sewn together, then the overlock seam on the left and right of the opening is separated again up to the sewing points. Now the threads are being cut. Last but not least, only the turning and filling openings have to be lined with a zig-zag stitch (black) right up to these points.
filling
The pillow is now turned over carefully and pressed all four corners to the outside. In order to be able to see the cushion opening well when suturing, ironing is recommended - iron the edge inwards at the opening. This smooth ironing edge helps with orientation.

A funnel or a piece of rolled-up paper is now inserted into the opening of the pillow. Through this cherry seeds can now be filled. If you are alone and have difficulty filling, you can also tape the rolled paper to the cherry stone bag. So you have one more hand to keep the filling under control.

Tip: A rolled paper is the better choice for cherry pits. Most of the cores are too big for commercial funnel openings.
After filling, hold the cushion opening closed and test the capacity. If the moldability of the pillow does not meet your expectations, you can refill it or remove cores.
With a pillow size of 25 cm x 20 cm we filled 530g cherry pits into the pillow. This amount transfers enough heat, but still forms well.
close
If the pillow is filled, it now only has to be closed. This is a magic seam, a seam that you do not see, best suited.
First, plug the opening with needles. Now you can use the ironing edge to see exactly where the opening starts and where it ends. By hand, the opening is now closed. The needle and thread are now started from the inside exactly at the end of the machine seam. The first stitch occurs at the left suture opening, which is then knotted.

Now the pillow is turned so that the thread is on the right side. The thread is now placed over the opening and pierced exactly at the ironed fold just before the thread with the needle. Then the needle should come out just behind the thread.

Now the thread is laid over the other side again and continued as just. The shorter the stitches, the less visible the seam is at the end. When you arrive at the end of the opening, all must be sewn and the thread cut off.

The pillow is now ready and ready to use. If you want to wash the pillow but once, you still need a pillowcase. A sewing instruction for a cushion cover with hotel closure can be found here: //www.zhonyingli.com/kissenbezug-mit-hotelverschluss-naehen/

Warm cherry stone pillows
1. Cherry pillows can be used just like a hot water bottle - but look better. Possible uses include abdominal pain, tension in the neck or shoulders, menstrual cramps or simply cold days.
2. Heat your pillow in the oven at a maximum of 150 degrees for 10 to 15 minutes.
3. Never forget to wrap the good piece in plenty of aluminum foil. Otherwise, the fabric turns brown.
Tip: Since the foil remains intact in the oven, simply pick up your used piece for the next time!
4. Alternatively, it is possible to warm the pillow in the microwave.
5. Insert it into the device for one minute at 600 watts. Attention: Both the cushion and the cherry stones must be absolutely dry for use in the microwave. The same applies to the microwave dish. Otherwise, you risk burning the substance. In addition, you should let enough time pass between the applications, so that your pillow can cool down. If you heat a cherry stone cushion at too short intervals, the cores may begin to glow and burn the fabric from the inside.
6. Never leave your small work of art unattended or in the oven or microwave for the recommended period of time, otherwise there is a risk of fire!
7. For less heat, place your pillow on the heater or oven for a quarter of an hour.
8. Since the cores inside store the heat over a longer period of time, their heated cushion is now ready as a cuddly hot water bottle.
Cherry stone pillow as a cold compress
1. First, feed your cherry cushion in a plastic bag to keep the fabric from getting wet.
2. Then put it in the freezer for about 15 minutes.
3. Alternatively, the safekeeping in the fridge is sufficient. However, more time - at least one hour - should be scheduled, until the pillow is cold enough.
4. Unlike warming, you may like to forget your cherry stone pillow in the cold, which will not harm the fabric or the cores.
5. Place your "cool pillow" on the appropriate area of the body in case of inflammation, or use it to relieve headaches. Of course, it offers a pleasant refreshment even in high summer temperatures.
6. Allow the pillow to dry well after the cold treatment, preferably even in the oven for a short time. By adapting to the room temperature your pillow "sweats" after the stay in the cooling. Consequently, the fabric cover assumes a slight moisture.
Cherry stone pillow for massage
1. Warm cherry cushions are great for relieving tension. Once just the heat unfolds in a pleasantly relaxing way, the muscles. In addition, the coarse-grained structure of the pillow does the rest.
2. Spread your cherry pillow as flat as possible and place it on the desired body part. Especially in the back area, it can be helpful to slowly rock on the pillow back and forth.
3. Anyone who can harness a second person as a back masseur, lies down comfortably, while the friendly masseur gently spreads the warm pillow over his back with his hands.
4. The pillow can also be used for a simple foot massage. To do this, just lay it on the floor in a heated condition and gently walk around on it - similar to what is known about stingbones from the physiotherapeutic foot reflex zone massage.
5. After a lot of manual work, for example on keyboards, you can relax your fingers by vigorously kneading the pillow with both hands.
design options
That's quite nice, but too simple for your taste ">
Tip: For applications, choose cotton fabrics that will set the color well off the pillow.
3. Before the pillow sides are sewn together, bring your application to the future front of the pillow.
4. For this, pin your little heart with pins on the desired area and then sew it clean. Do the same with the individual letters of a name or whatever you like as an ornament.
5. Then continue as described in the step-by-step instructions. You put the pages together, etc. Especially if a part of the pillow is decorated with appliqués, you should take special care not to confuse the order: Remember, before and during stitching, the outsides must be turned inwards!
Finished! It's so easy to make an individual cherry stone pillow yourself!
Tips for quick readers:
- Specify the desired shape for a cherry pillow
- Symmetrical motives especially suitable for beginners
- Make sewing patterns of about 32 cm x 27 cm
- Pin cushion parts with the outsides inwards
- When sewing the two sides of the pillow together leave a gap
- Through the small opening, add cherries as filling into the cushion cover
- Sew the gap by hand along the outer edges
- If necessary, sew the cover and order the cushions
- Heat or cool pillows