Calculate and create a point foundation - instructions

- Material and preparation
- Cost of the point foundation
- Calculation examples for point foundations
- Mixing ratio for cement
- Instructions Create a point foundation
- Prepare formwork
- Stir mixture
- Embed iron
- Insert post carrier
A point foundation can be used for many small structures. Whether carport, patio roof or greenhouse, with some point foundations, it is usually not necessary to pour a complete foundation. Another advantage is the simple preparation of finished small point foundations. We will show you how to calculate the point foundations and how to pour them yourself.
Before you set up a kit or DIY in the garden, you can start weeks in advance to make the required foundations. Of course, you can also pour a point foundation on site in an excavated hole. But more practical are small foundations that you can use flexibly anywhere. How to calculate the required amount of cement yourself, we show you in the calculation instructions. In addition, you will find instructions for different point foundations, which you can already make in stock.
Material and preparation
You need this:
- Shovel, spade
- Stirrer, drill, mixing machine
- Trowel, spirit level
- lashings
- Ruler, pencil
- Cordless Screwdriver
- Sand, gravel, old buckets
- Shuttering panels, slats, boards
- Screws (stainless steel)
- Garbage bags, cling film
Cost of the point foundation
Point foundations are really inexpensive to create. All you need is some cement and sand. The shape in which you pour the foundation can normally be reused more frequently. If you pour the foundation directly into its place in the ground, you do not even need wood or screws. In addition, you need the support you poured into the foundation. Whether you are concreting an H-beam or just a straight iron girder, the costs for each element are of course always included.

- 25 kilos of cement bag from about 3.00 euros (cheaper with pallet purchase)
- Sand costs depending on the purchase quantity -
- Example 7 cubic meters from 150, 00 Euro
- Sand in the Bigbag - 1 cubic meter including Bigbag about 40, 00 Euro
Tip: For small quantities you should not burden yourself with a large supply of sand or gravel. If you want to pour only one or two small dot foundations, a ready mix is very good at which you only have to add water.
Calculation examples for point foundations
A common punk foundation has at most a page width of about 20 centimeters and a height of 60 centimeters. Even if you want to pour ten of these dot foundations, you will not even need a quarter of a cubic meter of concrete mix. A finished load of concrete from a nearby concrete plant will usually be worthwhile only if you have to build at least one ring foundation.

Even with a huge point foundation with a side length of 50 centimeters and a depth of 80 centimeters, only one cubic meter of mixture is required for five such foundations.
- Side length 20 x 20 cm - height 60 cm
- gives 0.024 cubic meter of cement mixture
- Side length 50 x 50 cm - height 80 cm
- gives 0.200 cubic meters of cement mixture
- Diameter 30 cm - height 40 cm
- gives 0.038 cubic meter of cement mixture
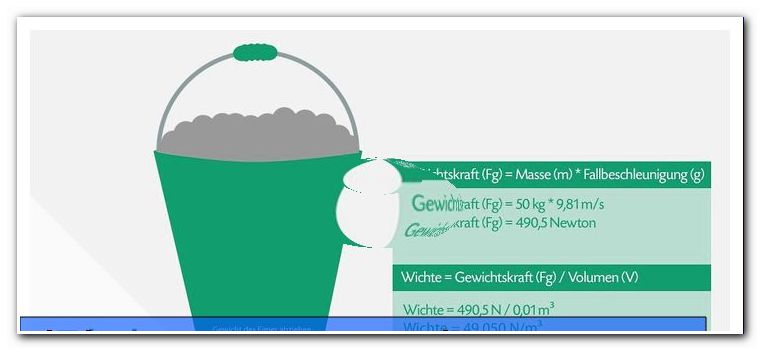
The width x depth x height is always calculated. So 0.2 x 0.2 x 0.6 for our first example. For a round bucket, calculate the diameter by 3.14. As you can see, however, even a large bucket does not contain a particularly generous amount. It is therefore usually worthwhile to mix the required point foundations yourself. 
Mixing ratio for cement
DIY enthusiasts often say that the mix of cement and sand is too good. This is not always an advantage, because the sand already has its job. Pure cement would not be as stable and unbreakable as the right mixture of both components. Therefore, home improvement, the usual "much helps a lot", unfortunately displace thoughts. The mixing ratio is sufficient if you use five parts of sand and one part of cement. If you want to pour the point foundation very safely, you can reduce the mixture by up to three parts sand and one part cement. Please also note our guide "mixing concrete yourself" .
- at least 1 part cement to 5 parts sand
- not more than 1 part cement to 3 parts sand

Tip: The more cement that is contained in a concrete mix, the more it will dry out after the blue color cast that the otherwise rather gray material will take on. Many builders, however, find the blue tone particularly attractive, but you should not overdo it.
Instructions Create a point foundation
Before starting any work, you must decide whether to pour the point foundations directly into the ground, or to make simple point foundations in buckets or timbered boxes. The advantage of the prepared foundations lies not only in the well-planned preliminary work, which can be carried out weeks before the actual start of construction. Another advantage is the better adjustment of the height of all point foundations with each other.
Tip: If you have holes in the ground, you can align a string precisely to cast the individual foundations at the same height. However, this is not always possible evenly. Holes in the ground or large air bubbles, which may occur when pouring in the cement mixture, in the worst case ensure that the concrete slips or shrinks more during drying. It is therefore usually safer to finish the foundations before finishing.
Prepare formwork
Cut the planks from wooden boards for your shape. If necessary, screw them with long stainless steel screws so that you can open the mold to remove the finished foundation. You can also use the shape over and over again. So if you start pouring the foundations in time, you can always use the same mold and just make one.
Tip: Always hit the shape or the bucket with a sturdy garbage bag. This keeps the mold clean and makes the dot foundation even easier to remove. Otherwise, wooden boards will soften too easily and give way after a few casting operations.

In addition, you can also pull an iron ring around the wooden formwork if you already have punches in your workshop. Stable nylon straps can also stabilize the wood shape. The pressure that wet concrete exerts is severely underestimated by many DIY enthusiasts. A slightly shabby or unstable bucket can break apart when pouring in the concrete.
Tip: In restaurants or nearby factories, ask if there are any buckets. The buckets for fryer fat or mayonnaise are particularly suitable for a point foundation because of their size and stability. If you can get more buckets this way, you do not need to remove the foundations. The buckets are then easily buried, which saves a lot of work and even the garbage bags.
Stir mixture
If you do not have a mixing machine, you can mix the foundations in a masonry bucket with the trowel. With the stir bar on the drill, it is rather difficult to touch a cement mixture. Whether by hand or in the blender, the consistency should be thick but not too wet. In addition, you must not mix the mixture. If cement is stirred too long in the mixing machine, the cement flooded with water and your foundation is not stable. 
There are no general recipes for the amount of water. This is partly due to the moisture stored in the sand, which is always different in size. You roughly have to count on half the amount of cement. If you use a bucket of cement, half a bucket of water is usually sufficient for this mixture. But you should not admit everything at once, because then you may need to remix and refill sand and cement, because the mixture is too liquid.
Embed iron
If you also want to reinforce the point foundation with embedded iron, you must be very careful that it does not protrude from the foundation at any point. The iron would rust later in the ground. The rusty bloated iron could blow up the concrete and break your foundation after a few years.

Tip: Be sure to trim the iron first. Consider the edges, cut the iron a little shorter, so it does not stick out. Adjust all parts within reach before pouring the mixture. In addition, you should always wear gloves in case of direct skin contact with the cement mixture.
Insert post carrier
Many do-it-yourselfers simply use flat iron, to which the stud is later attached. Whichever post carrier you use, the end that should look out of the concrete can be well protected with a plastic bag and some rubber bands. Also cling film from the kitchen is well suited, so that the post carrier is not contaminated by the cement. Especially if you have selected galvanized steel carriers or carriers, you should remember to protect the surface.

Immediately after pouring the cement mixture, the post carrier is just inserted into the mixture. Make a note in advance of the point at which the carrier must be placed in the wet concrete. So all foundations will be exactly the same later. Use the spirit level or a plumb to determine if the wearer is really straight.
Tip: Immediately clean all tools, the mason jug and the mixing machine with plenty of water. Once the cement has dried, it can not be removed and metal objects rust very quickly through the cement. To clean the mixer you can fill it about halfway with water and add some fist-sized stones. Then let the machine run for a short time and then pour it out. Through the stones in the wash also cement is dissolved, which is already slightly dried.
Tips for quick readers
- Determine number of required point foundations
- Calculate the size and extent of the foundations
- Prepare mold or bucket
- Screw the formwork tight
- If necessary, secure the form with straps
- Cast out the form with a sturdy bin liner
- Mix cement with sand, gravel and a little water
- mix thoroughly but do not stir too long
- Mix quickly into shape / pour pail
- possibly embed some iron bars
- Press in the post carrier to the desired height
- Align pole carrier with spirit level / solder
- Let point foundation dry
- Unscrew the form / carefully remove the foundation
- Pour foundation from bucket or use with