Wall tiles - Instructions for renewing joints

- Theory: Preparatory Information
- Instructions in 7 steps
- 1. Remove the old grout
- 2. Cleaning the wall tile joints
- 3. Mix the grout
- 4. Rebuild
- 5. Wash out
- 6. External expansion joint
- 7. Maintain the joints
While wall tiles retain their luster over many years, the tile joints between them often have minor or major damage. In these cases, it is time to actively lend a hand. Learn how to professionally grout your wall tiles with modern building materials. This guide takes you step by step to perfectly grouted wall tiles and gives you many useful tips along the way!
Joints are essential for a tiled wall. They connect the tiles non-positively. In this way, possibly acting forces, such as water, distributed over several tiles and balanced by the joints - even with minor differences in size between the individual tiles. However, in addition to the functional purpose, joints also have a visual-aesthetic sense, insofar as the sight of the wall is said to be more beautiful. To ensure both functionality and aesthetics, you must be extra careful and clean when repiling your wall tiles. Above all, the grout used is of crucial importance. Speaking of which ...
Theory: Preparatory Information
From the old to the new grout
Just a few decades ago, it was common practice to make grout yourself - from cement and sand. To give the mortar the desired color, color pigments were added. Today it is well-known that enormous demands are placed on the grout: Tiles are made of various building materials, such as ceramics, porcelain stoneware, concrete, cement, synthetic resin or real natural stone. Depending on the material from which the tiles are made, they have different suction properties - so absorb water in different amounts and expand accordingly. From this, various properties of the most suitable joint dimensions can be derived: For strongly absorbent tiles dynamic dimensions are to be preferred, but for hardly absorbent tiles static ones are preferred. And so, once again, the circle closes to the grout: Since in ancient times cement and sand were always used to produce it, many of the distinctions named in this section have yet to be made. Maybe your joints come from such an early hour and now need a renewal, because there was no harmonious with your tiles grout at that time. Fortunately, this is different now ...
Which grout for which wall tiles ">
The "old" mortar cement and sand tends to crumble over the years literally. In addition, water collects in the joints, causing germs and mold, which endanger the health. In this respect, it is an absolute must to replace the damaged grout and re-grout the tiles. In the retail trade, there are now numerous variants that are recommended for different tile coverings.
Tip: The right choice of grout depends primarily on the type and format of the tiles. However, the joint width, color, flexibility and hardening rate also play an important role.
Type of tiles: If the wall tiles of stoneware, stoneware or mosaic, there are usually no problems with the grouting. In contrast, porcelain stoneware is indeed a very robust coating; Unfortunately, the polished varieties can also be prone to discoloration. For this reason, you should use an abrasion-resistant and fast-hardening grout for such tiles. Thanks to its fast setting, discolorations caused by pigments rubbed into pores can be specifically avoided. When looking at the natural stone coverings it becomes clear that marble is particularly sensitive to scratching. If you would like to re-grout your marble tiles, you will resort to a special natural stone joint mortar that does not contain quartz powder. It spares the marble surface.

Tile format and joint width
Depending on the type of tile and the tile format, DIN 18157 gives guideline values for the joint widths. Large tiles and wide joints, small tiles and narrow joints - that was the rule of thumb. In the meantime, however, this "law" is often broken: For example, large-format natural stone slabs are often laid with narrow joints. For you it is especially important that you carefully consider whether you want wide or narrow joints and choose a suitable product before purchasing the grout. If you decide on joints that are 15 millimeters wide, you should not use any mortar that is thought to be five millimeters wide. Otherwise, cracks can quickly occur. On the mortar packs, the required information on the joint widths are noted, so you can easily find the right mass.
A note on the look: Narrow joints make tiles look more modern, while wide joints provide a rustic touch.
hue
White and gray are the standard colors of grout. But especially for such narrow joints, there is now a much wider range of colors, ranging from pastel couleurs over intense nuances to new fashion colors. A practical tip for you: While you should generally prefer dark shades in floor joints because they are less sensitive to dirt, you have a free choice in wall joints, although it is advisable to make sure that the color to both the tiles and fits the entire room. If you have dark tiles, it is best to combine them with a lighter shade of the same color family, so as not to make the room look even smaller. For light tiles, darker tones are also suitable for creating a sophisticated contrast. Common joint colors in the wall area are silver and light gray, anthracite, pergamon and white.
Flexibility of the joints
If the wall tiles have been laid on rigid substrates such as cement screed or concrete, you do not need a flexible joint mortar. On moving surfaces - such as particleboard, gypsum fibreboard or plasterboard - and those exposed to temperature fluctuations (including heated screeds, balconies and terraces), the use of flexible grout is highly recommended.
Remember: If the tiles are flexibly glued, it is also necessary to grout flexibly.
The following options are available for flexible grout:
- Joint mortars that have already been flexibilized with plastic powders in advance
- non-flexibilized grout, to which you add a liquid plastic dispersion instead of the otherwise obligatory mixing water
of hardening
The higher the hardening speed of the mortar, the more you stand under pressure during grouting, as you have to process it quickly. The advantage of a rapidly hardening mass is that it is virtually indestructible after just two to four hours.
Additional tips:
- Tiles defy a variety of chemicals - cementitious grout but not. If there is a risk that the tiled surface will be contaminated with acidic foods, fruit juices, hot fat or the like, you should use an epoxy grout.
- For your wall tiles in the bathroom there are special mortars, which are characterized by particularly water-repellent properties. Look out for just that!
Instructions in 7 steps
List of materials:
- grouts
- joint silicone
- water
- optional: primer for grout
Tools:
- Milling cutter with milling attachment for joints
- scraper
- Cutter or Stanley knife
- Electric drill with whisk
- mortar bucket
- joint filler
- spatula
- trowel
- Epoxifugbrett with hard rubber
- rubber gloves
- sponge board
- vacuum cleaner
- cover

1. Remove the old grout
To remove the old joint compound, you can choose between two variants, which differ in terms of the tool used.
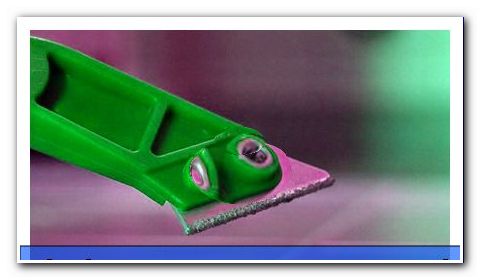
a) Clean joints with a milling cutter:
When removing the old grout you must be very attentive and work accurately - with a steady hand and great patience - so as not to damage the tiles. Use a router with a special milling attachment for joints. With this tool, you can cut the grout very quickly out of joint.
Tip: Cover your furniture with foil before milling!
b) Scrape out the joints with a joint scraper:
If the re-jointing of wall or floor tiles for you rather the exception, it is probably not worth the purchase of a milling machine. Act instead with a joint scraper - this will ultimately have the same effect, although it will require more time and muscle power on your part. The residual mortar residues remaining on the tiles can be removed with a cutter knife or a spatula after the scraping.
2. Cleaning the wall tile joints
Before applying the new grout, it is necessary to clean the joints so that they are absolutely clean. After cleaning, no more mortar remains should be present in the joints. To ensure this, it is best to use a powerful vacuum cleaner.
Caution: Make sure that the surface has dried evenly. Otherwise, under certain circumstances, staining may occur in the joint material.
If necessary - that is, in the case of bumps - you can still apply a primer on the tile edges or scratch the latter lightly and gently. Both procedures serve to create a well-adherent substrate for the grout.
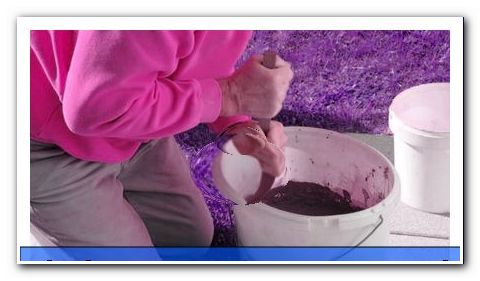
3. Mix the grout
Now is the time to touch the grout suitable for your purposes in a clean mixing vat. Note the ratio given on the mortar pack to add the correct amount of clear water. You should also work carefully. In this way, you ensure a homogeneous mixture without lumps and thus at the end of your Neuverfugung to get a visually appealing overall picture. For mixing, it is best to use a drill with a whisk. Depending on which grout you use, you have more or less time for the subsequent processing of the mass.
4. Rebuild
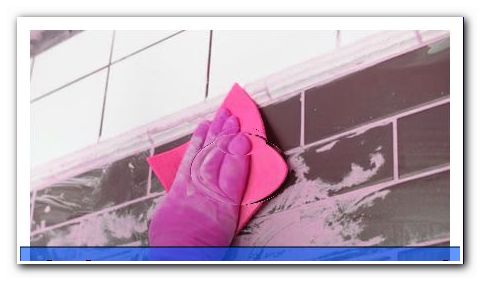
Re-grout the tiles with the just applied mixture! Bring the mortar into the joints with a trowel and apply an epoxy board diagonally to the joint.
Important: Before you take the Epoxifugbrett in hand, you should check that the joints are actually completely filled with grout.
Before you start washing it, it is best to cover it a second time. Here it is necessary to take the right time, which is between a few seconds and a few minutes. Attention: If you wait too long, the joints are already overfilled and you have difficulty washing dishes; If, on the other hand, you go over the surface too early a second time, the gap may not be full. Here is your instincts needed.
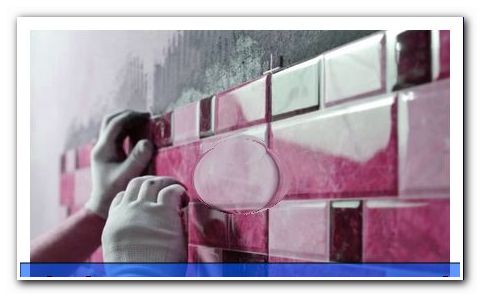
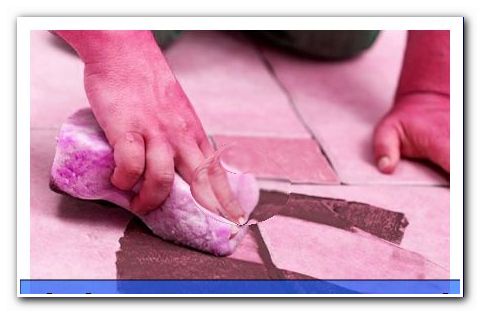
5. Wash out
Depending on which mortar now graces your wall, the grout after a shorter or a little longer time on the optimal consistency, so you can wash off carefree. Exact information can be found on the packaging of your grout used - keyword: hardening rate. Make sure you wash the joints evenly and not too deep. And: Work with a sponge board and again diagonally, as when grouting with the Epoxifugbrett. First, prewashed. Here, the direction - whether from top to bottom or left to right or vice versa - does not matter. Only the subsequent washing off should only happen in one direction, until everything is clean. A few minutes later, wash again for safety - and the next day rub the remaining cement curtain with a dry cloth. Take care not to cause discoloration!

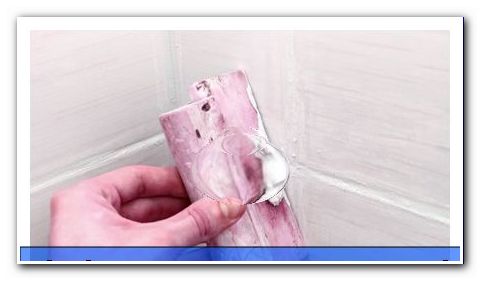
6. External expansion joint
Let your previous work rest for one night and take care of the renewal of the outer expansion joint the next day. First, cut out the old silicone on the expansion joint, which runs around the tile surface, with a cutter or Stanley knife. Then clean the joint before refilling it with a syringe containing silicone compound. After grouting your forefinger is in the center: Moisten it in a small bowl of water to be able to press the silicone more smoothly into the expansion joint and to obtain a perfectly shaped expression of the same.
7. Maintain the joints
In a homogeneous joint structure, it is not uncommon for mold spores or other deposits to become anchored now and then and cause an unsightly appearance. For the regular care of your new joints and to prevent unwanted soiling, it is best to use mild alkaline products. Acid-containing agents, on the other hand, should be left out completely - they could cause corrosion or even destruction of the grout. Of course, this should be avoided.
Tip: As a good and cheap home remedy for already existing dirt, water-diluted baking powder has proven itself. Apply this on the joints and let it work for a short time before removing it with a damp cloth. So fast, discolored joints are clean and beautiful again.
10 tips at a glance
- remove old joint compound with a milling cutter or a joint scraper
- Thoroughly clean wall tile joints with a vacuum cleaner
- Mix grout in clean mixing vat together with clear water
- Mortar with a trowel bring in the joints
- with an Epoxifugbrett diagonally to the fugue strip
- Wash excess grout with a sponge board
- Cut out old silicone from the outer expansion joint with a cutter knife
- Clean the expansion joint
- Apply new silicone grout with a syringe
- Maintain joints regularly with mild alkaline remedies