Renew tile joints - this is how joints can be freshened up


- Part 1: Replace silicone joints in the bath
- Part 2: Refresh cement joints
It can not be prevented. Tile joints become unsightly over time, get an unattractive gray haze or cracks through which moisture can penetrate. So that the tiled wall looks nice again, the joints are simply refreshed. Such a refresher course you can put into practice even without manual experience. A day at the weekend is enough for the few moves. Even though the tiles are always cleaned regularly, they joints are unaesthetic. Especially in the corners of the dirt can hardly be removed permanently. In wet rooms such as the bathroom, it can also lead to mold in unfavorable case. This shows up in dark to black spots that take the tiled wall's appeal. Outside, the tile joints become cracked, porous and exposed to intense sunshine, moisture, dirt and dust all year round. Depending on the condition you have to renew or refresh the interstices of the tiles.
Part 1: Replace silicone joints in the bath
The repair of silicone joints in the bathroom is done quite quickly. It is important, as with all work, that you have all the necessary materials at hand. In the case of silicone joints, this includes:
- a good cutter
- an old cloth
- a bowl of water or a nebulizer and
- a caulking gun with the new silicone in the
- corresponding color of the tiles
- possibly a chemical silicone remover if necessary
a smoothing agent for silicones
Tip: When working with silicone you should always wear work clothes or old trousers. Silicone can no longer be removed from textiles.
Removing the silicone
In the first step, the remains of the silicone must be removed. This is the cutter and careful work necessary. With the cutter you drive from both sides of the joint along and cut off the silicone clean. You have to go with a flat blade under the joint to solve the silicone can. In relief of this work, you can alternatively work with a shark or special joint knife. The shark shark is a great relief if the silicone really stubbornly sits between the tiles.

Important: Avoid damage to the seals under the silicone or the adjacent surface.
The second step: edit the joint
Now that you have removed the silicone joint, all residues must be removed. With vigorous rubbing of a coarse and damp cloth, the surfaces are cleaned. If necessary, you should take soap. If there are any residues that adhere very persistently to the surface of the tile joints, you can use a chemical silicone remover. These residues may under no circumstances be pasted over. Finally, the entire joint is cleaned well again, so that there are no residues on the surfaces. So, the most important steps to refresh your joints are now done. Now we come to the refreshing of the tile joints in the bathroom or the kitchen.
Renew the joints
Now it goes to the nozzle of the cartridge. Before you open the sealed cartridge with the cutter, you must cut open the enclosed nozzle. For this section, you should choose the maximum width of the joint. With a too large opening, clean working is hardly possible. Then the nozzle and cartridge are simply screwed together and placed in the cartridge holder. With light pressure you now pull the silicone along and press it into the joint.
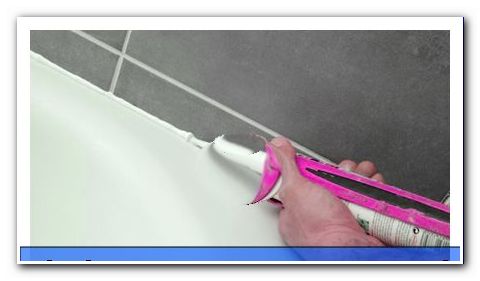
In the next step, the new silicone joint must be pulled into shape. With a little skill, you can accomplish this with your finger. Moisten your finger in clear water and smooth the silicone in a line with a little pressure. It is important that the silicone adheres to the surface everywhere and that no air bubbles form. Leftovers on the finger are simply wiped off the cloth. Alternatively, the atomizer or smoother for silicone is used here. It pays off to try both options, then you will quickly find out which method you prefer more.


Tip: When filling the joints do not exceed the length of three meters. That leaves you enough time to smooth out.
Note: A joint filler is also useful for molding.
Part 2: Refresh cement joints
Floor and wall tiles in interiors or on the terrace turn gray over the years. Even the best care can not prevent this debris between the tiles. In particular, frequently frequented areas such as the entrance to the house or the kitchen are affected. Worse is it on the terrace or the balcony. Here, the cement can break down due to weather conditions. Thus, moisture can penetrate under the tiles and ruin the entire surface. But unlike silicone, you can not just remove and renew grout. Here are other tools used, then you can also refresh cemented joints and provide a new, handsome look.
Refurbishing tile joints with cement is child's play. The trade offers here various products that serve to freshen or renew the joints. Particularly positive: The individual products are offered in different colors and can be adapted to the tiles.

Repair cracks and chips
The cleaning is the basis for the future appearance of the tiles. If mold is in the joints, it must be thoroughly cleaned with the appropriate cleaning agents. The spores must be removed in detail. Otherwise, these spots come through quickly even after refreshing.
When repairing cement tile joints you must work carefully. This is the only way to prevent moisture from getting under the tiles. Also important is a clean surface that is free of fatty or oily substances. This can be the case in the kitchen, for example. So the first step is: Thoroughly clean the tiles with alcohol or benzene. Then they have to dry well.


Tip: Use a hair dryer to dry all interstices well before you go to the next step. This will save you the long wait until it dries up.
Note: Mold must be removed from the joints with commercially available cleaning agents.
Provide materials
To renew the tile joints you have the choice between tile adhesive, a putty or epoxy resin.
When using tile adhesive or filler you do not need more than:
- the selected product itself
- some water
- a spatula
- fine sandpaper
- if necessary, a repair pen or varnish

Working with epoxy resin
For now, all loose parts are removed. Again, the surface is thoroughly cleaned with alcohol or benzine and dried. All areas to be repaired are rubbed with sandpaper. So the surface is roughened and prepared for good adhesion. Then apply with a spatula, the first layer of epoxy resin, let it dry well and grind it off again. Only then is the second layer applied. After the second drying time the surface is rubbed smooth again with the emery paper.

Tip: At a small point, try to make sure that the repairing compound you use also sticks to the tiles.
The cosmetic beautification
Some manufacturers also offer a pure joint color. These can be used if it is only a cosmetic correction. Joint color is available in the tube and is easily applied to dry areas with a sponge attachment. Depending on the product description, the paint needs about 30 minutes to dry. Then simply wipe off the excess paint on the tiles. Joint color can be applied to tiles on the floor or wall. With these DIY tips it will be very easy to renew your tile joints.
Tips for quick readers:
- When refreshing silicone joints, all residues must be completely removed
- Chemical silicone removers are helpful for stubborn silicone
- do not cut the nozzle of the cartridge too wide, at most the width of the joint
- Cracks or loose parts of cemented tile joints must be thoroughly cleaned before the grout is spread
- When working with epoxy resin, allow the first coat to dry before applying the second
- in the case of greyscale, a refreshment with grout is sufficient