Sew on shoulder bag / shoulder bag - instructions with pattern

- material
- preparation
- Sew on shoulder bag
Just in time for the beginning of the summer, I would like to show you today how you can easily make a chic shoulder bag for turning yourself. Whether for shopping, visiting the beach or at work: The bag is versatile and by the decorative zipper a real eye-catcher. The interior offers plenty of space for a laptop, wallet, mobile phone, etc. In addition, you can easily turn the shoulder bag depending on the outfit.
If you have old jeans or clothes at home that you no longer use: The shoulder bag is also ideal as an upcycled project! And who sews the shoulder bag for his children, the sizes can easily scale down.
material
You need this:
- 2x different cotton, jeans or Canvas fabrics
- SnapPap strip, webbing or cotton fabric for the wearer
- 1x zipper for the outside pocket
- ruler
- pen
- scissors
- sewing machine

Difficulty level 2/5
For beginners and slightly advanced
Cost of materials 1/5
about 10-15 euros
Time expenditure 2/5
about 1.5 hours
The carriers
Today I will make the straps of our shoulder bag from SnapPap stripes. The strips have a width of 2 cm and can be cut to any length. The advantage of SnapPap is that it is tear-resistant and easy to sew. Besides, you can easily wash it in the machine.

If no SnapPap is available, I'll show you below how you can easily sew the straps out of cotton fabric. (See step 10)
preparation
Step 1: First we cut the outer and inner parts of the bag. In our case I use a black and white dotted fabric for the outside (fabric A) and a red fabric for the inside and a part of the outside pocket (fabric B).
We need the following pieces for the shoulder bag:
- 2 x fabric B in size 30 x 45 cm
- 1x fabric A in the size 30 x 45 cm
- 1x fabric A in size 30 x 16 cm
- 1x fabric B in size 30 x 31 cm
The latter two, smaller pieces of fabric form the front with a decorative zipper, which divides the pieces optically beautiful and gives the bag a playful look.
Tip: For smaller pockets, simply scale the sides down in the same ratio (length 3: 2 width).

Step 2: For the wearer, we shorten the two SnapPap strips to a length of approx. 55 cm each.
Tip: If you prefer cotton fabric straps, cut fabric A and fabric B two times in a size of 55 cm x 5 cm. (See step 10 below)
Step 3: Finally, shorten the color-matching, non-divisible zipper to a length of approx. 35 cm and start sewing.
Sew on shoulder bag
Step 1: Next we start with the two pieces of fabric that will later be on the inside of the shoulder bag. To do this, place the two pieces of fabric B together left to left and sew together the three sides, which must be closed later.
Step 2: For the outer part, we first put the two smaller pieces of fabric (fabric A + fabric B) together and place the zipper between them.
Then we put the zipper right to right on the edge of the lower fabric. With the presser foot for zippers, we now quilt the whole thing off.

Tip: If the zipper gets in the way while sewing, use the handwheel to move the sewing machine needle into the fabric, lift the presser foot, and pull the zipper backwards for easy sewing.
Step 3: We will do the same with the second part of the front (fabric B) and the other side of the zipper. Already we have a great optical division of the two fabrics.
Step 4: Next you put together the fabric side just stitched, including the zipper and the second side (fabric A) right to right, and in turn stitch the three sides with the straight stitch - just as before for the inner part of the bag.

Tip: Sew on the two long sides over the ends of the zipper. Here it is recommended to sew very slowly, so that the closure does not slip and a hole is created on the side. With your hands you can push the halves of the zipper slowly under the foot of the sewing machine.
Step 5: The two bag parts are now almost finished. To flatten the two lower corners of the shoulder bag, we put the two closed seams of the lower, closed corners on each other, so that a Zipfel arises. From this corner we measure 5 cm inwards and mark the line with our pencil.

Now that we have stitched the line with the sewing machine, we cut off the excess fabric, so that no bead is formed at the bottom of the bag.

Outside and inside pocket are now finished!

Step 6: Now it's time to attach the straps to the shoulder bag. From the outer edges, we again measure about 5 cm inwards and make a small mark with our pen. There we pin the ends of the carriers with pins or clips.
ATTENTION: The carriers point down! Also make sure that the carriers are not twisted on the bag.
With a few stitches, the straps can now be sewn about 1 cm below the edge.

Step 7: To make the shoulder bag into a reversible pocket, in the next step, insert the two parts right to the right into each other.

Tip: The outer seams should be as close together as possible.
Step 8: Next we can stitch the bag all around. We leave an approximately 10 cm large opening, through which we can turn the shoulder bag back to the right and so the wearer come to the fore.

Step 9: In order to close the turning opening and the upper edge has a beautiful finish, we stitch 5 mm along the opening again with the straight stitch.
Tip: Make sure that the yarn used matches the color of the bag or the carrier. Depending on the sewing machine, beautiful decorative stitches are also suitable at this point.

cotton backing
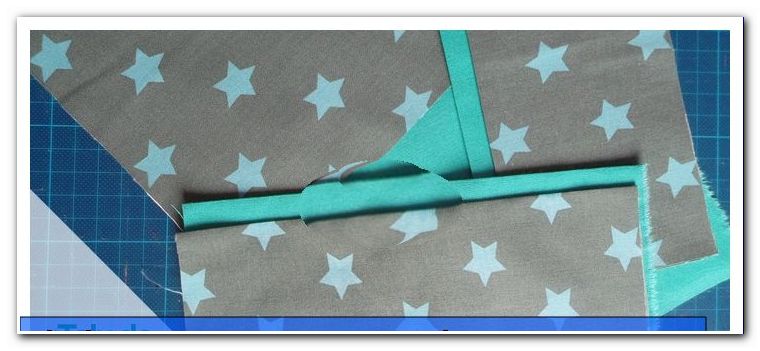
Step 10: For the cotton straps mentioned earlier, place Fabric A and Fabric B together two times, right sides together, and pin down the whole. Then stitch both straps together with short edges along the long sides and turn them to the right side.
The rest of the procedure corresponds to the steps in the upper part. Already our bag is ready and ready for use.

Of course, if you feel like it, you can do more divisions - with or without a zipper - or stitch the open sides of the bag with a button in the middle.
Have fun sewing!